Canon PowerShot G1 X Mark III PowerShot G1X MarkIII Camera User Guide - Page 46
Shooting
 |
View all Canon PowerShot G1 X Mark III manuals
Add to My Manuals
Save this manual to your list of manuals |
Page 46 highlights
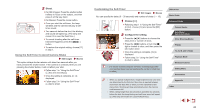
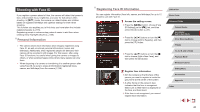
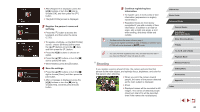
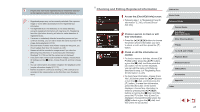
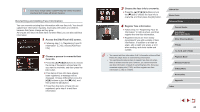
zzAfter [Register?] is displayed, press the [ ][ ] buttons or turn the [ ] dial to choose [OK], and then press the [ ] button. zzThe [Edit Profile] screen is displayed. 3 Register the person's name and birthday. zzPress the [ ] button to access the keyboard, and then enter the name (= 32). zzTo register a birthday, on the [Edit Profile] screen, choose [Birthday] (either press the [ ][ ] buttons or turn the [ ] dial), and then press the [ ] button. zzPress the [ ][ ] buttons to choose an option. zzPress the [ ][ ] buttons or turn the [ ] dial to specify the date. zzWhen finished, press the [ ] button. 4 Save the settings. zzPress the [ ][ ] buttons or turn the [ ] dial to choose [Save], and then press the [ ] button. zzAfter a message is displayed, press the [ ][ ] buttons or turn the [ ] dial to choose [Yes], and then press the [ ] button. 5 Continue registering face information. zzTo register up to 4 more points of face information (expressions or angles), repeat step 2. zzRegistered faces are more easily recognized if you add a variety of face information. In addition to a head-on angle, add a slight side angle, a shot when smiling, and shots inside and outside. ●● The flash will not fire when following step 2. ●● If you do not register a birthday in step 3, Babies or Children icons (=39) will not be displayed in [ ] mode. ●● You can overwrite registered face info, and add face info later if you have not filled all 5 face info slots (=45). Shooting If you register a person ahead of time, the camera will prioritize that person as the main subject, and optimize focus, brightness, and color for that person when shooting. zzWhen you point the camera toward people, the name of the person detected as the main subject is displayed. zzShoot. zzDisplayed names will be recorded in still images. The names of detected people (maximum total of 5) will be recorded, even if the names are not displayed. Before Use Basic Guide Advanced Guide Camera Basics Auto Mode / Hybrid Auto Mode Other Shooting Modes P Mode Tv, Av, M, and C Mode Playback Mode Wireless Features Setting Menu Accessories Appendix Index 46
-
 1
1 -
2
-
3
-
4
-
5
-
6
-
7
-
8
-
9
-
10
-
11
-
12
-
13
-
14
-
15
-
16
-
17
-
18
-
19
-
20
-
21
-
22
-
23
-
24
-
25
-
26
-
27
-
28
-
29
-
30
-
31
-
32
-
33
-
34
-
35
-
36
-
37
-
38
-
39
-
40
-
 41
41 -
 42
42 -
 43
43 -
 44
44 -
 45
45 -
 46
46 -
 47
47 -
 48
48 -
 49
49 -
 50
50 -
 51
51 -
52
-
53
-
54
-
55
-
56
-
57
-
58
-
59
-
60
-
61
-
62
-
63
-
64
-
65
-
66
-
67
-
68
-
69
-
70
-
71
-
72
-
73
-
74
-
75
-
76
-
77
-
78
-
79
-
80
-
81
-
82
-
83
-
84
-
85
-
86
-
87
-
88
-
89
-
90
-
91
-
92
-
93
-
94
-
95
-
96
-
97
-
98
-
99
-
100
-
101
-
102
-
103
-
104
-
105
-
106
-
107
-
108
-
109
-
110
-
111
-
112
-
113
-
114
-
115
-
116
-
117
-
118
-
119
-
120
-
121
-
122
-
123
-
124
-
125
-
126
-
127
-
128
-
129
-
130
-
131
-
132
-
133
-
134
-
135
-
136
-
137
-
138
-
139
-
140
-
141
-
142
-
143
-
144
-
145
-
146
-
147
-
148
-
149
-
150
-
151
-
152
-
153
-
154
-
155
-
156
-
157
-
158
-
159
-
160
-
161
-
162
-
163
-
164
-
165
-
166
-
167
-
168
-
169
-
170
-
171
-
172
-
173
-
174
-
175
-
176
-
177
-
178
-
179
-
180
-
181
-
182
-
183
-
184
-
185
-
186
-
187
-
188
-
189
-
190
-
191
-
192
-
193
-
194
-
195
-
196
-
197
-
198
-
199
-
200
-
201
-
202
-
203
-
204
-
205
-
206
-
207
-
208
-
209
-
210
-
211
-
212
-
213
-
214
-
215
-
216
-
217
-
218
-
219
-
220
-
221
-
222
-
223
-
224
-
225
-
226
-
227
-
228
-
229
-
230
-
231
 |
 |