Canon PowerShot G1 X Mark III PowerShot G1X MarkIII Camera User Guide - Page 162
Sending Images Automatically Image
 |
View all Canon PowerShot G1 X Mark III manuals
Add to My Manuals
Save this manual to your list of manuals |
Page 162 highlights
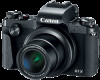
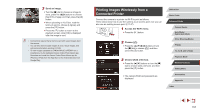
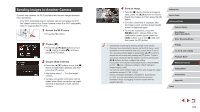
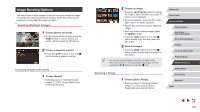
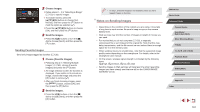
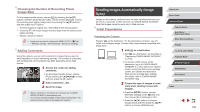
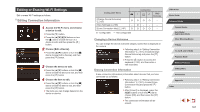
Choosing the Number of Recording Pixels (Image Size) On the image transfer screen, choose [ ] by pressing the [ ][ ] buttons, and then press the [ ] button. On the screen displayed, choose the recording pixel setting (image size) by pressing the [ ][ ] buttons, and then press the [ ] button. ●● To send images at original size, select [No] as the resizing option. ●● Choosing [ ] will resize images that are larger than the selected size before sending. ●● Movies cannot be resized. ●● Image size can also be configured in MENU (=31) > [ 4] tab > [Wireless settings] > [Wi-Fi Settings] > [Resize for Sending]. Adding Comments Using the camera, you can add comments to images that you send to email recipients or social networking services. The number of characters and symbols that can be entered may differ depending on the Web service. 1 Access the screen for adding comments. zzOn the image transfer screen, choose [ ] by pressing the buttons, and then press the [ ] button. 2 Add a comment (=32). 3 Send the image. ●● When a comment is not entered, the comment set in CANON iMAGE GATEWAY is automatically sent. ●● You can also annotate multiple images before sending them. The same comment is added to all images sent together. Sending Images Automatically (Image Sync) Images on the memory card that have not been transferred already can be sent to a computer or Web services via CANON iMAGE GATEWAY. Note that images cannot be sent only to Web services. Initial Preparations Preparing the Camera Register [ ] as the destination. On the destination computer, you will install and configure Image Transfer Utility, free software compatible with Image Sync. 1 Add [ ] as a destination. zzAdd [ ] as a destination, as described in "Registering CANON iMAGE GATEWAY" (= 154). zzTo include a Web service as the destination, log in to CANON iMAGE GATEWAY (=154), select your camera model, access the Web service settings screen, and choose the destination Web service in Image Sync settings. For details, refer to CANON iMAGE GATEWAY Help. 2 Choose the type of images to send (only when sending movies with images). zzPress the [ ] button, choose [Wireless settings] on the [ 4] tab, and then choose [Wi-Fi Settings] (=31). zzPress the [ ][ ] buttons to choose [Image Sync], and then press the [ ][ ] buttons to choose [Stills/Movies]. Before Use Basic Guide Advanced Guide Camera Basics Auto Mode / Hybrid Auto Mode Other Shooting Modes P Mode Tv, Av, M, and C Mode Playback Mode Wireless Features Setting Menu Accessories Appendix Index 162
-
 1
1 -
2
-
3
-
4
-
5
-
6
-
7
-
8
-
9
-
10
-
11
-
12
-
13
-
14
-
15
-
16
-
17
-
18
-
19
-
20
-
21
-
22
-
23
-
24
-
25
-
26
-
27
-
28
-
29
-
30
-
31
-
32
-
33
-
34
-
35
-
36
-
37
-
38
-
39
-
40
-
41
-
42
-
43
-
44
-
45
-
46
-
47
-
48
-
49
-
50
-
51
-
52
-
53
-
54
-
55
-
56
-
57
-
58
-
59
-
60
-
61
-
62
-
63
-
64
-
65
-
66
-
67
-
68
-
69
-
70
-
71
-
72
-
73
-
74
-
75
-
76
-
77
-
78
-
79
-
80
-
81
-
82
-
83
-
84
-
85
-
86
-
87
-
88
-
89
-
90
-
91
-
92
-
93
-
94
-
95
-
96
-
97
-
98
-
99
-
100
-
101
-
102
-
103
-
104
-
105
-
106
-
107
-
108
-
109
-
110
-
111
-
112
-
113
-
114
-
115
-
116
-
117
-
118
-
119
-
120
-
121
-
122
-
123
-
124
-
125
-
126
-
127
-
128
-
129
-
130
-
131
-
132
-
133
-
134
-
135
-
136
-
137
-
138
-
139
-
140
-
141
-
142
-
143
-
144
-
145
-
146
-
147
-
148
-
149
-
150
-
151
-
152
-
153
-
154
-
155
-
156
-
 157
157 -
 158
158 -
 159
159 -
 160
160 -
 161
161 -
 162
162 -
 163
163 -
 164
164 -
 165
165 -
 166
166 -
 167
167 -
168
-
169
-
170
-
171
-
172
-
173
-
174
-
175
-
176
-
177
-
178
-
179
-
180
-
181
-
182
-
183
-
184
-
185
-
186
-
187
-
188
-
189
-
190
-
191
-
192
-
193
-
194
-
195
-
196
-
197
-
198
-
199
-
200
-
201
-
202
-
203
-
204
-
205
-
206
-
207
-
208
-
209
-
210
-
211
-
212
-
213
-
214
-
215
-
216
-
217
-
218
-
219
-
220
-
221
-
222
-
223
-
224
-
225
-
226
-
227
-
228
-
229
-
230
-
231
 |
 |