Canon PowerShot G1 X Mark III PowerShot G1X MarkIII Camera User Guide - Page 183
Using Optional Accessories
 |
View all Canon PowerShot G1 X Mark III manuals
Add to My Manuals
Save this manual to your list of manuals |
Page 183 highlights
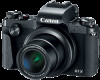
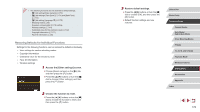
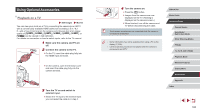
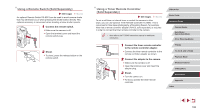
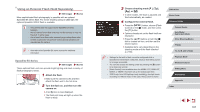
Using Optional Accessories Playback on a TV Still Images Movies You can view your shots on a TV by connecting the camera to an HDTV with a commercially available HDMI cable (not exceeding 2.5 m / 8.2 ft., with a Type D terminal on the camera end). Movies shot at an image quality of [ ], [ ], [ ], [ ], [ ], [ ], or [ ] can be viewed in high definition. For details on connection or how to switch inputs, refer to the TV manual. 1 Make sure the camera and TV are off. 2 Connect the camera to the TV. zzOn the TV, insert the cable plug fully into the HDMI input as shown. zzOn the camera, open the terminal cover and insert the cable plug fully into the camera terminal. 3 Turn the TV on and switch to external input. zzSwitch the TV input to the external input you connected the cable to in step 2. 4 Turn the camera on. zzPress the [ ] button. zzImages from the camera are now displayed on the TV. (Nothing is displayed on the camera screen.) zzWhen finished, turn off the camera and TV before disconnecting the cable. ●● Touch-screen operations are not supported while the camera is connected to a television. ●● Some information may not be available when using a TV as the display (=205). ●● Camera operating sounds are not played while the camera is connected to an HDTV. Before Use Basic Guide Advanced Guide Camera Basics Auto Mode / Hybrid Auto Mode Other Shooting Modes P Mode Tv, Av, M, and C Mode Playback Mode Wireless Features Setting Menu Accessories Appendix Index 183
-
 1
1 -
2
-
3
-
4
-
5
-
6
-
7
-
8
-
9
-
10
-
11
-
12
-
13
-
14
-
15
-
16
-
17
-
18
-
19
-
20
-
21
-
22
-
23
-
24
-
25
-
26
-
27
-
28
-
29
-
30
-
31
-
32
-
33
-
34
-
35
-
36
-
37
-
38
-
39
-
40
-
41
-
42
-
43
-
44
-
45
-
46
-
47
-
48
-
49
-
50
-
51
-
52
-
53
-
54
-
55
-
56
-
57
-
58
-
59
-
60
-
61
-
62
-
63
-
64
-
65
-
66
-
67
-
68
-
69
-
70
-
71
-
72
-
73
-
74
-
75
-
76
-
77
-
78
-
79
-
80
-
81
-
82
-
83
-
84
-
85
-
86
-
87
-
88
-
89
-
90
-
91
-
92
-
93
-
94
-
95
-
96
-
97
-
98
-
99
-
100
-
101
-
102
-
103
-
104
-
105
-
106
-
107
-
108
-
109
-
110
-
111
-
112
-
113
-
114
-
115
-
116
-
117
-
118
-
119
-
120
-
121
-
122
-
123
-
124
-
125
-
126
-
127
-
128
-
129
-
130
-
131
-
132
-
133
-
134
-
135
-
136
-
137
-
138
-
139
-
140
-
141
-
142
-
143
-
144
-
145
-
146
-
147
-
148
-
149
-
150
-
151
-
152
-
153
-
154
-
155
-
156
-
157
-
158
-
159
-
160
-
161
-
162
-
163
-
164
-
165
-
166
-
167
-
168
-
169
-
170
-
171
-
172
-
173
-
174
-
175
-
176
-
177
-
 178
178 -
 179
179 -
 180
180 -
 181
181 -
 182
182 -
 183
183 -
 184
184 -
 185
185 -
 186
186 -
 187
187 -
 188
188 -
189
-
190
-
191
-
192
-
193
-
194
-
195
-
196
-
197
-
198
-
199
-
200
-
201
-
202
-
203
-
204
-
205
-
206
-
207
-
208
-
209
-
210
-
211
-
212
-
213
-
214
-
215
-
216
-
217
-
218
-
219
-
220
-
221
-
222
-
223
-
224
-
225
-
226
-
227
-
228
-
229
-
230
-
231
 |
 |