Canon PowerShot G1 X Mark III PowerShot G1X MarkIII Camera User Guide - Page 160
Image Sending Options
 |
View all Canon PowerShot G1 X Mark III manuals
Add to My Manuals
Save this manual to your list of manuals |
Page 160 highlights
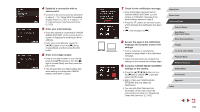
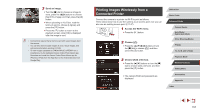
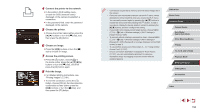
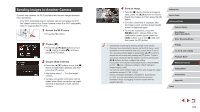
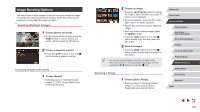
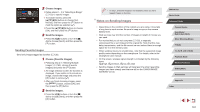
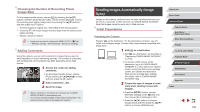
Image Sending Options You can choose multiple images to send at once and change the image recording pixel setting (size) before sending. Some Web services also enable you to annotate the images you send. Sending Multiple Images 1 Choose [Select and send]. zzOn the image transfer screen, press the [ ][ ] buttons to choose [Select and send], and then press the [ ] button. 2 Choose a selection method. zzPress the [ ][ ] buttons or turn the [ ] dial to choose a selection method. Choosing Images Individually 1 Choose [Select]. zzFollowing step 2 in "Sending Multiple Images" (=160), choose [Select] and press the [ ] button. 2 Choose an image. zzPress the buttons to choose an image to send, and then press the [ ] button. [ ] is displayed. zzTo cancel selection, press the [ ] button again. [ ] is no longer displayed. zzRepeat this process to choose additional images. zzAfter you finish choosing images, press the [ ] button. zzPress the [ ][ ] buttons or turn the [ ] dial to choose [OK], and then press the [ ] button. 3 Send the images. zzPress the [ ][ ] buttons or turn the [ ] dial to choose [Send], and then press the [ ] button. ●● You can also choose images in step 2 by moving the zoom lever twice toward [ ] to access single-image display and then pressing the [ ][ ] buttons or turning the [ ] dial. Selecting a Range 1 Choose [Select Range]. zzFollowing step 2 in "Sending Multiple Images" (=160), choose [Select Range] and press the [ ] button. Before Use Basic Guide Advanced Guide Camera Basics Auto Mode / Hybrid Auto Mode Other Shooting Modes P Mode Tv, Av, M, and C Mode Playback Mode Wireless Features Setting Menu Accessories Appendix Index 160
-
 1
1 -
2
-
3
-
4
-
5
-
6
-
7
-
8
-
9
-
10
-
11
-
12
-
13
-
14
-
15
-
16
-
17
-
18
-
19
-
20
-
21
-
22
-
23
-
24
-
25
-
26
-
27
-
28
-
29
-
30
-
31
-
32
-
33
-
34
-
35
-
36
-
37
-
38
-
39
-
40
-
41
-
42
-
43
-
44
-
45
-
46
-
47
-
48
-
49
-
50
-
51
-
52
-
53
-
54
-
55
-
56
-
57
-
58
-
59
-
60
-
61
-
62
-
63
-
64
-
65
-
66
-
67
-
68
-
69
-
70
-
71
-
72
-
73
-
74
-
75
-
76
-
77
-
78
-
79
-
80
-
81
-
82
-
83
-
84
-
85
-
86
-
87
-
88
-
89
-
90
-
91
-
92
-
93
-
94
-
95
-
96
-
97
-
98
-
99
-
100
-
101
-
102
-
103
-
104
-
105
-
106
-
107
-
108
-
109
-
110
-
111
-
112
-
113
-
114
-
115
-
116
-
117
-
118
-
119
-
120
-
121
-
122
-
123
-
124
-
125
-
126
-
127
-
128
-
129
-
130
-
131
-
132
-
133
-
134
-
135
-
136
-
137
-
138
-
139
-
140
-
141
-
142
-
143
-
144
-
145
-
146
-
147
-
148
-
149
-
150
-
151
-
152
-
153
-
154
-
 155
155 -
 156
156 -
 157
157 -
 158
158 -
 159
159 -
 160
160 -
 161
161 -
 162
162 -
 163
163 -
 164
164 -
 165
165 -
166
-
167
-
168
-
169
-
170
-
171
-
172
-
173
-
174
-
175
-
176
-
177
-
178
-
179
-
180
-
181
-
182
-
183
-
184
-
185
-
186
-
187
-
188
-
189
-
190
-
191
-
192
-
193
-
194
-
195
-
196
-
197
-
198
-
199
-
200
-
201
-
202
-
203
-
204
-
205
-
206
-
207
-
208
-
209
-
210
-
211
-
212
-
213
-
214
-
215
-
216
-
217
-
218
-
219
-
220
-
221
-
222
-
223
-
224
-
225
-
226
-
227
-
228
-
229
-
230
-
231
 |
 |
