Canon PowerShot G1 X Mark III PowerShot G1X MarkIII Camera User Guide - Page 28
Viewfinder
 |
View all Canon PowerShot G1 X Mark III manuals
Add to My Manuals
Save this manual to your list of manuals |
Page 28 highlights
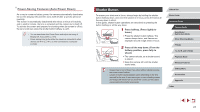
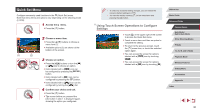
Viewfinder Still Images Movies Shooting is easier with a viewfinder, which helps you concentrate on keeping subjects in focus. 1 Switch between using the screen and viewfinder as needed. zzMoving the viewfinder near your eye will activate its display and deactivate the camera screen. zzMoving the viewfinder away from your eye will deactivate its display and activate the camera screen. 2 Adjust the diopter. zzTurn the dial to bring viewfinder images into sharp focus. ●● The viewfinder display and camera screen cannot be activated at the same time. ●● Although the viewfinder is produced under extremely high-precision manufacturing conditions and more than 99.99% of the pixels meet design specifications, in rare cases some pixels may be defective or may appear as red or black dots. This does not indicate camera damage or affect recorded images. ●● Some aspect ratio settings (=49) will cause black bars to be displayed on the top and bottom or left and right edges of the screen. These areas will not be recorded. ●● The screen will not be activated when you move your eye away from the viewfinder if you have selected MENU (=31) > [ 1] tab > [Display settings] > [Display Control] > [Manual] and then [Manual display] > [Viewfinder]. ●● Display of shooting information will not be adjusted when you hold the camera vertically if you have selected MENU (=31) > [ 1] tab > [Shooting information display] > [VF vertical display] > [Off]. ●● Display switches from the viewfinder to the camera screen for some features. ●● You can configure display brightness (=173) for the viewfinder and camera screen separately. ●● To reduce the shooting screen, choose MENU (=31) > [ 2] tab > [VF display format] > [Display 2]. Before Use Basic Guide Advanced Guide Camera Basics Auto Mode / Hybrid Auto Mode Other Shooting Modes P Mode Tv, Av, M, and C Mode Playback Mode Wireless Features Setting Menu Accessories Appendix Index 28
-
 1
1 -
2
-
3
-
4
-
5
-
6
-
7
-
8
-
9
-
10
-
11
-
12
-
13
-
14
-
15
-
16
-
17
-
18
-
19
-
20
-
21
-
22
-
 23
23 -
 24
24 -
 25
25 -
 26
26 -
 27
27 -
 28
28 -
 29
29 -
 30
30 -
 31
31 -
 32
32 -
 33
33 -
34
-
35
-
36
-
37
-
38
-
39
-
40
-
41
-
42
-
43
-
44
-
45
-
46
-
47
-
48
-
49
-
50
-
51
-
52
-
53
-
54
-
55
-
56
-
57
-
58
-
59
-
60
-
61
-
62
-
63
-
64
-
65
-
66
-
67
-
68
-
69
-
70
-
71
-
72
-
73
-
74
-
75
-
76
-
77
-
78
-
79
-
80
-
81
-
82
-
83
-
84
-
85
-
86
-
87
-
88
-
89
-
90
-
91
-
92
-
93
-
94
-
95
-
96
-
97
-
98
-
99
-
100
-
101
-
102
-
103
-
104
-
105
-
106
-
107
-
108
-
109
-
110
-
111
-
112
-
113
-
114
-
115
-
116
-
117
-
118
-
119
-
120
-
121
-
122
-
123
-
124
-
125
-
126
-
127
-
128
-
129
-
130
-
131
-
132
-
133
-
134
-
135
-
136
-
137
-
138
-
139
-
140
-
141
-
142
-
143
-
144
-
145
-
146
-
147
-
148
-
149
-
150
-
151
-
152
-
153
-
154
-
155
-
156
-
157
-
158
-
159
-
160
-
161
-
162
-
163
-
164
-
165
-
166
-
167
-
168
-
169
-
170
-
171
-
172
-
173
-
174
-
175
-
176
-
177
-
178
-
179
-
180
-
181
-
182
-
183
-
184
-
185
-
186
-
187
-
188
-
189
-
190
-
191
-
192
-
193
-
194
-
195
-
196
-
197
-
198
-
199
-
200
-
201
-
202
-
203
-
204
-
205
-
206
-
207
-
208
-
209
-
210
-
211
-
212
-
213
-
214
-
215
-
216
-
217
-
218
-
219
-
220
-
221
-
222
-
223
-
224
-
225
-
226
-
227
-
228
-
229
-
230
-
231
 |
 |
