Canon PowerShot G1 X Mark III PowerShot G1X MarkIII Camera User Guide - Page 174
Date and Time, Lens Retraction Timing, World Clock
 |
View all Canon PowerShot G1 X Mark III manuals
Add to My Manuals
Save this manual to your list of manuals |
Page 174 highlights
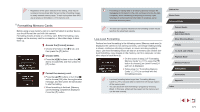
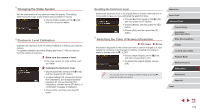
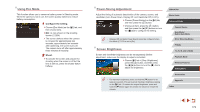
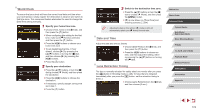
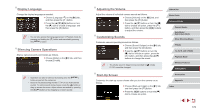
World Clock To ensure that your shots will have the correct local date and time when you travel abroad, simply register the destination in advance and switch to that time zone. This convenient feature eliminates the need to change the Date/Time setting manually. 1 Specify your home time zone. zzChoose [Time Zone] on the [ 2] tab, and then press the [ ] button. zzWhen configuring this setting for the first time, make sure [ Home] is selected, and then press the [ ] button. zzPress the [ ][ ] buttons to choose your home time zone. zzTo set daylight saving time (1 hour ahead), choose [ ] by pressing the [ ][ ] buttons or turning the [ ] dial, and then choose [ ] by pressing the [ ][ ] buttons. zzPress the [ ] button. 2 Specify your destination. zzPress the [ ][ ] buttons or turn the [ ] dial to choose [ World], and then press the [ ] button. zzPress the [ ][ ] buttons to choose the destination. zzIf necessary, specify daylight saving time as in step 1. zzPress the [ ] button. 3 Switch to the destination time zone. zzPress the [ ][ ] buttons or turn the [ ] dial to choose [ World], and then press the [ ] button. zz[ ] is now shown on [Time Zone] and shooting screens (=204). ●● Adjusting the date or time while in [ ] mode (=22) will automatically update your [ Home] time and date. Date and Time Adjust the date and time as follows. zzChoose [Date/Time] on the [ 2] tab, and then press the [ ] button. zzPress the [ ][ ] buttons to choose an item, and then adjust the setting, either by pressing the [ ][ ] buttons or turning the [ ] dial. Lens Retraction Timing The lens is normally retracted for safety about one minute after you press the [ ] button in Shooting mode (=26). To have the lens retracted immediately after you press the [ ] button, set the retraction timing to [0 sec.]. zzChoose [Lens Retraction] on the [ 2] tab, and then choose [0 sec.]. Before Use Basic Guide Advanced Guide Camera Basics Auto Mode / Hybrid Auto Mode Other Shooting Modes P Mode Tv, Av, M, and C Mode Playback Mode Wireless Features Setting Menu Accessories Appendix Index 174
-
 1
1 -
2
-
3
-
4
-
5
-
6
-
7
-
8
-
9
-
10
-
11
-
12
-
13
-
14
-
15
-
16
-
17
-
18
-
19
-
20
-
21
-
22
-
23
-
24
-
25
-
26
-
27
-
28
-
29
-
30
-
31
-
32
-
33
-
34
-
35
-
36
-
37
-
38
-
39
-
40
-
41
-
42
-
43
-
44
-
45
-
46
-
47
-
48
-
49
-
50
-
51
-
52
-
53
-
54
-
55
-
56
-
57
-
58
-
59
-
60
-
61
-
62
-
63
-
64
-
65
-
66
-
67
-
68
-
69
-
70
-
71
-
72
-
73
-
74
-
75
-
76
-
77
-
78
-
79
-
80
-
81
-
82
-
83
-
84
-
85
-
86
-
87
-
88
-
89
-
90
-
91
-
92
-
93
-
94
-
95
-
96
-
97
-
98
-
99
-
100
-
101
-
102
-
103
-
104
-
105
-
106
-
107
-
108
-
109
-
110
-
111
-
112
-
113
-
114
-
115
-
116
-
117
-
118
-
119
-
120
-
121
-
122
-
123
-
124
-
125
-
126
-
127
-
128
-
129
-
130
-
131
-
132
-
133
-
134
-
135
-
136
-
137
-
138
-
139
-
140
-
141
-
142
-
143
-
144
-
145
-
146
-
147
-
148
-
149
-
150
-
151
-
152
-
153
-
154
-
155
-
156
-
157
-
158
-
159
-
160
-
161
-
162
-
163
-
164
-
165
-
166
-
167
-
168
-
 169
169 -
 170
170 -
 171
171 -
 172
172 -
 173
173 -
 174
174 -
 175
175 -
 176
176 -
 177
177 -
 178
178 -
 179
179 -
180
-
181
-
182
-
183
-
184
-
185
-
186
-
187
-
188
-
189
-
190
-
191
-
192
-
193
-
194
-
195
-
196
-
197
-
198
-
199
-
200
-
201
-
202
-
203
-
204
-
205
-
206
-
207
-
208
-
209
-
210
-
211
-
212
-
213
-
214
-
215
-
216
-
217
-
218
-
219
-
220
-
221
-
222
-
223
-
224
-
225
-
226
-
227
-
228
-
229
-
230
-
231
 |
 |