IBM 4846-545 Service Guide - Page 105
Installing, keyboard-integration, drawer
 |
View all IBM 4846-545 manuals
Add to My Manuals
Save this manual to your list of manuals |
Page 105 highlights
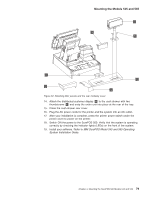
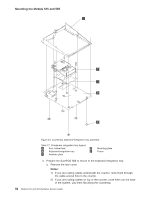
Mounting the Models 545 and 565 5. Remove the rear cover on the cash drawer. While pressing in on the two buttons located on the sides of the cash drawer, pull back on the rear cover back to remove it. Discard this rear cover. A new rear cover is used for installation of the keyboard integration kit. 6. Install the keyboard-integration tray on a cash drawer: G F E D B A C Figure 55. Installing the keyboard-integration tray on a cash drawer a. Tilt the integration tray down so the three tabs B align with the three tab holes C on the cash drawer as shown in Figure 55. Set the integration tray down on the cash drawer while aligning the screw holes D with holes on the cash drawer. b. Secure the integration tray to the cash drawer with two screws at location D. 7. Attach the mounting plate F to the integration tray with four plastic washers and screws as shown in Figure 55. 8. Attach the fence G to the integration tray with six small screws. 9. Remove the base plate. See "Base plate - removing and replacing" on page 57. 10. Attach the SurePOS 500 to the mounting plate as shown in Figure 56 on page 84. Slide the unit from the back toward the front until the frame fits into the Chapter 4. Mounting the SurePOS 500 Models 545 and 565 83
-
 1
1 -
2
-
3
-
4
-
5
-
6
-
7
-
8
-
9
-
10
-
11
-
12
-
13
-
14
-
15
-
16
-
17
-
18
-
19
-
20
-
21
-
22
-
23
-
24
-
25
-
26
-
27
-
28
-
29
-
30
-
31
-
32
-
33
-
34
-
35
-
36
-
37
-
38
-
39
-
40
-
41
-
42
-
43
-
44
-
45
-
46
-
47
-
48
-
49
-
50
-
51
-
52
-
53
-
54
-
55
-
56
-
57
-
58
-
59
-
60
-
61
-
62
-
63
-
64
-
65
-
66
-
67
-
68
-
69
-
70
-
71
-
72
-
73
-
74
-
75
-
76
-
77
-
78
-
79
-
80
-
81
-
82
-
83
-
84
-
85
-
86
-
87
-
88
-
89
-
90
-
91
-
92
-
93
-
94
-
95
-
96
-
97
-
98
-
99
-
 100
100 -
 101
101 -
 102
102 -
 103
103 -
 104
104 -
 105
105 -
 106
106 -
 107
107 -
 108
108 -
 109
109 -
 110
110 -
111
-
112
-
113
-
114
-
115
-
116
-
117
-
118
-
119
-
120
-
121
-
122
-
123
-
124
-
125
-
126
-
127
-
128
-
129
-
130
-
131
-
132
-
133
-
134
-
135
-
136
-
137
-
138
-
139
-
140
-
141
-
142
-
143
-
144
-
145
-
146
-
147
-
148
-
149
-
150
-
151
-
152
-
153
-
154
-
155
-
156
-
157
-
158
-
159
-
160
-
161
-
162
-
163
-
164
-
165
-
166
-
167
-
168
-
169
-
170
-
171
-
172
-
173
-
174
-
175
-
176
-
177
-
178
-
179
-
180
-
181
-
182
-
183
-
184
-
185
-
186
-
187
-
188
-
189
-
190
-
191
-
192
-
193
-
194
-
195
-
196
 |
 |
