IBM 4846-545 Service Guide - Page 98
without, printer
 |
View all IBM 4846-545 manuals
Add to My Manuals
Save this manual to your list of manuals |
Page 98 highlights
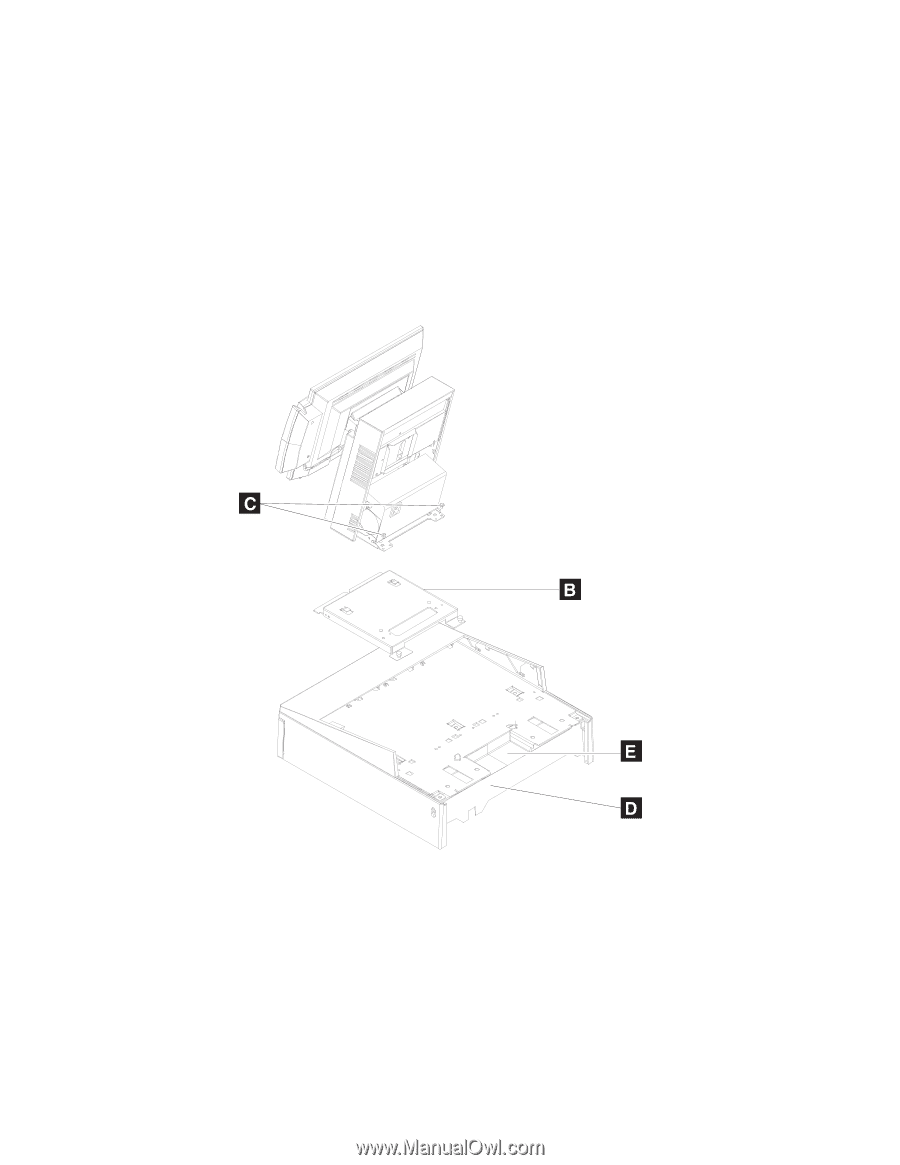
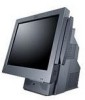
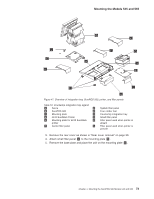
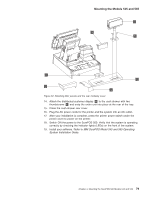
Mounting the Models 545 and 565 2. To install the SurePOS 500 on an integration tray: a. Remove the rear cover. "Rear cover removal" on page 30. b. Remove the base plate. See "Base plate - removing and replacing" on page 57. c. Attach the system base to the mounting plate B with the screws C , as shown in Figure 50. d. Open the rear cash drawer cover D by pushing in the two buttons located on each side of the cash drawer. This provides access to the cash drawer connector for cabling it to the system. You will also route cables inside the cover through hole E and to the system. Figure 50. Attaching a mounting plate to center of cash-drawer integration tray 3. For installations without a printer, install the mounting plate in the center of the base using the removable thumbscrews. Place the filler panels on both sides. See Figure 47 on page 73. Install rear system panel G first and use filler panels K to lock in filler panel G onto the tray. 4. Install the IBM 4610 SureMark printer on the integration tray with the SurePOS 500. Go to "Installing IBM 4610 SureMark Models TF6 or TF7 printers" on page 91 for detailed instructions on printer cable routing, RS-232 printer switch settings, and mounting plate installation: 76 Models 545 and 565 Hardware Service Guide
-
 1
1 -
2
-
3
-
4
-
5
-
6
-
7
-
8
-
9
-
10
-
11
-
12
-
13
-
14
-
15
-
16
-
17
-
18
-
19
-
20
-
21
-
22
-
23
-
24
-
25
-
26
-
27
-
28
-
29
-
30
-
31
-
32
-
33
-
34
-
35
-
36
-
37
-
38
-
39
-
40
-
41
-
42
-
43
-
44
-
45
-
46
-
47
-
48
-
49
-
50
-
51
-
52
-
53
-
54
-
55
-
56
-
57
-
58
-
59
-
60
-
61
-
62
-
63
-
64
-
65
-
66
-
67
-
68
-
69
-
70
-
71
-
72
-
73
-
74
-
75
-
76
-
77
-
78
-
79
-
80
-
81
-
82
-
83
-
84
-
85
-
86
-
87
-
88
-
89
-
90
-
91
-
92
-
 93
93 -
 94
94 -
 95
95 -
 96
96 -
 97
97 -
 98
98 -
 99
99 -
 100
100 -
 101
101 -
 102
102 -
 103
103 -
104
-
105
-
106
-
107
-
108
-
109
-
110
-
111
-
112
-
113
-
114
-
115
-
116
-
117
-
118
-
119
-
120
-
121
-
122
-
123
-
124
-
125
-
126
-
127
-
128
-
129
-
130
-
131
-
132
-
133
-
134
-
135
-
136
-
137
-
138
-
139
-
140
-
141
-
142
-
143
-
144
-
145
-
146
-
147
-
148
-
149
-
150
-
151
-
152
-
153
-
154
-
155
-
156
-
157
-
158
-
159
-
160
-
161
-
162
-
163
-
164
-
165
-
166
-
167
-
168
-
169
-
170
-
171
-
172
-
173
-
174
-
175
-
176
-
177
-
178
-
179
-
180
-
181
-
182
-
183
-
184
-
185
-
186
-
187
-
188
-
189
-
190
-
191
-
192
-
193
-
194
-
195
-
196
 |
 |