IBM 4846-545 Service Guide - Page 115
freestanding
 |
View all IBM 4846-545 manuals
Add to My Manuals
Save this manual to your list of manuals |
Page 115 highlights
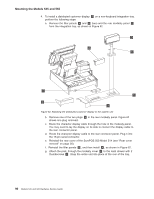
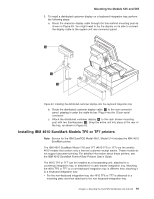
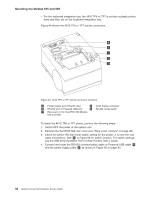
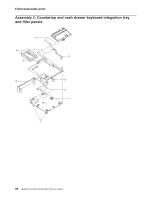
Mounting the Models 545 and 565 C A B Figure 65. Attaching and routing the cables to the printer. 5. Connect any other signal cables for I/O devices to the correct ports. 6. If you are installing a freestanding printer, route the cables to the rear connector panel on the SurePOS 500 Models 545 and 565 system unit. Pass the cables under the cable-tie bar, and plug it into one of the standard serial ports. 7. Go to the appropriate procedure for non-keyboard integration tray or keyboard integration tray mounting of the 4610 TF6 or TF7 printer: v If you are installing a 4610 TF6 or TF7 printer on a non-keyboard integration tray, continue with Step 8. v If installing a 4610 TF6 or TF7 printer on a keyboard integration tray, continue with Step 11 on page 84. 8. To install a 4610 TF6 or TF7 printer on a non-keyboard integration tray, perform the following steps: a. Attach the printer mounting plate to the bottom of the printer. The mounting plate slides into the two bottom slots of the printer. Figure 66. Attaching the 4610 TF6 or TF7 printer mounting plate for a non-keyboard integration tray b. The procedure for mounting the printer to a non-keyboard integration tray is the same for countertop or cash drawer. With the mounting plate attached to the printer, slide the front of the printer mounting plate into the slots located Chapter 4. Mounting the SurePOS 500 Models 545 and 565 93
-
 1
1 -
2
-
3
-
4
-
5
-
6
-
7
-
8
-
9
-
10
-
11
-
12
-
13
-
14
-
15
-
16
-
17
-
18
-
19
-
20
-
21
-
22
-
23
-
24
-
25
-
26
-
27
-
28
-
29
-
30
-
31
-
32
-
33
-
34
-
35
-
36
-
37
-
38
-
39
-
40
-
41
-
42
-
43
-
44
-
45
-
46
-
47
-
48
-
49
-
50
-
51
-
52
-
53
-
54
-
55
-
56
-
57
-
58
-
59
-
60
-
61
-
62
-
63
-
64
-
65
-
66
-
67
-
68
-
69
-
70
-
71
-
72
-
73
-
74
-
75
-
76
-
77
-
78
-
79
-
80
-
81
-
82
-
83
-
84
-
85
-
86
-
87
-
88
-
89
-
90
-
91
-
92
-
93
-
94
-
95
-
96
-
97
-
98
-
99
-
100
-
101
-
102
-
103
-
104
-
105
-
106
-
107
-
108
-
109
-
 110
110 -
 111
111 -
 112
112 -
 113
113 -
 114
114 -
 115
115 -
 116
116 -
 117
117 -
 118
118 -
 119
119 -
 120
120 -
121
-
122
-
123
-
124
-
125
-
126
-
127
-
128
-
129
-
130
-
131
-
132
-
133
-
134
-
135
-
136
-
137
-
138
-
139
-
140
-
141
-
142
-
143
-
144
-
145
-
146
-
147
-
148
-
149
-
150
-
151
-
152
-
153
-
154
-
155
-
156
-
157
-
158
-
159
-
160
-
161
-
162
-
163
-
164
-
165
-
166
-
167
-
168
-
169
-
170
-
171
-
172
-
173
-
174
-
175
-
176
-
177
-
178
-
179
-
180
-
181
-
182
-
183
-
184
-
185
-
186
-
187
-
188
-
189
-
190
-
191
-
192
-
193
-
194
-
195
-
196
 |
 |
