IBM 4846-545 Service Guide - Page 75
Processor, fan/heatsink, assembly, removing, replacing
 |
View all IBM 4846-545 manuals
Add to My Manuals
Save this manual to your list of manuals |
Page 75 highlights
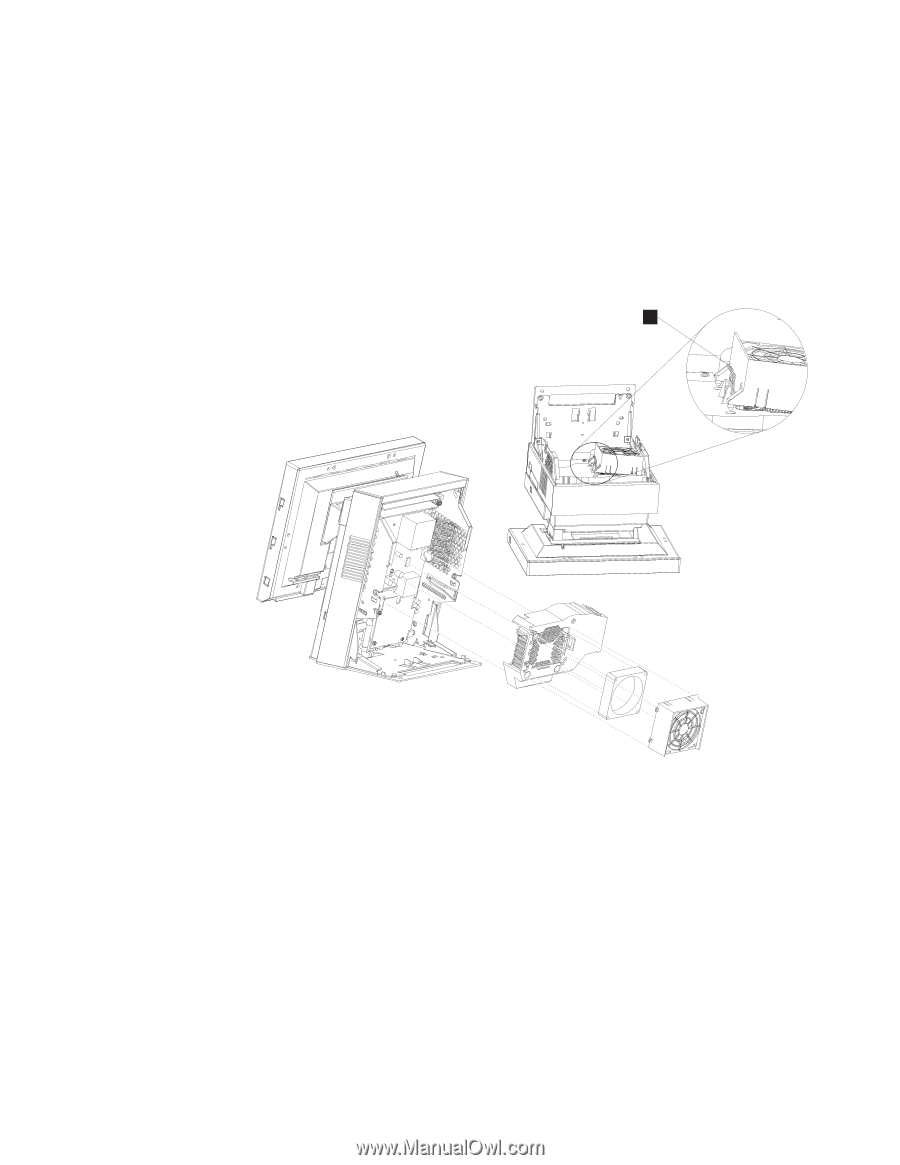
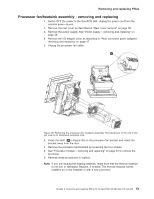
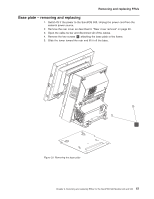
Removing and replacing FRUs Processor fan/heatsink assembly - removing and replacing 1. Switch OFF the power to the SurePOS 500. Unplug the power cord from the external power source. 2. Remove the rear cover as described at "Rear cover removal" on page 30. 3. Remove the power supply. See "Power supply - removing and replacing" on page 45 4. Remove the I/O tailgate cover as described in "Rear connector panel (tailgate) - removing and replacing" on page 47 5. Unplug the processor fan cable. A Figure 30. Removing the processor fan/ heatsink assembly. The placement of the unit in the top view is for illustrative purposes only. 6. Press the latch ( A in Figure 30) on the processor fan bracket and rotate fan bracket away from the duct. 7. Remove the processor fan/heatsink by loosening the four screws. 8. See "Processor module - removing and replacing" on page 54 to remove the processor. 9. Reverse these procedures to replace. Note: If you are reusing the existing heatsink, make sure that the thermal material is not torn or damaged. Replace, if needed. The thermal material comes installed on a new heatsink or with a new processor. Chapter 3. Removing and replacing FRUs for the SurePOS 500 Models 545 and 565 53
-
 1
1 -
2
-
3
-
4
-
5
-
6
-
7
-
8
-
9
-
10
-
11
-
12
-
13
-
14
-
15
-
16
-
17
-
18
-
19
-
20
-
21
-
22
-
23
-
24
-
25
-
26
-
27
-
28
-
29
-
30
-
31
-
32
-
33
-
34
-
35
-
36
-
37
-
38
-
39
-
40
-
41
-
42
-
43
-
44
-
45
-
46
-
47
-
48
-
49
-
50
-
51
-
52
-
53
-
54
-
55
-
56
-
57
-
58
-
59
-
60
-
61
-
62
-
63
-
64
-
65
-
66
-
67
-
68
-
69
-
 70
70 -
 71
71 -
 72
72 -
 73
73 -
 74
74 -
 75
75 -
 76
76 -
 77
77 -
 78
78 -
 79
79 -
 80
80 -
81
-
82
-
83
-
84
-
85
-
86
-
87
-
88
-
89
-
90
-
91
-
92
-
93
-
94
-
95
-
96
-
97
-
98
-
99
-
100
-
101
-
102
-
103
-
104
-
105
-
106
-
107
-
108
-
109
-
110
-
111
-
112
-
113
-
114
-
115
-
116
-
117
-
118
-
119
-
120
-
121
-
122
-
123
-
124
-
125
-
126
-
127
-
128
-
129
-
130
-
131
-
132
-
133
-
134
-
135
-
136
-
137
-
138
-
139
-
140
-
141
-
142
-
143
-
144
-
145
-
146
-
147
-
148
-
149
-
150
-
151
-
152
-
153
-
154
-
155
-
156
-
157
-
158
-
159
-
160
-
161
-
162
-
163
-
164
-
165
-
166
-
167
-
168
-
169
-
170
-
171
-
172
-
173
-
174
-
175
-
176
-
177
-
178
-
179
-
180
-
181
-
182
-
183
-
184
-
185
-
186
-
187
-
188
-
189
-
190
-
191
-
192
-
193
-
194
-
195
-
196
 |
 |