IBM 4846-545 Service Guide - Page 92
Non-keyboard-integration, mounting, Countertop, non-keyboard-integration
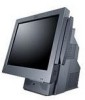 |
View all IBM 4846-545 manuals
Add to My Manuals
Save this manual to your list of manuals |
Page 92 highlights
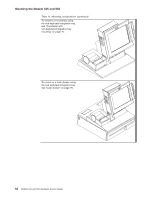
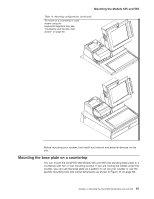
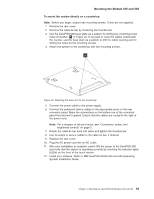
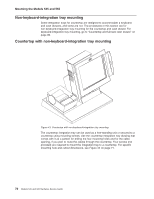
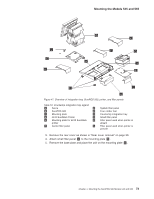
Mounting the Models 545 and 565 Non-keyboard-integration tray mounting Some integration trays for countertop are designed to accommodate a keyboard and cash drawers, and some are not. The procedures in this section are for non-keyboard-integration tray mounting for the countertop and cash drawer. For keyboard-integration tray mounting, go to "Countertop and full-size cash drawer" on page 80. Countertop with non-keyboard-integration tray mounting Figure 43. Countertop with non-keyboard-integration tray mounting The countertop integration tray can be used as a free-standing unit or secured to a countertop using mounting screws. Use the countertop integration tray drawing that comes with it as a pattern for drilling the four mounting holes and for the cable opening, if you plan to route the cables through the countertop. Four screws (not provided) are required to mount the integration tray to a countertop. For specific mounting hole and cutout dimensions, see Figure 44 on page 71. 70 Models 545 and 565 Hardware Service Guide
-
 1
1 -
2
-
3
-
4
-
5
-
6
-
7
-
8
-
9
-
10
-
11
-
12
-
13
-
14
-
15
-
16
-
17
-
18
-
19
-
20
-
21
-
22
-
23
-
24
-
25
-
26
-
27
-
28
-
29
-
30
-
31
-
32
-
33
-
34
-
35
-
36
-
37
-
38
-
39
-
40
-
41
-
42
-
43
-
44
-
45
-
46
-
47
-
48
-
49
-
50
-
51
-
52
-
53
-
54
-
55
-
56
-
57
-
58
-
59
-
60
-
61
-
62
-
63
-
64
-
65
-
66
-
67
-
68
-
69
-
70
-
71
-
72
-
73
-
74
-
75
-
76
-
77
-
78
-
79
-
80
-
81
-
82
-
83
-
84
-
85
-
86
-
 87
87 -
 88
88 -
 89
89 -
 90
90 -
 91
91 -
 92
92 -
 93
93 -
 94
94 -
 95
95 -
 96
96 -
 97
97 -
98
-
99
-
100
-
101
-
102
-
103
-
104
-
105
-
106
-
107
-
108
-
109
-
110
-
111
-
112
-
113
-
114
-
115
-
116
-
117
-
118
-
119
-
120
-
121
-
122
-
123
-
124
-
125
-
126
-
127
-
128
-
129
-
130
-
131
-
132
-
133
-
134
-
135
-
136
-
137
-
138
-
139
-
140
-
141
-
142
-
143
-
144
-
145
-
146
-
147
-
148
-
149
-
150
-
151
-
152
-
153
-
154
-
155
-
156
-
157
-
158
-
159
-
160
-
161
-
162
-
163
-
164
-
165
-
166
-
167
-
168
-
169
-
170
-
171
-
172
-
173
-
174
-
175
-
176
-
177
-
178
-
179
-
180
-
181
-
182
-
183
-
184
-
185
-
186
-
187
-
188
-
189
-
190
-
191
-
192
-
193
-
194
-
195
-
196
 |
 |
