IBM 4846-545 Service Guide - Page 93
Alternating
 |
View all IBM 4846-545 manuals
Add to My Manuals
Save this manual to your list of manuals |
Page 93 highlights
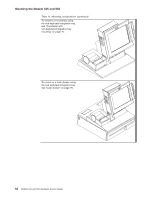
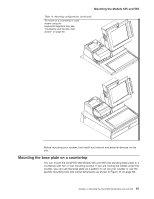
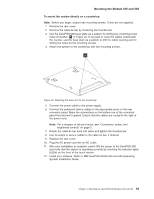
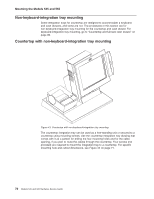
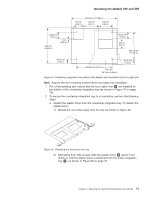
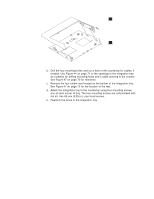
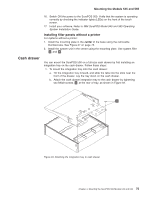
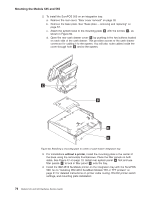
Mounting the Models 545 and 565 441.52 mm (17.38 in.) 90 mm (3.54 in.) 149 mm (5.87 in.) 128 mm (5.04 in.) 66.22 mm (2.6 in.) 7 mm (0.28 in.) 340 mm (13.39 in.) 66.22 mm (2.6 in.) 95 mm (3.7 in.) 260.16 mm (10.24 in.) 40.72 mm (1.6 in.) 343.02 mm (13.51 in.) 45.76 mm (1.8 in.) 64.1 mm (2.52 in.) Figure 44. Countertop integration tray pattern with display and countertop cutout on right side Note: Acquire the four mounting screws before you begin this installation. 1. For a free-standing unit, ensure that the four rubber feet H are installed on the bottom of the countertop integration tray (as shown in Figure 47 on page 73). 2. To secure the countertop integration tray to a countertop, perform the following steps: a. Detach the plastic fence from the countertop integration tray. To detach the plastic fence: 1) Spread the rear sides away from the tray as shown in Figure 45. Figure 45. Detaching the fence from the tray 2) Alternating from side to side, slide the plastic fence B about 7 mm (0.25 in.) until the plastic fence is detached from the metal integration tray A , as shown in Figure 46 on page 72. Chapter 4. Mounting the SurePOS 500 Models 545 and 565 71
-
 1
1 -
2
-
3
-
4
-
5
-
6
-
7
-
8
-
9
-
10
-
11
-
12
-
13
-
14
-
15
-
16
-
17
-
18
-
19
-
20
-
21
-
22
-
23
-
24
-
25
-
26
-
27
-
28
-
29
-
30
-
31
-
32
-
33
-
34
-
35
-
36
-
37
-
38
-
39
-
40
-
41
-
42
-
43
-
44
-
45
-
46
-
47
-
48
-
49
-
50
-
51
-
52
-
53
-
54
-
55
-
56
-
57
-
58
-
59
-
60
-
61
-
62
-
63
-
64
-
65
-
66
-
67
-
68
-
69
-
70
-
71
-
72
-
73
-
74
-
75
-
76
-
77
-
78
-
79
-
80
-
81
-
82
-
83
-
84
-
85
-
86
-
87
-
 88
88 -
 89
89 -
 90
90 -
 91
91 -
 92
92 -
 93
93 -
 94
94 -
 95
95 -
 96
96 -
 97
97 -
 98
98 -
99
-
100
-
101
-
102
-
103
-
104
-
105
-
106
-
107
-
108
-
109
-
110
-
111
-
112
-
113
-
114
-
115
-
116
-
117
-
118
-
119
-
120
-
121
-
122
-
123
-
124
-
125
-
126
-
127
-
128
-
129
-
130
-
131
-
132
-
133
-
134
-
135
-
136
-
137
-
138
-
139
-
140
-
141
-
142
-
143
-
144
-
145
-
146
-
147
-
148
-
149
-
150
-
151
-
152
-
153
-
154
-
155
-
156
-
157
-
158
-
159
-
160
-
161
-
162
-
163
-
164
-
165
-
166
-
167
-
168
-
169
-
170
-
171
-
172
-
173
-
174
-
175
-
176
-
177
-
178
-
179
-
180
-
181
-
182
-
183
-
184
-
185
-
186
-
187
-
188
-
189
-
190
-
191
-
192
-
193
-
194
-
195
-
196
 |
 |
