Pioneer AVIC-X850BT Operation Manual - Page 149
Setting video input 1 AV1, Setting video input 2 AV2, Changing the screen size of SD, USB video,
 |
View all Pioneer AVIC-X850BT manuals
Add to My Manuals
Save this manual to your list of manuals |
Page 149 highlights
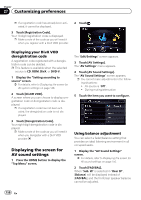
Customizing preferences Chapter 27 Customizing preferences Setting video input 1 (AV1) You can use outside video equipment such as portable players connected to this product with this setting. p This setting applies to mini-jack input. 1 Display the "Setting according to source" screen. = For details, refer to Displaying the screen for AV system settings on page 148. 2 Touch [AV Input]. 3 Touch [AV1 Input]. 4 Touch [On]. The connected component is enabled. p Use "AV1 Input" when connecting CDRM10 (sold separately) through the external video component. # If you touch [Off], the setting is turned off. Setting video input 2 (AV2) You can use outside video equipment such as portable players connected to this product with this setting. p This setting applies to RCA inputs (AUDIO INPUT and VIDEO INPUT) on the back of the system. 1 Display the "Setting according to source" screen. = For details, refer to Displaying the screen for AV system settings on page 148. 2 Touch [AV Input]. 3 Touch [AV2 Input]. 4 Touch [On]. The connected component is enabled. # If you touch [Off], the setting is turned off. Changing the screen size of SD/ USB video Changes the screen size of video. If a video file is played, you can select the display mode between normal and full screen. 1 Display the "Setting according to source" screen. = For details, refer to Displaying the screen for AV system settings on page 148. 2 Touch [SD/USB Settings]. 3 Touch [SD Video Output Settings] or [USB Video Output Settings]. 4 Touch [Full] or [Normal]. ! Full (default): A picture is enlarged in four directions without keeping the aspect ratio and displays to the full extent of a screen. ! Normal: A picture is displayed fitting to the long side of the screen while keeping the aspect ratio. Displaying your DivX VOD registration code If you want to play DivX VOD (video on demand) content on this navigation system, you must first register the unit with your DivX VOD content provider. You do this by generating a DivX VOD registration code, which you submit to your provider. p This feature is available when the selected source is CD, ROM, DivX, or DVD-V. 1 Display the "Setting according to source" screen. = For details, refer to Displaying the screen for AV system settings on page 148. 2 Touch [DivX® VOD]. A screen where you can choose to display a registration code or deregistration code is displayed. En 149
-
 1
1 -
2
-
3
-
4
-
5
-
6
-
7
-
8
-
9
-
10
-
11
-
12
-
13
-
14
-
15
-
16
-
17
-
18
-
19
-
20
-
21
-
22
-
23
-
24
-
25
-
26
-
27
-
28
-
29
-
30
-
31
-
32
-
33
-
34
-
35
-
36
-
37
-
38
-
39
-
40
-
41
-
42
-
43
-
44
-
45
-
46
-
47
-
48
-
49
-
50
-
51
-
52
-
53
-
54
-
55
-
56
-
57
-
58
-
59
-
60
-
61
-
62
-
63
-
64
-
65
-
66
-
67
-
68
-
69
-
70
-
71
-
72
-
73
-
74
-
75
-
76
-
77
-
78
-
79
-
80
-
81
-
82
-
83
-
84
-
85
-
86
-
87
-
88
-
89
-
90
-
91
-
92
-
93
-
94
-
95
-
96
-
97
-
98
-
99
-
100
-
101
-
102
-
103
-
104
-
105
-
106
-
107
-
108
-
109
-
110
-
111
-
112
-
113
-
114
-
115
-
116
-
117
-
118
-
119
-
120
-
121
-
122
-
123
-
124
-
125
-
126
-
127
-
128
-
129
-
130
-
131
-
132
-
133
-
134
-
135
-
136
-
137
-
138
-
139
-
140
-
141
-
142
-
143
-
 144
144 -
 145
145 -
 146
146 -
 147
147 -
 148
148 -
 149
149 -
 150
150 -
 151
151 -
 152
152 -
 153
153 -
 154
154 -
155
-
156
-
157
-
158
-
159
-
160
-
161
-
162
-
163
-
164
-
165
-
166
-
167
-
168
-
169
-
170
-
171
-
172
-
173
-
174
-
175
-
176
-
177
-
178
-
179
-
180
-
181
-
182
-
183
-
184
-
185
-
186
-
187
-
188
-
189
-
190
-
191
-
192
-
193
-
194
-
195
-
196
-
197
-
198
-
199
-
200
-
201
-
202
-
203
-
204
 |
 |
