Pioneer AVIC-X850BT Operation Manual - Page 162
Touch [Parking Assist Line Adjustment].
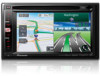 |
View all Pioneer AVIC-X850BT manuals
Add to My Manuals
Save this manual to your list of manuals |
Page 162 highlights
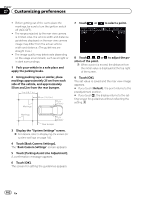
Chapter 27 Customizing preferences ! Before getting out of the car to place the markings, be sure to turn the ignition switch off (ACC OFF). ! The range projected by the rear view camera is limited. Also, the vehicle width and distance guidelines displayed on the rear view camera image may differ from the actual vehicle width and distance. (The guidelines are straight lines.) ! The image quality may deteriorate depending on the usage environment, such as at night or in dark surroundings. 1 Park your vehicle in a safe place and apply the parking brake. 2 Using packing tape or similar, place markings approximately 25 cm from each side of the vehicle, and approximately 50 cm and 2 m from the rear bumper. 2 m (6 ft. 7 in.) Markings 50 cm (1 ft. 8 in.) 25 cm (9-7/8 in.) 7 Touch or to select a point. 8 Touch , , or to adjust the position of the point. p When a point is moved, the distance from the initial value is displayed at the top right of the screen. 9 Touch [OK]. The set value is saved and the rear view image appears. # If you touch [Default], the point returns to the preadjustment position. # If you touch , the display returns to the setting screen for guidelines without reflecting the setting. Markings 25 cm (9-7/8 in.) Rear bumper 3 Display the "System Settings" screen. = For details, refer to Displaying the screen for system settings on page 144. 4 Touch [Back Camera Settings]. The "Back Camera Settings" screen appears. 5 Touch [Parking Assist Line Adjustment]. A confirmation message appears. 6 Touch [OK]. The screen for setting the guidelines appears. 162 En
-
 1
1 -
2
-
3
-
4
-
5
-
6
-
7
-
8
-
9
-
10
-
11
-
12
-
13
-
14
-
15
-
16
-
17
-
18
-
19
-
20
-
21
-
22
-
23
-
24
-
25
-
26
-
27
-
28
-
29
-
30
-
31
-
32
-
33
-
34
-
35
-
36
-
37
-
38
-
39
-
40
-
41
-
42
-
43
-
44
-
45
-
46
-
47
-
48
-
49
-
50
-
51
-
52
-
53
-
54
-
55
-
56
-
57
-
58
-
59
-
60
-
61
-
62
-
63
-
64
-
65
-
66
-
67
-
68
-
69
-
70
-
71
-
72
-
73
-
74
-
75
-
76
-
77
-
78
-
79
-
80
-
81
-
82
-
83
-
84
-
85
-
86
-
87
-
88
-
89
-
90
-
91
-
92
-
93
-
94
-
95
-
96
-
97
-
98
-
99
-
100
-
101
-
102
-
103
-
104
-
105
-
106
-
107
-
108
-
109
-
110
-
111
-
112
-
113
-
114
-
115
-
116
-
117
-
118
-
119
-
120
-
121
-
122
-
123
-
124
-
125
-
126
-
127
-
128
-
129
-
130
-
131
-
132
-
133
-
134
-
135
-
136
-
137
-
138
-
139
-
140
-
141
-
142
-
143
-
144
-
145
-
146
-
147
-
148
-
149
-
150
-
151
-
152
-
153
-
154
-
155
-
156
-
 157
157 -
 158
158 -
 159
159 -
 160
160 -
 161
161 -
 162
162 -
 163
163 -
 164
164 -
 165
165 -
 166
166 -
 167
167 -
168
-
169
-
170
-
171
-
172
-
173
-
174
-
175
-
176
-
177
-
178
-
179
-
180
-
181
-
182
-
183
-
184
-
185
-
186
-
187
-
188
-
189
-
190
-
191
-
192
-
193
-
194
-
195
-
196
-
197
-
198
-
199
-
200
-
201
-
202
-
203
-
204
 |
 |
