Samsung SCD6040 User Manual (user Manual) (English, Spanish) - Page 100
Viewing Still Images, Viewing a Single Still Image
 |
View all Samsung SCD6040 manuals
Add to My Manuals
Save this manual to your list of manuals |
Page 100 highlights
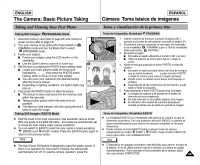
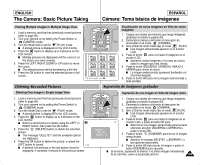
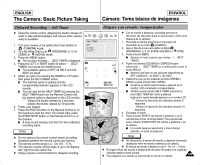
ENGLISH The Camera: Basic Picture Taking ESPAÑOL Cámara: Toma básica de imágenes Viewing Still Images Visualización de fotografías ✤ You can playback and view still images stored on the Memory Card. ✤ Still images stored on the memory card are all displayed in the same size despite their original resolution using the LCD monitor or viewfinder. ✤ There are three ways to view the recorded images in Camera (PLAY) mode: I Single: To view an image frame by frame I Slide Show: To view all images automatically in consecutive order I Multiple Display: Up to 9 thumbnails are displayed on the LCD monitor at one time. Viewing a Single Still Image 1. Turn on your camera by setting the Power Switch to (CAMERA) mode. 2 Set the Mode Dial to (PLAY) mode. I The last picture taken appears on the LCD monitor. 3. Using the RIGHT and LEFT buttons, search for the desired still image. I To view the next image, press the RIGHT button. I To view the previous image, press the LEFT button. I To view the detailed information on a picture, press the DISPLAY button. I Pressing the RIGHT button when you are on the last image will take you to the first image and pressing the LEFT button when you are on the first image will take you to the last image. I Keep pressing RIGHT or LEFT to search quickly for an image. I To delete the image displayed, press the (DELETE) button. Notes DELETE ? DEL : OK CANCEL : ✤ Es posible ver las imágenes almacenadas en la tarjeta de memoria. ✤ Las fotografías almacenadas en la tarjeta de memoria aparecen con el mismo tamaño a pesar de su resolución original utilizando el monitor LCD o el visor. ✤ Existen tres formas de ver las imágenes grabadas en la modalidad de cámara (PLAY): I Una a una: Para ver las imágenes fotograma a fotograma. I Presentación: Para ver todas las imágenes automáticamente y en orden consecutivo. I Visualización múltiple: Aparecen hasta 9 miniaturas en el monitor LCD al mismo tiempo. Visualización de una sola fotografía 1. Encienda la cámara colocando el interruptor de encendido en la modalidad (CÁMARA). 2. Coloque el Dial de modalidad en (PLAY). I Aparece la última imagen tomada en la pantalla LCD. 3. Busque la imagen que desee pulsando los botones DERECHA e IZQUIERDA. I Para ver la imagen siguiente, pulse el botón DERECHA. I Para ver la imagen anterior, pulse el botón IZQUIERDA. I Para ver información detallada sobre la imagen, pulse el botón DISPLAY. I Si se pulsa el botón DERECHA cuando se está en la última imagen, aparecerá la primera imagen u si se pulsa el botón IZQUIERDA cuando se está 2/33 en la primera imagen aparecerá la última imagen. I Para buscar una imagen rápidamente, mantenga pulsado el botón DERECHA o IZQUIERDA. I Para borrar la imagen visualizada, pulse el botón (BORRAR). Notas ✤ If there is no stored image in the memory card, when you switch to (PLAY) mode, a message "NO IMAGE!" is displayed and the MENU button will not function. ✤ When you connect the Multi-AV cable under the (PLAY) mode, the 100 LCD monitor turns off automatically and the TV displays the image. ✤ Si no hay ninguna imagen en la tarjeta de memoria, cuando cambie al modo (PLAY), aparece el mensaje NO IMAGE! y el botón MENU no funcionará. ✤ Cuando conecte el cable Multi-AV en el modo (PLAY), el monitor LCD se apaga automáticamente y el TV muestra la imagen.
-
 1
1 -
2
-
3
-
4
-
5
-
6
-
7
-
8
-
9
-
10
-
11
-
12
-
13
-
14
-
15
-
16
-
17
-
18
-
19
-
20
-
21
-
22
-
23
-
24
-
25
-
26
-
27
-
28
-
29
-
30
-
31
-
32
-
33
-
34
-
35
-
36
-
37
-
38
-
39
-
40
-
41
-
42
-
43
-
44
-
45
-
46
-
47
-
48
-
49
-
50
-
51
-
52
-
53
-
54
-
55
-
56
-
57
-
58
-
59
-
60
-
61
-
62
-
63
-
64
-
65
-
66
-
67
-
68
-
69
-
70
-
71
-
72
-
73
-
74
-
75
-
76
-
77
-
78
-
79
-
80
-
81
-
82
-
83
-
84
-
85
-
86
-
87
-
88
-
89
-
90
-
91
-
92
-
93
-
94
-
 95
95 -
 96
96 -
 97
97 -
 98
98 -
 99
99 -
 100
100 -
 101
101 -
 102
102 -
 103
103 -
 104
104 -
 105
105 -
106
-
107
-
108
-
109
-
110
-
111
-
112
-
113
-
114
-
115
-
116
-
117
-
118
-
119
-
120
-
121
-
122
-
123
-
124
-
125
-
126
-
127
-
128
-
129
-
130
-
131
-
132
-
133
-
134
-
135
-
136
-
137
-
138
-
139
-
140
-
141
-
142
-
143
-
144
-
145
-
146
-
147
-
148
-
149
-
150
-
151
-
152
-
153
-
154
-
155
-
156
-
157
-
158
-
159
-
160
-
161
-
162
-
163
-
164
-
165
-
166
 |
 |
