Samsung SCD6040 User Manual (user Manual) (English, Spanish) - Page 141
Printing Images Using DPOF Digital Print Order Format Settings
 |
View all Samsung SCD6040 manuals
Add to My Manuals
Save this manual to your list of manuals |
Page 141 highlights
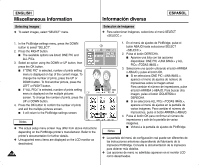
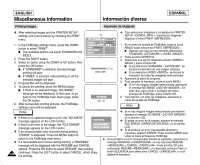
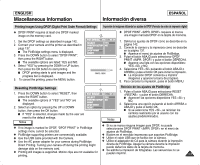
ENGLISH Miscellaneous Information Información diversa ESPAÑOL Printing Images Using DPOF (Digital Print Order Format) Settings ✤ DPOF PRINT requires at least one DPOF marked image on the memory card. 1. Set the DPOF settings as described in page 142. 2. Connect your camera and the printer as described in page 137. I The PictBridge settings menu is displayed. 3. Press the DOWN button to select "DPOF PRINT", then press the RIGHT button. I The available options are listed: YES and NO. 4. Select "YES" by pressing the DOWN or UP button, then press the OK button to start printing. I DPOF printing starts to print images and the progress bar is displayed. 5. To cancel the printing, press the MENU button. Resetting PictBridge Settings 1. Press the DOWN button to select "RESET", then press the RIGHT button. I The available options of "YES" and "NO" are displayed. 2. Select an option by pressing the UP or DOWN button, then press the OK button. I If "YES" is selected, changes made by the user are reset to the default settings. Notes ✤ If no image is marked for DPOF, "DPOF PRINT" in PictBridge settings menu cannot be selected. ✤ PictBridge supporting printers are commercially available. ✤ Use the USB cable provided with the Camera. ✤ Use the AC power adapter for your camera during PictBridge Direct Printing. Turning your camera off during the printing might damage data on the memory card. ✤ Printing still images is supported. Motion clips are not available for printing. Impresión de imágenes utilizando los ajustes de DPOF (Formato de orden de impresión digital) ✤ DPOF PRINT requiere al menos una imagen marcada DPOF en la tarjeta de memoria. Notas 1. Defina los ajustes de DPOF como se describe en la página 142. 2. Conecte la cámara y la impresora como se describe en la página 137. I Aparece el menú de ajustes de PictBridge. 3. Pulse el botón ABAJO para seleccionar DPOF PRINT y pulse el botón DERECHA. I Aparece una lista con las opciones disponibles: YES y NO. 4. Seleccione YES pulsando el botón ABAJO o ARRIBA y pulse el botón OK para iniciar la impresión. I La impresión DPOF comienza a imprimir imágenes y aparece la barra de progreso. 5. Para cancelar la impresión, pulse el botón MENU. Reinicio de los ajustes de PictBridge 1. Pulse el botón ABAJO para seleccionar RESET y pulse el botón DERECHA. I Aparecen las opciones disponibles YES y NO. 2. Seleccione una opción pulsando el botón ARRIBA o ABAJO y pulse el botón OK. I Si se selecciona YES , se reinician los cambios realizados por el usuario con los ajustes predeterminados. ✤ Si no se marca ninguna imagen para DPOF, no puede seleccionarse DPOF PRINT en el menú de ajustes de PictBridge. ✤ Existen en el mercado impresoras que soportan PictBridge. ✤ Utilice el cable USB que se facilita con la cámara. ✤ Utilice el adaptador de CA para la cámara durante la impresión directa de PictBridge. Apagar la cámara durante la impresión puede dañar los datos de la tarjeta de memoria. ✤ Se admite la impresión de fotografías. Las secuencias no se pueden imprimir. 141
-
 1
1 -
2
-
3
-
4
-
5
-
6
-
7
-
8
-
9
-
10
-
11
-
12
-
13
-
14
-
15
-
16
-
17
-
18
-
19
-
20
-
21
-
22
-
23
-
24
-
25
-
26
-
27
-
28
-
29
-
30
-
31
-
32
-
33
-
34
-
35
-
36
-
37
-
38
-
39
-
40
-
41
-
42
-
43
-
44
-
45
-
46
-
47
-
48
-
49
-
50
-
51
-
52
-
53
-
54
-
55
-
56
-
57
-
58
-
59
-
60
-
61
-
62
-
63
-
64
-
65
-
66
-
67
-
68
-
69
-
70
-
71
-
72
-
73
-
74
-
75
-
76
-
77
-
78
-
79
-
80
-
81
-
82
-
83
-
84
-
85
-
86
-
87
-
88
-
89
-
90
-
91
-
92
-
93
-
94
-
95
-
96
-
97
-
98
-
99
-
100
-
101
-
102
-
103
-
104
-
105
-
106
-
107
-
108
-
109
-
110
-
111
-
112
-
113
-
114
-
115
-
116
-
117
-
118
-
119
-
120
-
121
-
122
-
123
-
124
-
125
-
126
-
127
-
128
-
129
-
130
-
131
-
132
-
133
-
134
-
135
-
 136
136 -
 137
137 -
 138
138 -
 139
139 -
 140
140 -
 141
141 -
 142
142 -
 143
143 -
 144
144 -
 145
145 -
 146
146 -
147
-
148
-
149
-
150
-
151
-
152
-
153
-
154
-
155
-
156
-
157
-
158
-
159
-
160
-
161
-
162
-
163
-
164
-
165
-
166
 |
 |
