Samsung SCD6040 User Manual (user Manual) (English, Spanish) - Page 143
Configuración de DPOF del índice, Configuración de DPOF de tamaño de impresión, Index DPOF Setup,
 |
View all Samsung SCD6040 manuals
Add to My Manuals
Save this manual to your list of manuals |
Page 143 highlights
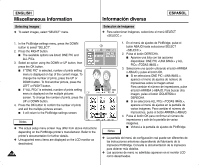
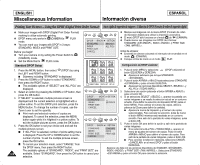
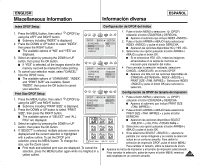
ENGLISH Miscellaneous Information Información diversa ESPAÑOL Index DPOF Setup 1. Press the MENU button, then select (DPOF) by using the LEFT and RIGHT button. I Submenu including "INDEX" is displayed. 2. Press the DOWN or UP button to select "INDEX", then press the RIGHT button. I The available options of "NO" and "YES" are displayed. 3. Select an option by pressing the DOWN or UP button, then press the OK button. I If "YES" is selected, all the images stored in the memory card will be marked for index printing. 4. To cancel your selection made, select "CANCEL" from the DPOF menu. I The available options of "STANDARD", "INDEX", and "PRINT SIZE" are available. Select "INDEX", then press the OK button to cancel your selection. Print Size DPOF Setup 1. Press the MENU button, then select (DPOF) by using the LEFT and RIGHT button. I Submenu including "PRINT SIZE" is displayed. 2. Press the DOWN or UP button to select "PRINT SIZE", then press the RIGHT button. I The available options of "SELECT" and "ALL PICs" are displayed. 3. Select an option by pressing the DOWN or UP button, then press the OK button. 4. If "SELECT" is selected, multiple pictures screen is displayed and the current selection is highlighted with a yellow outline. To set the DPOF print selection, press the MENU button. To change the size, use the Zoom Lever. I Print mark and selected print size are displayed. To cancel the selection, press the MENU button again while it is hilighted in a yellow outline. Configuración de DPOF del índice 1. Pulse el botón MENU y seleccione (DPOF) utilizando el botón IZQUIERDA y DERECHA. I Aparece el submenú que incluye INDEX . 2. Pulse el botón ARRIBA o ABAJO hasta seleccionar INDEX y pulse el botón DERECHA. I Aparecen las opciones disponibles NO y YES . 3. Seleccione una opción pulsando el botón ARRIBA o ABAJO y pulse el botón OK. I Si se selecciona YES , todas las imágenes almacenadas en la tarjeta de memoria se marcarán para impresión del índice. 4. Para cancelar la selección realizada, seleccione CANCEL en el menú DPOF. I Aparece una lista con las opciones disponibles de STANDAR , INDEX y PRINT SIZE . Seleccione INDEX y pulse el botón OK para cancelar la selección. Configuración de DPOF de tamaño de impresión 1. Pulse el botón MENU y seleccione (DPOF) utilizando el botón IZQUIERDA y DERECHA. I Aparece el submenú que incluye PRINT SIZE . 2. Pulse el botón ARRIBA o ABAJO hasta seleccionar PRINT SIZE y pulse el botón DERECHA. I Aparecen las opciones disponibles SELECT y ALL PICs . 3. Seleccione una opción pulsando el botón ARRIBA o ABAJO y pulse el botón OK. 4. Si se selecciona SELECT , aparece la pantalla con varias imágenes y se resalta la selección actual en un contorno amarillo. Para definir la selección de impresión DPOF, pulse el botón MENU. Para cambiar el tamaño, utilice la palanca de Zoom. I Aparece la marca de impresión y el tamaño de impresión seleccionado. Para cancelar la selección, pulse de nuevo el botón MENU mientras está resaltada en un contorno amarillo. 143
-
 1
1 -
2
-
3
-
4
-
5
-
6
-
7
-
8
-
9
-
10
-
11
-
12
-
13
-
14
-
15
-
16
-
17
-
18
-
19
-
20
-
21
-
22
-
23
-
24
-
25
-
26
-
27
-
28
-
29
-
30
-
31
-
32
-
33
-
34
-
35
-
36
-
37
-
38
-
39
-
40
-
41
-
42
-
43
-
44
-
45
-
46
-
47
-
48
-
49
-
50
-
51
-
52
-
53
-
54
-
55
-
56
-
57
-
58
-
59
-
60
-
61
-
62
-
63
-
64
-
65
-
66
-
67
-
68
-
69
-
70
-
71
-
72
-
73
-
74
-
75
-
76
-
77
-
78
-
79
-
80
-
81
-
82
-
83
-
84
-
85
-
86
-
87
-
88
-
89
-
90
-
91
-
92
-
93
-
94
-
95
-
96
-
97
-
98
-
99
-
100
-
101
-
102
-
103
-
104
-
105
-
106
-
107
-
108
-
109
-
110
-
111
-
112
-
113
-
114
-
115
-
116
-
117
-
118
-
119
-
120
-
121
-
122
-
123
-
124
-
125
-
126
-
127
-
128
-
129
-
130
-
131
-
132
-
133
-
134
-
135
-
136
-
137
-
 138
138 -
 139
139 -
 140
140 -
 141
141 -
 142
142 -
 143
143 -
 144
144 -
 145
145 -
 146
146 -
 147
147 -
 148
148 -
149
-
150
-
151
-
152
-
153
-
154
-
155
-
156
-
157
-
158
-
159
-
160
-
161
-
162
-
163
-
164
-
165
-
166
 |
 |
