Samsung SCD6040 User Manual (user Manual) (English, Spanish) - Page 56
Setting the Digital Image Stabiliser DIS, Ajuste del Estabilizador digital de la imagen DIS
 |
View all Samsung SCD6040 manuals
Add to My Manuals
Save this manual to your list of manuals |
Page 56 highlights
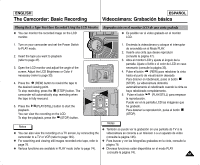
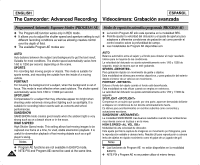
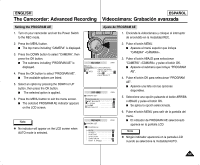
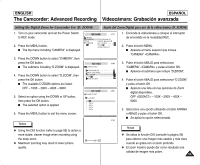
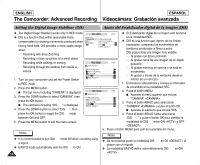
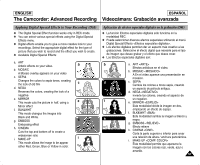
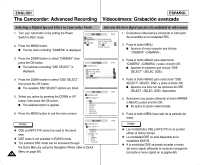
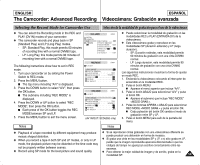
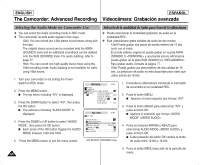
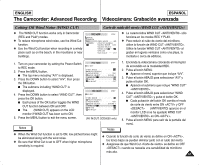
ENGLISH ESPAÑOL The Camcorder: Advanced Recording Videocámara: Grabación avanzada Setting the Digital Image Stabiliser (DIS) ✤ The Digital Image Stabiliser works only in REC mode. ✤ DIS is a function that, within reasonable limits, compensates for shaking movements produced when filming hand-held. DIS provides a more stable image when: - Recording with deep Zooming - Recording a close up picture of a small object - Recording while walking, or moving - Recording through the window, from inside a vehicle 1. Turn on your camcorder and set the Power Switch to REC mode. 2. Press the MENU button. I The top menu including "CAMERA" is displayed. 3. Press the DOWN button to select "CAMERA", then press the OK button. I The submenu including "DIS " is displayed. 4. Press the DOWN button to select "DIS ", then press the OK button to toggle the DIS mode between ON and OFF. 5. Press the MENU button to exit the menu screen. Notes ✤ It is recommended to turn DIS mode Off when recording using a tripod. ✤ EASYQ mode automatically sets the DIS to ON. 56 Ajuste del Estabilizador digital de la imagen (DIS) ✤ El Estabilizador digital de la imagen sólo funciona en la modalidad REC. ✤ DIS es una función que, dentro de los límites razonables, compensa los movimientos de temblores producidos al filmar a pulso. DIS proporciona una imagen más estable: - Al grabar con Zoom profundo. - Al grabar cerca de una imagen de un objeto pequeño. - Al grabar mientras se camina o se está en movimiento. - Al grabar a través de la ventanilla desde el interior de un vehículo. 1. Encienda la videocámara y coloque el interruptor de encendido en la modalidad REC. 2. Pulse el botón MENU. I Aparece el menú superior que incluye "CAMERA" . 3. Pulse el botón ABAJO para seleccionar "CAMERA" y pulse el botón OK. I Aparece el submenú que incluye "DIS ". 4. Pulse el botón ABAJO hasta seleccionar "DIS " y pulse el botón OK para cambiar la modalidad de DIS entre ON y OFF . 5. Pulse el botón MENU para salir de la pantalla del menú. Notas ✤ Se recomienda poner la modalidad DIS en Off al grabar con un trípode. ✤ La modalidad EASYQ define automáticamente DIS en ON .
-
 1
1 -
2
-
3
-
4
-
5
-
6
-
7
-
8
-
9
-
10
-
11
-
12
-
13
-
14
-
15
-
16
-
17
-
18
-
19
-
20
-
21
-
22
-
23
-
24
-
25
-
26
-
27
-
28
-
29
-
30
-
31
-
32
-
33
-
34
-
35
-
36
-
37
-
38
-
39
-
40
-
41
-
42
-
43
-
44
-
45
-
46
-
47
-
48
-
49
-
50
-
 51
51 -
 52
52 -
 53
53 -
 54
54 -
 55
55 -
 56
56 -
 57
57 -
 58
58 -
 59
59 -
 60
60 -
 61
61 -
62
-
63
-
64
-
65
-
66
-
67
-
68
-
69
-
70
-
71
-
72
-
73
-
74
-
75
-
76
-
77
-
78
-
79
-
80
-
81
-
82
-
83
-
84
-
85
-
86
-
87
-
88
-
89
-
90
-
91
-
92
-
93
-
94
-
95
-
96
-
97
-
98
-
99
-
100
-
101
-
102
-
103
-
104
-
105
-
106
-
107
-
108
-
109
-
110
-
111
-
112
-
113
-
114
-
115
-
116
-
117
-
118
-
119
-
120
-
121
-
122
-
123
-
124
-
125
-
126
-
127
-
128
-
129
-
130
-
131
-
132
-
133
-
134
-
135
-
136
-
137
-
138
-
139
-
140
-
141
-
142
-
143
-
144
-
145
-
146
-
147
-
148
-
149
-
150
-
151
-
152
-
153
-
154
-
155
-
156
-
157
-
158
-
159
-
160
-
161
-
162
-
163
-
164
-
165
-
166
 |
 |
