Samsung SCD6040 User Manual (user Manual) (English, Spanish) - Page 133
Customizing Your Camera - Changing the Start-Up Image, Personalización de la cámara: Cambio de
 |
View all Samsung SCD6040 manuals
Add to My Manuals
Save this manual to your list of manuals |
Page 133 highlights
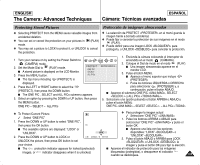
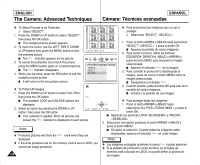
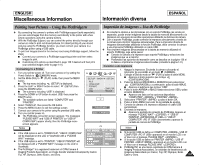
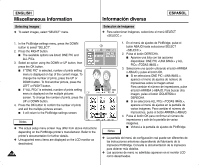
ENGLISH The Camera: Advanced Techniques ESPAÑOL Cámara: Técnicas avanzadas Customizing Your Camera - Changing the Start-Up Image ✤ This function works in (CAMERA) mode. ✤ This function changes the starting image that is displayed when the camera is turned on. ✤ You can select and resize a still image to appear as your new start-up image. Personalización de la cámara: Cambio de imagen de inicio ✤ Esta función solo está operativa en los modos (CÁMARA). ✤ Esta función cambia la imagen inicial que aparece al encender la cámara. ✤ Puede seleccionar y cambiar el tamaño de una fotografía para que aparezca como su nueva imagen de inicio. 1. Turn your camera on by setting the Power Switch to (CAMERA) mode. 2. Set the Mode Dial to any camera modes, then press the MENU button. I The top menu including the (MYCAM) is displayed. 3. Press the LEFT or RIGHT button to select press the DOWN button. (MYCAM), then 4. Press the DOWN or UP button to select START IMAGE 3. 1. Encienda la cámara colocando el interruptor de encendido en el modo (CÁMARA). 2. Coloque el Dial de modo en cualquier modo de cámara y pulse el botón MENU. I Aparece el menú superior que incluye (MI CÁMARA). 3. Pulse los botones IZQUIERDA o DERECHA para seleccionar (MYCAM ) y, a continuación, pulse el botón ABAJO. 4. Pulse el botón ARRIBA o ABAJO para seleccionar START IMAGE 3 . 5. Pulse el botón OK para guardar y salir de la pantalla del menú. 5. Press the OK button to save and exit the menu screen. Notes ✤ START IMAGE 1 and START IMAGE 2 are Samsung logo images and cannot be changed. ✤ START IMAGE 3 should be saved in "START IMAGE" size. ✤ Formatting or deleting the still picture on the memory card does not affect the start-up images. Start-up images are saved in the built-in internal memory of the Camera. Notas ✤ START IMAGE 1 y START IMAGE 2 son imágenes del logotipo de Samsung y no pueden cambiarse. ✤ START IMAGE 3 debe guardarse en el tamaño de START IMAGE . ✤ Dar formato o suprimir la fotografía en la tarjeta de memoria no afecta a las imágenes de inicio. Las imágenes de inicio se guardan en la memoria interna incorporada en la cámara. 133
-
 1
1 -
2
-
3
-
4
-
5
-
6
-
7
-
8
-
9
-
10
-
11
-
12
-
13
-
14
-
15
-
16
-
17
-
18
-
19
-
20
-
21
-
22
-
23
-
24
-
25
-
26
-
27
-
28
-
29
-
30
-
31
-
32
-
33
-
34
-
35
-
36
-
37
-
38
-
39
-
40
-
41
-
42
-
43
-
44
-
45
-
46
-
47
-
48
-
49
-
50
-
51
-
52
-
53
-
54
-
55
-
56
-
57
-
58
-
59
-
60
-
61
-
62
-
63
-
64
-
65
-
66
-
67
-
68
-
69
-
70
-
71
-
72
-
73
-
74
-
75
-
76
-
77
-
78
-
79
-
80
-
81
-
82
-
83
-
84
-
85
-
86
-
87
-
88
-
89
-
90
-
91
-
92
-
93
-
94
-
95
-
96
-
97
-
98
-
99
-
100
-
101
-
102
-
103
-
104
-
105
-
106
-
107
-
108
-
109
-
110
-
111
-
112
-
113
-
114
-
115
-
116
-
117
-
118
-
119
-
120
-
121
-
122
-
123
-
124
-
125
-
126
-
127
-
 128
128 -
 129
129 -
 130
130 -
 131
131 -
 132
132 -
 133
133 -
 134
134 -
 135
135 -
 136
136 -
 137
137 -
 138
138 -
139
-
140
-
141
-
142
-
143
-
144
-
145
-
146
-
147
-
148
-
149
-
150
-
151
-
152
-
153
-
154
-
155
-
156
-
157
-
158
-
159
-
160
-
161
-
162
-
163
-
164
-
165
-
166
 |
 |
