Samsung SCD6040 User Manual (user Manual) (English, Spanish) - Page 65
Power Nite Pix
 |
View all Samsung SCD6040 manuals
Add to My Manuals
Save this manual to your list of manuals |
Page 65 highlights
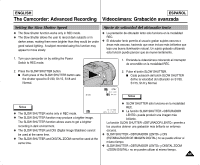
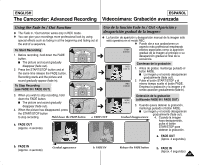
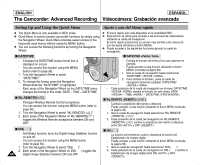
ENGLISH ESPAÑOL The Camcorder: Advanced Recording Videocámara: Grabación avanzada POWER NITE PIX POWER NITE PIX ✤ The POWER NITE PIX function works only in REC mode. ✤ With its maximum sensitivity, POWER NITE PIX enables you to make dark subjects and areas brighter. POWER NITE PIX works with the Slow Shutter function to produce ✤ La función POWER NITE PIX sólo está operativa en la modalidad REC. ✤ Con su máxima sensibilidad, POWER NITE PIX permite hacer que aparezcan más brillantes sujetos y áreas oscuros. brighter recordings under extremely dark lighting conditions. POWER NITE PIX está 1. Turn your camcorder on by setting the Power Switch to REC mode. 2. Slide the NITE PIX button to upwards. I "NITE PIX" and indicator will appear on the LCD operativa con la función del obturador lento para producir grabaciones en condiciones de iluminación extremadamente oscura. 1. Encienda la videocámara colocando el interruptor de encendido en la modalidad REC. 2. Deslice hacia adelante el botón NITE PIX. monitor. The NITE PIX message will disappear within I Aparece NITE PIX y la indicación 3 seconds. 3. Press the Slow Shutter button. I POWER NITE PIX and P the LCD monitor. indicator will appear on STBY 0 : 0 0 : 3 1 64 min en el monitor LCD. El mensaje NITE PIX desaparece transcurridos 3 segundos. 3. Pulse el botón SLOW SHUTTER. I Aparece POWER NITE PIX y la indicación P en el monitor LCD. El The POWER NITE PIX message will disappear within 3 seconds. The current shutter speed appears on the LCD monitor. Each press of the SLOW SHUTTER button toggles the mode between S1/30, S1/15, S1/8 and Normal shutter speeds. (Refer to page 63) 4. To return to NITE PIX mode, press the SLOW SHUTTER button to select normal shutter speed. I The P indicator disappears while the indicator S1/30 NITE PIX 9 : 53 AM JAN. 3 , 2 0 0 4 STBY 0 : 0 0 : 3 1 64 min mensaje POWER NITE PIX desaparece transcurridos 3 segundos. En el monitor LCD aparece la velocidad actual del obturador. Cada pulsación del botón SLOW SHUTTER cambia la modalidad entre las velocidades de obturador S1/30, S1/15, S1/8 y Normal. (Consulte la página 63). 4. Para volver a la modalidad NITE PIX , pulse el botón SLOW SHUTTER para seleccionar la velocidad de obturador normal. I El indicador P desaparece mientas el indicador permanece en el monitor LCD. remains on the LCD monitor. 5. Para salir de la modalidad NITE PIX , 5. To exit NITE PIX mode, slide the NITE PIX button downwards. deslice el botón NITE PIX hacia abajo. I Desaparece el indicador . I The indicator disappears. POWER NITE PIX Notas 9 : 53 AM Notes JAN. 3 , 2 0 0 4 ✤ NITE PIX y POWER NITE PIX sólo funcionan en la ✤ NITE PIX and POWER NITE PIX work only in the REC mode. ✤ Do not set the POWER NITE PIX to ON in bright lighting modalidad REC. ✤ No defina POWER NITE PIX en ON en condiciones de iluminación intensa. conditions. ✤ Using the POWER NITE PIX under natural lighting may affect the color balance. ✤ Use manual focusing if you have an unclear image while ✤ Al utilizar POWER NITE PIX en condiciones de iluminación natural puede afectar al balance de colores. ✤ Utilice el enfoque manual si tiene una imagen poco clara mientras utiliza la modalidad POWER NITE PIX . ✤ The maximum recording distance using Infrared light is about 9 feet (3m). ✤ POWER NITE PIX is not available in EASYQ mode. ✤ POWER NITE PIX cannot be used with Manual Exposure, White Balance, ✤ La distancia máxima de grabación usando la luz infrarroja es de unos 3 m (9 pies). ✤ La función POWER NITE PIX no está operativa en la modalidad EASYQ. ✤ POWER NITE PIX no se puede utilizar con Program AE, BLC, DSE and Digital ZOOM. Manual Exposure , White Balance , Program AE, BLC, DSE 65 y Zoom Digital.
-
 1
1 -
2
-
3
-
4
-
5
-
6
-
7
-
8
-
9
-
10
-
11
-
12
-
13
-
14
-
15
-
16
-
17
-
18
-
19
-
20
-
21
-
22
-
23
-
24
-
25
-
26
-
27
-
28
-
29
-
30
-
31
-
32
-
33
-
34
-
35
-
36
-
37
-
38
-
39
-
40
-
41
-
42
-
43
-
44
-
45
-
46
-
47
-
48
-
49
-
50
-
51
-
52
-
53
-
54
-
55
-
56
-
57
-
58
-
59
-
 60
60 -
 61
61 -
 62
62 -
 63
63 -
 64
64 -
 65
65 -
 66
66 -
 67
67 -
 68
68 -
 69
69 -
 70
70 -
71
-
72
-
73
-
74
-
75
-
76
-
77
-
78
-
79
-
80
-
81
-
82
-
83
-
84
-
85
-
86
-
87
-
88
-
89
-
90
-
91
-
92
-
93
-
94
-
95
-
96
-
97
-
98
-
99
-
100
-
101
-
102
-
103
-
104
-
105
-
106
-
107
-
108
-
109
-
110
-
111
-
112
-
113
-
114
-
115
-
116
-
117
-
118
-
119
-
120
-
121
-
122
-
123
-
124
-
125
-
126
-
127
-
128
-
129
-
130
-
131
-
132
-
133
-
134
-
135
-
136
-
137
-
138
-
139
-
140
-
141
-
142
-
143
-
144
-
145
-
146
-
147
-
148
-
149
-
150
-
151
-
152
-
153
-
154
-
155
-
156
-
157
-
158
-
159
-
160
-
161
-
162
-
163
-
164
-
165
-
166
 |
 |
