Samsung SCD6040 User Manual (user Manual) (English, Spanish) - Page 101
Visualizaci, n de una presentaci, Viewing a Slide Show
 |
View all Samsung SCD6040 manuals
Add to My Manuals
Save this manual to your list of manuals |
Page 101 highlights
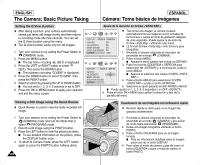
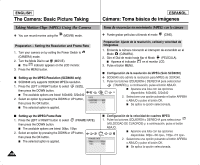
ENGLISH The Camera: Basic Picture Taking Viewing a Slide Show 1. Turn your camera on by setting the Power Switch to (CAMERA) mode. 2. Turn the Mode Dial to set to (PLAY) mode. I A stored picture is displayed on the LCD monitor. 3. Press the MENU button. I The top menu including (SLIDE) is displayed. 4. Press the LEFT or RIGHT button to select (SLIDE), then press the DOWN button. 5. Press the DOWN or UP button to select "INTERVAL", then press the RIGHT button. I The cursor is located on Interval. Select an interval between slides by pressing the UP or DOWN button. 6. Select an interval by pressing the UP or DOWN button. The available range is 01 ~ 10 seconds. 7. Press the LEFT button and then press the DOWN button to select REPEAT. 8. Press the RIGHT button and select OFF or ON. I The REPEAT option is turned OFF or ON. 9. Press the LEFT button, then press the DOWN button. I START is selected. 10. Press the OK button to start the Slide Show. To pause the Slide Show, press the (PLAY/STILL) button. To resume the Slide Show, press the (PLAY/STILL) button again. 11. To stop the Slide Show, press the OK or MENU button. Notes ✤ Loading time may vary depending on the image size. ✤ The Slide Show will start from the current picture. ✤ For motion clips, only the first frame is displayed. ✤ TIFF images are not displayed by the Slide Show. ESPAÑOL Cámara: Toma básica de imágenes Visualización de una presentación 1. Encienda la cámara colocando el interruptor de encendido en la modalidad (CÁMARA). 2. Gire el Dial de modalidad hasta fijar la modalidad PLAY. I Una imagen almacenada aparece en el monitor LCD. 3. Pulse el botón MENU. I Aparece el menú superior que incluye (DIAPOSITIVA). 4. Pulse los botones IZQUIERDA o DERECHA para seleccionar (DIAPOSITIVA) y, a continuación, pulse el botón ABAJO. EXIT:OK MOVE: 5. Pulse el botón ARRIBA o ABAJO hasta seleccionar INTERVAL y pulse el botón DERECHA. I El cursor funciona de acuerdo con el intervalo. Seleccione un intervalo entre diapositivas pulsando el botón ARRIBA o ABAJO. 6. Seleccione un intervalo el botón ARRIBA o ABAJO. El rango disponible es de 1 a 10 segundos. 7. Pulse el botón IZQUIERDA y, a continuación pulse el botón ABAJO hasta seleccionar REPEAT . 8. Pulse el botón DERECHA y seleccione OFF o ON . I La opción REPEAT cambia a ON u OFF . 9. Pulse el botón IZQUIERDA y, a continuación, pulse el botón ABAJO. I Se selecciona START . 10. Pulse el botón OK para iniciar la presentación. Para hacer una pausa en la presentación, pulse el botón (PLAY/STILL). Para reanudar la presentación, pulse de nuevo el botón (PLAY/STILL). 11. Para detener la presentación, pulse el botón OK o MENU. Notas ✤ El tiempo de carga puede variar dependiendo del tamaño de la imagen. ✤ La Presentación se iniciará a partir de la imagen actual. ✤ En las secuencias, solo aparece el primer fotograma. ✤ Las imágenes TIFF no se visualizan con la presentación. 101
-
 1
1 -
2
-
3
-
4
-
5
-
6
-
7
-
8
-
9
-
10
-
11
-
12
-
13
-
14
-
15
-
16
-
17
-
18
-
19
-
20
-
21
-
22
-
23
-
24
-
25
-
26
-
27
-
28
-
29
-
30
-
31
-
32
-
33
-
34
-
35
-
36
-
37
-
38
-
39
-
40
-
41
-
42
-
43
-
44
-
45
-
46
-
47
-
48
-
49
-
50
-
51
-
52
-
53
-
54
-
55
-
56
-
57
-
58
-
59
-
60
-
61
-
62
-
63
-
64
-
65
-
66
-
67
-
68
-
69
-
70
-
71
-
72
-
73
-
74
-
75
-
76
-
77
-
78
-
79
-
80
-
81
-
82
-
83
-
84
-
85
-
86
-
87
-
88
-
89
-
90
-
91
-
92
-
93
-
94
-
95
-
 96
96 -
 97
97 -
 98
98 -
 99
99 -
 100
100 -
 101
101 -
 102
102 -
 103
103 -
 104
104 -
 105
105 -
 106
106 -
107
-
108
-
109
-
110
-
111
-
112
-
113
-
114
-
115
-
116
-
117
-
118
-
119
-
120
-
121
-
122
-
123
-
124
-
125
-
126
-
127
-
128
-
129
-
130
-
131
-
132
-
133
-
134
-
135
-
136
-
137
-
138
-
139
-
140
-
141
-
142
-
143
-
144
-
145
-
146
-
147
-
148
-
149
-
150
-
151
-
152
-
153
-
154
-
155
-
156
-
157
-
158
-
159
-
160
-
161
-
162
-
163
-
164
-
165
-
166
 |
 |
