Samsung SCD6040 User Manual (user Manual) (English, Spanish) - Page 99
Toma y visualización de la primera foto, Taking and Viewing Your First Photo
 |
View all Samsung SCD6040 manuals
Add to My Manuals
Save this manual to your list of manuals |
Page 99 highlights
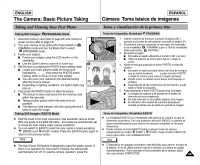
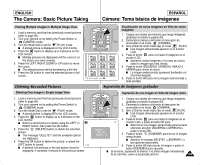
ENGLISH The Camera: Basic Picture Taking ESPAÑOL Cámara: Toma básica de imágenes Taking and Viewing Your First Photo Toma y visualización de la primera foto Taking Still Images: (PROGRAM) Mode 1. Insert the memory card (refer to page 83) and connect a power source (refer to page 27). 2. Turn your camera on by setting the Power Switch to (CAMERA) mode and turn the Mode Dial to select (PROGRAM) mode. 3. Frame your subject. I Frame your subject using the LCD monitor or the viewfinder. I Use the Zoom Lever to zoom in or zoom out. 4. Set the focus by pressing the PHOTO button halfway down. I Locate your main subject inside the focus area indicated by , then press the PHOTO button halfway down to focus on your main subject. I You can move your camera to the desired framing after the focus is locked. I Depending on lighting conditions, the built-in flash may pop up. 5. Fully press the PHOTO button to take the picture. I The picture is taken and saved into the memory card within few seconds. I Taking another picture within this interval is not possible. I The Memory Card indicator will blink during the time it takes to save the image. Taking Still Images: EASYQ Mode ✤ EASYQ mode is the most convenient, fully automatic camera mode. With one press of the EASYQ button, the camera is automatically set to create the best results under various conditions. ✤ You can switch to EASYQ mode from any camera modes excepting (MOVIE) and (PLAY) modes. Press the EASYQ button again to return to the previous mode. Note ✤ The Auto Power Off feature is designed to save the battery power. If there is no operation for more than 5 minutes, the camera will automatically turn off. To resume camera operation, press the Toma de fotografías: Modalidad PROGRAM 1. Inserte la tarjeta de memoria (consulte la página 83) y conecte una fuente de alimentación (consulte la página 27). 2. Encienda la cámara colocando el interruptor de encendido en la modalidad (CÁMARA) y gire el Dial de modalidad hasta seleccionar (AUTOM.). 3. Encuadre al sujeto. I Encuadre el sujeto utilizando el monitor LCD o el visor. I Utilice la palanca de Zoom para aplicar o alejar el zoom. 2 4. Ajuste el enfoque pulsando el botón PHOTO a mitad de camino. I Encuadre el sujeto principal dentro del área de enfoque que se indica mediante y pulse el botón PHOTO a mitad de camino para enfocar el sujeto principal. I Puede mover la cámara como desee tras bloquear el enfoque. I Dependiendo de las condiciones de iluminación, puede saltar el flash incorporado. 5. Pulse totalmente el botón PHOTO para tomar la imagen. I La imagen se captura y se guarda en la tarjeta de memoria en pocos segundos. I En este intervalo no es posible capturar otra imagen. I El indicador de la tarjeta de memoria parpadeará durante el tiempo que se tarda en guardar la imagen. Toma de fotografías: Modalidad EASYQ ✤ La modalidad EASYQ es la modalidad más práctica de cámara ya que es totalmente automática. Con una pulsación del botón EASYQ, la cámara se ajusta automáticamente para obtener los mejores resultados en diversas situaciones. ✤ Puede cambiar al modo EASYQ desde cualquier modo de cámara exceptuando los modos (CINE) y (PLAY). Pulse el botón EASYQ de nuevo para volver a la modalidad anterior. Nota ✤ El dispositivo de apagado automático está diseñado para ahorrar energía de la batería. Si no se utiliza durante más de 5 minutos, la cámara se apaga automáticamente. Para reanudar el funcionamiento de la cámara, pulse otra vez el botón START/STOP. 99
-
 1
1 -
2
-
3
-
4
-
5
-
6
-
7
-
8
-
9
-
10
-
11
-
12
-
13
-
14
-
15
-
16
-
17
-
18
-
19
-
20
-
21
-
22
-
23
-
24
-
25
-
26
-
27
-
28
-
29
-
30
-
31
-
32
-
33
-
34
-
35
-
36
-
37
-
38
-
39
-
40
-
41
-
42
-
43
-
44
-
45
-
46
-
47
-
48
-
49
-
50
-
51
-
52
-
53
-
54
-
55
-
56
-
57
-
58
-
59
-
60
-
61
-
62
-
63
-
64
-
65
-
66
-
67
-
68
-
69
-
70
-
71
-
72
-
73
-
74
-
75
-
76
-
77
-
78
-
79
-
80
-
81
-
82
-
83
-
84
-
85
-
86
-
87
-
88
-
89
-
90
-
91
-
92
-
93
-
 94
94 -
 95
95 -
 96
96 -
 97
97 -
 98
98 -
 99
99 -
 100
100 -
 101
101 -
 102
102 -
 103
103 -
 104
104 -
105
-
106
-
107
-
108
-
109
-
110
-
111
-
112
-
113
-
114
-
115
-
116
-
117
-
118
-
119
-
120
-
121
-
122
-
123
-
124
-
125
-
126
-
127
-
128
-
129
-
130
-
131
-
132
-
133
-
134
-
135
-
136
-
137
-
138
-
139
-
140
-
141
-
142
-
143
-
144
-
145
-
146
-
147
-
148
-
149
-
150
-
151
-
152
-
153
-
154
-
155
-
156
-
157
-
158
-
159
-
160
-
161
-
162
-
163
-
164
-
165
-
166
 |
 |
