Samsung SCD6040 User Manual (user Manual) (English, Spanish) - Page 66
Ajuste de la exposición y la velocidad del obturador, Setting the Shutter Speed and Exposure
 |
View all Samsung SCD6040 manuals
Add to My Manuals
Save this manual to your list of manuals |
Page 66 highlights
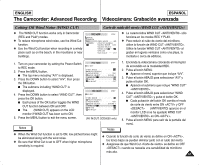
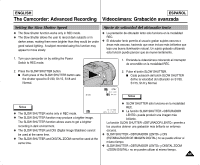
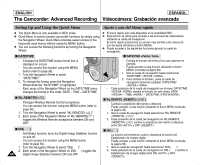
ENGLISH ESPAÑOL The Camcorder: Advanced Recording Videocámara: Grabación avanzada Setting the Shutter Speed and Exposure ✤ Shutter Speed function works only in REC mode. ✤ Adjusting the exposure and shutter speed helps the user to control the image to be recorded. Greater exposure results in a brighter image while shorter shutter speeds make the image darker. 1. Turn on your camcorder by setting the Power Switch to REC mode. 2. Turn the Navigation Wheel to select , then press the Navigation Wheel. I The Quick Menu including "SHUTTER" and "EXPOSURE" is displayed. 3. Turn the Navigation Wheel to select SHUTTER for shutter speed adjustment, or select "EXPOSURE" for exposure adjustment. I The Control Bar appears for the selected submenu. 4. Turn the Navigation Wheel for adjustment, then press the Navigation Wheel to set the adjustment. I The new value of your adjustment is applied. I Values for Shutter Speed: 1/60, 1/100, 1/250, 1/500, 1/1000, 1/2000, 1/4000, 1/10000 second I Values for Exposure: 00 ~ 29 5. Press the START/STOP button to start recording. Note that the Manual Exposure and Shutter Speed are only applied while this menu appears on the LCD monitor. 6. Turn the Navigation Wheel to select , then press the Navigation Wheel to exit the menu screen. Notes ✤ Do not frame the sun when you set the shutter speed to less than 1/1000 second. Slower shutter speeds expose the CCD to the light source and can damage the CCD. ✤ Slow shutter speed may produce discontinuous and uneven motion. ✤ Manual Exposure and Shutter Speed are not available in EASYQ mode. 66 ✤ NITE PIX and Manual Shutter Speed/Exposure cannot be applied at the same time. Ajuste de la exposición y la velocidad del obturador ✤ La función de velocidad del obturador sólo está operativa en la modalidad REC. ✤ El ajuste de la exposición y la velocidad del obturador ayuda al usuario a controlar la imagen grabada. Una mayor exposición da como resultado una imagen más brillante mientras que las velocidades de obturador más cortas hacen que la imagen aparezca más oscura. 1. Encienda la videocámara colocando el interruptor de encendido en la modalidad REC. 2. Gire la rueda de navegación hasta seleccionar y pulse la rueda de navegación. I Aparece el menú rápido con "SHUTTER" y "EXPOSURE" en pantalla. 3. Gire la rueda de navegación hasta seleccionar SHUTTER para realizar el ajuste de velocidad del obturador o seleccione "EXPOSURE" para realizar el ajuste de la exposición. I Aparece la barra de control del submenú seleccionado. 4. Gire la rueda de navegación para realizar el ajuste y pulse la rueda de navegación para definir el ajuste. I Se aplica el nuevo valor del ajuste. I Los valores para velocidad del obturador son: 1/60, 1/100, 1/250, 1/500, 1/1000, 1/2000, 1/4000, 1/10000 segundo I Valores de exposición: 00 ~ 29 5. Pulse el botón START/STOP para comenzar la grabación. Tenga en cuenta que la exposición manual y la velocidad el obturador solo se aplican mientras este menú aparece en el monitor LCD. 6. Gire la rueda de navegación hasta seleccionar y pulse la rueda de navegación para salir de la pantalla del menú. Notas ✤ No encuadre el sol cuando fije la velocidad del obturador por debajo de 1/1000 segundo. ✤ Las velocidades de obturador más lentas exponen el CCD a la fuente de luz y pueden dañarlo. ✤ La velocidad de obturador lenta puede producir movimiento discontinuo y desigual. ✤ La exposición manual y la velocidad del obturador no están disponibles en la modalidad EASYQ. ✤ NITE PIX y la velocidad de obturador y exposición manual no pueden aplicarse al mismo tiempo.
-
 1
1 -
2
-
3
-
4
-
5
-
6
-
7
-
8
-
9
-
10
-
11
-
12
-
13
-
14
-
15
-
16
-
17
-
18
-
19
-
20
-
21
-
22
-
23
-
24
-
25
-
26
-
27
-
28
-
29
-
30
-
31
-
32
-
33
-
34
-
35
-
36
-
37
-
38
-
39
-
40
-
41
-
42
-
43
-
44
-
45
-
46
-
47
-
48
-
49
-
50
-
51
-
52
-
53
-
54
-
55
-
56
-
57
-
58
-
59
-
60
-
 61
61 -
 62
62 -
 63
63 -
 64
64 -
 65
65 -
 66
66 -
 67
67 -
 68
68 -
 69
69 -
 70
70 -
 71
71 -
72
-
73
-
74
-
75
-
76
-
77
-
78
-
79
-
80
-
81
-
82
-
83
-
84
-
85
-
86
-
87
-
88
-
89
-
90
-
91
-
92
-
93
-
94
-
95
-
96
-
97
-
98
-
99
-
100
-
101
-
102
-
103
-
104
-
105
-
106
-
107
-
108
-
109
-
110
-
111
-
112
-
113
-
114
-
115
-
116
-
117
-
118
-
119
-
120
-
121
-
122
-
123
-
124
-
125
-
126
-
127
-
128
-
129
-
130
-
131
-
132
-
133
-
134
-
135
-
136
-
137
-
138
-
139
-
140
-
141
-
142
-
143
-
144
-
145
-
146
-
147
-
148
-
149
-
150
-
151
-
152
-
153
-
154
-
155
-
156
-
157
-
158
-
159
-
160
-
161
-
162
-
163
-
164
-
165
-
166
 |
 |
