Sony Ericsson P990i User Guide - Page 82
Business card scanner, Scanning cards, Processing batches of captured cards, Scanning, cards
 |
View all Sony Ericsson P990i manuals
Add to My Manuals
Save this manual to your list of manuals |
Page 82 highlights
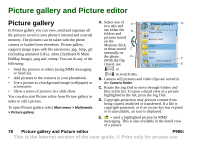
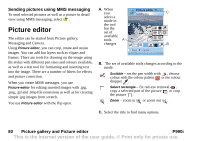
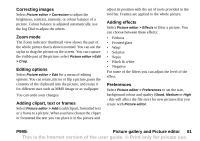
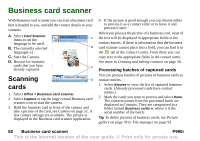
Business card scanner With Business card scanner you can scan a business card that is handed to you, and add the contact details to your contacts. A. Select Card Scanner menu to set the Card scanner ENG/CHI card A language to be used. B. The currently selected B language(-s). C. Start the Camera. D. Browse for business cards that you have already captured. C Scanning Capture Browse D cards 1. Select Office > Business card scanner. 2. Select Capture or tap the large central Business card scanner icon to start the camera. 3. Hold the business card in front of the camera and take a picture of the card, see Camera on page 51. A few camera settings are available. The picture is displayed in the Business card scanner application. 4. If the picture is good enough you can choose either to process it as a contact entry or to leave it and process it later. When you process the picture of a business card, most of the text will be displayed in appropriate fields in the contact entries. If there is information that the business card scanner cannot place into a field, you can find it in the tab of the contact's entry. From there you can copy text to the appropriate fields in the contact entry. See more in Creating and editing contacts on page 58. Processing batches of captured cards You can process batches of pictures of business cards as contact entries. 1. Select Browse to view the list of captured business cards. (Already processed cards have contact names.) 2. Mark the cards you want to process and select Done. The contacts names from the processed batch are displayed in Contacts. They are categorized in a folder named Business cards n, where n is the serial number of the batch. Tip To delete pictures of business cards, see Picture gallery on page 78 or File manager on page 93. 82 Business card scanner P990i This is the Internet version of the user guide. © Print only for private use.
-
 1
1 -
2
-
3
-
4
-
5
-
6
-
7
-
8
-
9
-
10
-
11
-
12
-
13
-
14
-
15
-
16
-
17
-
18
-
19
-
20
-
21
-
22
-
23
-
24
-
25
-
26
-
27
-
28
-
29
-
30
-
31
-
32
-
33
-
34
-
35
-
36
-
37
-
38
-
39
-
40
-
41
-
42
-
43
-
44
-
45
-
46
-
47
-
48
-
49
-
50
-
51
-
52
-
53
-
54
-
55
-
56
-
57
-
58
-
59
-
60
-
61
-
62
-
63
-
64
-
65
-
66
-
67
-
68
-
69
-
70
-
71
-
72
-
73
-
74
-
75
-
76
-
 77
77 -
 78
78 -
 79
79 -
 80
80 -
 81
81 -
 82
82 -
 83
83 -
 84
84 -
 85
85 -
 86
86 -
 87
87 -
88
-
89
-
90
-
91
-
92
-
93
-
94
-
95
-
96
-
97
-
98
-
99
-
100
-
101
-
102
-
103
-
104
-
105
-
106
-
107
-
108
-
109
-
110
-
111
-
112
-
113
-
114
-
115
-
116
-
117
-
118
-
119
-
120
-
121
-
122
-
123
-
124
-
125
-
126
-
127
-
128
-
129
-
130
-
131
-
132
-
133
-
134
-
135
-
136
-
137
-
138
-
139
-
140
-
141
-
142
-
143
-
144
-
145
-
146
-
147
-
148
-
149
-
150
-
151
-
152
 |
 |