Kyocera Ai2310 3010/2310 Instruction Handbook - Page 59
If Left Margin, Right Margin, Top Margin or Bottom Margin was
 |
View all Kyocera Ai2310 manuals
Add to My Manuals
Save this manual to your list of manuals |
Page 59 highlights
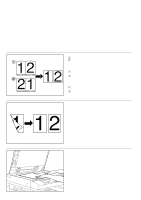
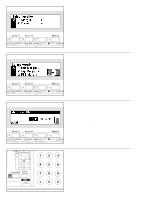
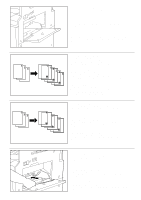
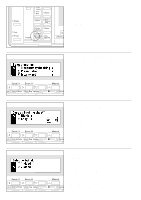
8. Check the settings for the front & back margin screen. Press the enter key if the present setting is OK. The message display will return to the "Ready to copy." screen, To change the setting, go to the next step. 8. Vérifier les réglages de l'écran de marge recto & verso. Appuyer sur la touche d'entrée si le réglage actuel est accepté. L'affichage des messages retourne à l'écran "Prêt à copier.". Pour changer le réglage, aller à l'étape suivante. 8. Verifique los ajustes para la pantalla de margen frontal y trasero. Presione la tecla de entrada si el ajuste actual está bien. El visualizador de mensajes volverá a la indicación "Lista para copiar.". Para cambiar el ajuste, vaya al siguiente paso. 9. Press the cursor down key to select "Change #", and press the enter key. The setting screen of the front side will appear. 9. Appuyer sur la touche curseur vers le bas pour sélectionner "Ch. Marge" et appuyer sur la touche d'entrée. L'écran de réglage du recto apparaît. 9. Presione de tecla de cursor abajo para seleccionar "Cambio #" y presione la tecla de entrada. Aparecerá la pantalla de ajuste para el lado frontal. 10. Press the cursor down or up key to select the margin mode for the front side. 11. Press the enter key. * If "Left Margin", "Right Margin", "Top Margin" or "Bottom Margin" was selected, go to the next step. If "No Margin" was selected, go to step 14. 10. Appuyer sur la touche curseur vers le haut ou vers le bas pour sélectionner le mode de marge du recto. 11. Appuyer sur la touche d'entrée. * Si "Marge gauche", "Marge droite", "Marge haut" ou "Marge inf." a été sélectionné, aller à l'étape suivante. Si "Sansmarge" a été sélectionné, aller à l'étape 14. 10. Presione la tecla de cursor abajo o arriba para seleccionar el modo de margen para el lado frontal. 11. Presione la tecla de entrada. * Si se seleccionó "Marg. Izq.", "Marg. derecho", "margen. Sup." o "Marg. Infe." vaya el siguiente paso. Si se seleccionó "No margen", vaya al paso 14. 12. Press the cursor right or left key to select the margin width. Select any width from 1/8", 1/4", 3/8", 1/2", 5/8" or 3/4". 13. Press the enter key. 12. Appuyer sur la touche curseur vers la droite ou vers la gauche pour sélectionner la largeur de la marge. Sélectionner n'importe quelle largeur parmi 1/8 po, 1/4 po., 3/8 po., 1/2 po., 5/8 po. et 3/4 po. 13. Appuyer sur la touche d'entrée. 12. Presione la tecla de cursor derecha o izquierda para seleccionar el ancho de margen. Seleccione cualquier ancho entre 1/8", 1/4", 3/8", 1/2", 5/8" o 3/4". 13. Presione la tecla de entrada. 54
-
 1
1 -
2
-
3
-
4
-
5
-
6
-
7
-
8
-
9
-
10
-
11
-
12
-
13
-
14
-
15
-
16
-
17
-
18
-
19
-
20
-
21
-
22
-
23
-
24
-
25
-
26
-
27
-
28
-
29
-
30
-
31
-
32
-
33
-
34
-
35
-
36
-
37
-
38
-
39
-
40
-
41
-
42
-
43
-
44
-
45
-
46
-
47
-
48
-
49
-
50
-
51
-
52
-
53
-
 54
54 -
 55
55 -
 56
56 -
 57
57 -
 58
58 -
 59
59 -
 60
60 -
 61
61 -
 62
62 -
 63
63 -
 64
64 -
65
-
66
-
67
-
68
-
69
-
70
-
71
-
72
-
73
-
74
-
75
-
76
-
77
-
78
-
79
-
80
-
81
-
82
-
83
-
84
-
85
-
86
-
87
-
88
-
89
-
90
-
91
-
92
-
93
-
94
-
95
-
96
-
97
-
98
-
99
-
100
-
101
-
102
-
103
-
104
-
105
-
106
-
107
-
108
-
109
-
110
-
111
-
112
-
113
-
114
-
115
-
116
-
117
-
118
-
119
-
120
-
121
-
122
-
123
-
124
-
125
-
126
-
127
-
128
-
129
-
130
-
131
-
132
-
133
-
134
-
135
-
136
-
137
-
138
-
139
-
140
-
141
-
142
-
143
-
144
-
145
-
146
-
147
-
148
-
149
-
150
-
151
-
152
-
153
-
154
-
155
-
156
-
157
-
158
-
159
-
160
-
161
-
162
-
163
-
164
-
165
-
166
-
167
-
168
-
169
-
170
-
171
-
172
-
173
-
174
-
175
-
176
-
177
-
178
-
179
-
180
-
181
-
182
-
183
-
184
 |
 |
