Kyocera KM-3035 Kyocera Extended Driver 4.0 User Guide Rev-2.1 - Page 104
Send a Document to the Form Box, Combine a Stored Form and another Document, Custom Quality Settings - hard drive
 |
View all Kyocera KM-3035 manuals
Add to My Manuals
Save this manual to your list of manuals |
Page 104 highlights
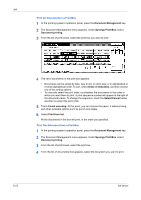
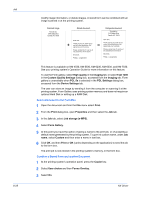
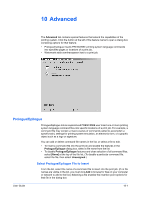
Job 8-25 modify image information, or delete images. A stored form can be combined with an image scanned in at the printing system. Scanned image Fernville Inc. 2179 Valley Drive Carville, NY, 13079 Stored document Dear Sirs, + Thank you for you order of our one-of-a-kind doohickey. We appreciate your business. Please contact me if I can be of any assistance in the future. Sincerely, Phillip J. Longshanks Composite document Fernville Inc. 2179 Valley Drive Carville, NY, 13079 Dear Sirs, Thank you for you order of our = one-of-a-kind doohickey. We appreciate your business. Please contact me if I can be of any assistance in the future. Sincerely, Phillip J. Longshanks This feature is available on KM-4530, KM-5530, KM-6230, KM-6330, and KM-7530. See your printing system's Operation Guide for more information on this feature. To use the Form gallery, select High quality in the Imaging tab; or select Fast 1200 in the Custom Quality Settings dialog box, accessed from the Imaging tab. Form gallery is unavailable when PCL 5e is selected in the PDL Settings dialog box, accessed from the Device Settings tab. The user can store an image by sending it from the computer or scanning it at the printing system. Form Gallery uses printing system memory and does not require an optional Hard Disk or setting up a RAM Disk. Send a Document to the Form Box 1 Open the document and from the File menu select Print. 1 2 From the Print dialog box, open Properties and then select the Job tab. 2 3 In the Job tab, select Job storage (e-MPS). 3 4 Select Form Gallery. 4 5 At this point you have the option of giving a name to the print job, or of accepting a default name generated by the printing system. To give it a custom name, under Job name, select Custom and then enter a name in text box. 5 6 Click OK, and then Print or OK (varies depending on the application) to send the job to the form box. 6 The print job is now stored in the printing system's memory, in the form box. Combine a Stored Form and another Document 1 At the printing system's operation panel, press the Copier key. 1 2 Select User choice and then Forms Overlay. 2 3 Select On. 3 KX Driver
-
 1
1 -
2
-
3
-
4
-
5
-
6
-
7
-
8
-
9
-
10
-
11
-
12
-
13
-
14
-
15
-
16
-
17
-
18
-
19
-
20
-
21
-
22
-
23
-
24
-
25
-
26
-
27
-
28
-
29
-
30
-
31
-
32
-
33
-
34
-
35
-
36
-
37
-
38
-
39
-
40
-
41
-
42
-
43
-
44
-
45
-
46
-
47
-
48
-
49
-
50
-
51
-
52
-
53
-
54
-
55
-
56
-
57
-
58
-
59
-
60
-
61
-
62
-
63
-
64
-
65
-
66
-
67
-
68
-
69
-
70
-
71
-
72
-
73
-
74
-
75
-
76
-
77
-
78
-
79
-
80
-
81
-
82
-
83
-
84
-
85
-
86
-
87
-
88
-
89
-
90
-
91
-
92
-
93
-
94
-
95
-
96
-
97
-
98
-
 99
99 -
 100
100 -
 101
101 -
 102
102 -
 103
103 -
 104
104 -
 105
105 -
 106
106 -
 107
107 -
 108
108 -
 109
109 -
110
-
111
-
112
-
113
-
114
-
115
-
116
-
117
-
118
-
119
-
120
-
121
-
122
-
123
-
124
-
125
-
126
-
127
 |
 |