Kyocera KM-3035 Kyocera Extended Driver 4.0 User Guide Rev-2.1 - Page 78
Transparency Interleaving, Media for Print, Properties, Compatibility, Settings
 |
View all Kyocera KM-3035 manuals
Add to My Manuals
Save this manual to your list of manuals |
Page 78 highlights
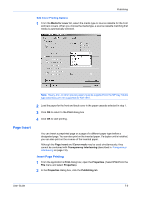
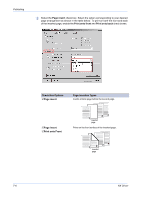
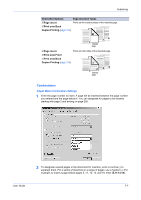
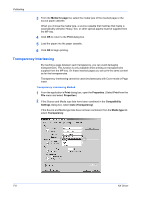
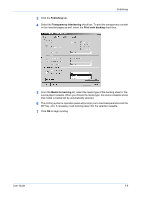
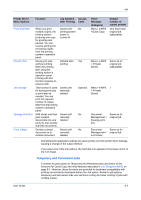
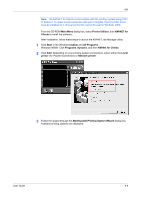
Publishing 3 From the Media for page list, select the media type of the inserted page or the source paper cassette. 3 When you choose the media type, a source cassette that matches that media is automatically selected. Heavy, thin, or other special papers must be supplied from the MP tray. 4 4 Click OK to return to the Print dialog box. 5 5 Load the paper into the paper cassette. 6 6 Click OK to begin printing. 7 Transparency Interleaving By inserting a page between each transparency, you can avoid damaging transparencies. This function is only available when printing on transparencies supplied from the MP tray. On these inserted pages you can print the same content as for the transparencies. Transparency interleaving cannot be used simultaneously with Cover mode or Page insert. Transparency Interleaving Method 1 From the application's Print dialog box, open the Properties. (Select Print from the File menu and select Properties.) 1 2 If the Source and Media type lists have been combined in the Compatibility Settings dialog box, select Auto (Transparency). 2 If the Source and Media type lists have not been combined, from the Media type list, select Transparency. 3 7-8 KX Driver
-
 1
1 -
2
-
3
-
4
-
5
-
6
-
7
-
8
-
9
-
10
-
11
-
12
-
13
-
14
-
15
-
16
-
17
-
18
-
19
-
20
-
21
-
22
-
23
-
24
-
25
-
26
-
27
-
28
-
29
-
30
-
31
-
32
-
33
-
34
-
35
-
36
-
37
-
38
-
39
-
40
-
41
-
42
-
43
-
44
-
45
-
46
-
47
-
48
-
49
-
50
-
51
-
52
-
53
-
54
-
55
-
56
-
57
-
58
-
59
-
60
-
61
-
62
-
63
-
64
-
65
-
66
-
67
-
68
-
69
-
70
-
71
-
72
-
 73
73 -
 74
74 -
 75
75 -
 76
76 -
 77
77 -
 78
78 -
 79
79 -
 80
80 -
 81
81 -
 82
82 -
 83
83 -
84
-
85
-
86
-
87
-
88
-
89
-
90
-
91
-
92
-
93
-
94
-
95
-
96
-
97
-
98
-
99
-
100
-
101
-
102
-
103
-
104
-
105
-
106
-
107
-
108
-
109
-
110
-
111
-
112
-
113
-
114
-
115
-
116
-
117
-
118
-
119
-
120
-
121
-
122
-
123
-
124
-
125
-
126
-
127
 |
 |