Kyocera KM-3035 Kyocera Extended Driver 4.0 User Guide Rev-2.1 - Page 96
Proof and Hold, Print, e-MPS >, >Quick Copy, ENTER, Delete
 |
View all Kyocera KM-3035 manuals
Add to My Manuals
Save this manual to your list of manuals |
Page 96 highlights
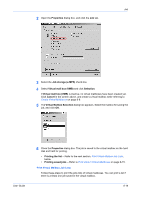
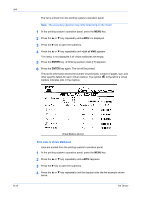
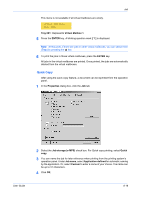
Job 5 When you Print from the application, the job will be saved to the hard disk while the specified number of copies prints. 5 For further details on printing additional copies of a Quick copy job, see below. Printing Additional Copies of Quick Copy Jobs Note: The actual key operation may differ depending on the model. 1 Press the MENU key at the printing system's operation panel. 1 2 Press the S or T key repeatedly until e-MPS > appears. 2 3 Press the X key to open the submenu. 3 4 Press the S or T key repeatedly until >Quick Copy appears. 4 5 Press the ENTER key. A blinking question mark [ ? ] displays by the user name. 5 6 If the user name is correct, press the ENTER key. Otherwise, press the S or T key until the correct name appears. 6 7 Press the ENTER key. Follow the instructions in Identification on page 2-5 to continue. 7 8 The job name appears with a blinking question mark [ ? ]. If this is the correct job for printing, press the ENTER key. 8 9 Otherwise, press the T or S key until the correct name appears. Then, press the ENTER key. 9 10 Press theT or S key to specify the number of copies. 10 11 Press the ENTER key. The Quick Copy job initially printed is printed in the specified number of copies. 11 Deleting Quick Copy Jobs 1 Refer to steps 1 through 8 in Printing Additional Copies of Quick Copy Jobs on page 8-17. 1 2 If this is the correct job for deletion, press the ENTER key. 2 3 Otherwise, press the T or S key until the correct name appears. 3 4 After the menu for specifying the number of print copies appears, press the T key once. Delete appears. 4 5 Press the ENTER key to delete the job. 5 Proof and Hold 1 Open the Job Settings dialog box as indicated in the instructions for Quick Copy on page 8-16. Select Proof and hold. 1 8-17 KX Driver
-
 1
1 -
2
-
3
-
4
-
5
-
6
-
7
-
8
-
9
-
10
-
11
-
12
-
13
-
14
-
15
-
16
-
17
-
18
-
19
-
20
-
21
-
22
-
23
-
24
-
25
-
26
-
27
-
28
-
29
-
30
-
31
-
32
-
33
-
34
-
35
-
36
-
37
-
38
-
39
-
40
-
41
-
42
-
43
-
44
-
45
-
46
-
47
-
48
-
49
-
50
-
51
-
52
-
53
-
54
-
55
-
56
-
57
-
58
-
59
-
60
-
61
-
62
-
63
-
64
-
65
-
66
-
67
-
68
-
69
-
70
-
71
-
72
-
73
-
74
-
75
-
76
-
77
-
78
-
79
-
80
-
81
-
82
-
83
-
84
-
85
-
86
-
87
-
88
-
89
-
90
-
 91
91 -
 92
92 -
 93
93 -
 94
94 -
 95
95 -
 96
96 -
 97
97 -
 98
98 -
 99
99 -
 100
100 -
 101
101 -
102
-
103
-
104
-
105
-
106
-
107
-
108
-
109
-
110
-
111
-
112
-
113
-
114
-
115
-
116
-
117
-
118
-
119
-
120
-
121
-
122
-
123
-
124
-
125
-
126
-
127
 |
 |