Kyocera KM-3035 Kyocera Extended Driver 4.0 User Guide Rev-2.1 - Page 16
Device Options, Auto Con Device Settings, Hard Disk Settings, Hard disk, Memory - driver download
 |
View all Kyocera KM-3035 manuals
Add to My Manuals
Save this manual to your list of manuals |
Page 16 highlights
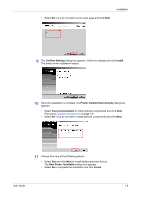
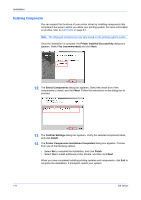
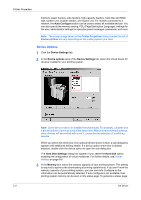
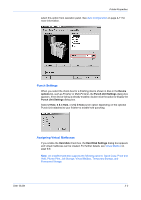
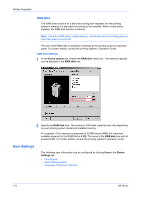
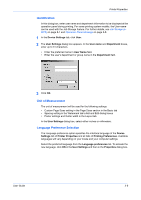
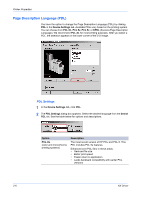
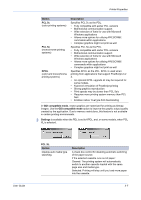
Printer Properties finishers, paper feeders, side feeders, high-capacity feeders, hard disk and RAM disk, tandem unit, booklet stitcher, and duplex unit. For models connected to a network, the Auto Configure button can be used to select all available devices. You can also specify the memory setting, PDL (Page Description Language), settings for the user, administrator settings for operation panel messages, passwords, and more. Note: The printer image shown in the Printer Properties dialog box and the list of Device options will vary depending on the printing system you have. Device Options 1 Click the Device Settings tab. 1 2 In the Device options area of the Device Settings tab, select the check boxes for devices installed in your printing system. 2 Note: Some devices cannot be installed simultaneously. For example, a finisher and a booklet stitcher cannot be used at the same time. After you have selected a device, other devices will be marked with a red X, preventing the selection of conflicting devices. When you select the check box of an optional device shown in blue, a sub-dialog box appears with additional setting details. If a device option check box is already selected, double-click the device option to open the sub-dialog box. 3 The Hard Disk Settings dialog box appears if you select the Hard disk option, enabling the configuration of virtual mailboxes. For further details, see Virtual Mailbox on page 8-8. 3 In the Memory box, select the memory capacity of your printing system. This setting is required to optimize the downloading of printing system fonts. If you don't know the memory capacity of your printing system, you can use Auto Configure so the information can be automatically selected. If auto configure is not available, then printing system memory can be seen on the status page. To generate a status page, 2-2 KX Driver
-
 1
1 -
2
-
3
-
4
-
5
-
6
-
7
-
8
-
9
-
10
-
 11
11 -
 12
12 -
 13
13 -
 14
14 -
 15
15 -
 16
16 -
 17
17 -
 18
18 -
 19
19 -
 20
20 -
 21
21 -
22
-
23
-
24
-
25
-
26
-
27
-
28
-
29
-
30
-
31
-
32
-
33
-
34
-
35
-
36
-
37
-
38
-
39
-
40
-
41
-
42
-
43
-
44
-
45
-
46
-
47
-
48
-
49
-
50
-
51
-
52
-
53
-
54
-
55
-
56
-
57
-
58
-
59
-
60
-
61
-
62
-
63
-
64
-
65
-
66
-
67
-
68
-
69
-
70
-
71
-
72
-
73
-
74
-
75
-
76
-
77
-
78
-
79
-
80
-
81
-
82
-
83
-
84
-
85
-
86
-
87
-
88
-
89
-
90
-
91
-
92
-
93
-
94
-
95
-
96
-
97
-
98
-
99
-
100
-
101
-
102
-
103
-
104
-
105
-
106
-
107
-
108
-
109
-
110
-
111
-
112
-
113
-
114
-
115
-
116
-
117
-
118
-
119
-
120
-
121
-
122
-
123
-
124
-
125
-
126
-
127
 |
 |