Kyocera KM-3035 Kyocera Extended Driver 4.0 User Guide Rev-2.1 - Page 33
Printer and Faxes, Properties, Print Size, Media type, Usable Paper Cassettes
 |
View all Kyocera KM-3035 manuals
Add to My Manuals
Save this manual to your list of manuals |
Page 33 highlights
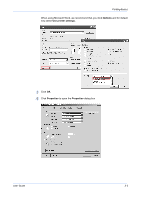
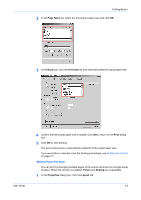
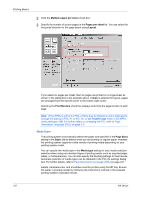
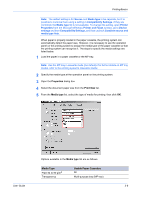
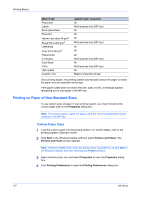
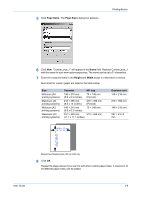
Printing Basics Note: The default setting is for Source and Media type to be separate, but it is possible to combine them using a setting in Compatibility Settings. If they are combined, the Media type list is not available. To change this setting, open Printer Properties from the Microsoft Windows Printer and Faxes window, go to Device settings and then Compatibility Settings, and then uncheck Combine source and media type lists. When paper is properly loaded in the paper cassette, the printing system can automatically detect the paper size. However, it is necessary to use the operation panel on the printing system to assign the media type of the paper cassette so that the printing system can recognize it. The steps to specify the media settings are listed below. 1 Load the paper in a paper cassette or the MP tray. 1 Note: Use the MP tray in cassette mode (the default). For further details on MP tray modes, refer to the printing system's Operation Guide. 2 Specify the media type at the operation panel on the printing system. 2 3 Open the Properties dialog box. 3 4 Select the document paper size from the Print Size list. 4 5 From the Media type list, select the type of media for printing, then click OK. 5 Options available in the Media type list are as follows. Media Type Plain 64 to 90 g/m2 Transparency Usable Paper Cassettes All Multi-purpose tray (MP tray) User Guide 3-6
-
 1
1 -
2
-
3
-
4
-
5
-
6
-
7
-
8
-
9
-
10
-
11
-
12
-
13
-
14
-
15
-
16
-
17
-
18
-
19
-
20
-
21
-
22
-
23
-
24
-
25
-
26
-
27
-
 28
28 -
 29
29 -
 30
30 -
 31
31 -
 32
32 -
 33
33 -
 34
34 -
 35
35 -
 36
36 -
 37
37 -
 38
38 -
39
-
40
-
41
-
42
-
43
-
44
-
45
-
46
-
47
-
48
-
49
-
50
-
51
-
52
-
53
-
54
-
55
-
56
-
57
-
58
-
59
-
60
-
61
-
62
-
63
-
64
-
65
-
66
-
67
-
68
-
69
-
70
-
71
-
72
-
73
-
74
-
75
-
76
-
77
-
78
-
79
-
80
-
81
-
82
-
83
-
84
-
85
-
86
-
87
-
88
-
89
-
90
-
91
-
92
-
93
-
94
-
95
-
96
-
97
-
98
-
99
-
100
-
101
-
102
-
103
-
104
-
105
-
106
-
107
-
108
-
109
-
110
-
111
-
112
-
113
-
114
-
115
-
116
-
117
-
118
-
119
-
120
-
121
-
122
-
123
-
124
-
125
-
126
-
127
 |
 |