Kyocera KM-3035 Kyocera Extended Driver 4.0 User Guide Rev-2.1 - Page 53
Using the Stapler, Punch
 |
View all Kyocera KM-3035 manuals
Add to My Manuals
Save this manual to your list of manuals |
Page 53 highlights
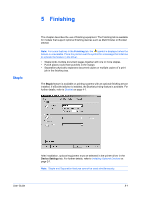
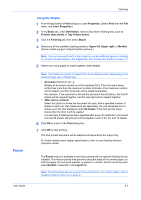
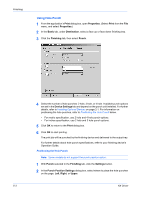
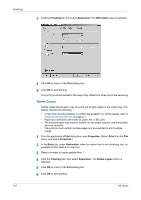
Punch User Guide Finishing Using the Stapler 1 From the application's Print dialog box, open Properties. (Select Print from the File menu, and select Properties.) 1 2 In the Basic tab, under Destination, select a face down finishing tray, such as Finisher (face down) or Tray A (face down). 2 3 Click the Finishing tab, then select Staple. 3 4 Select one of the available stapling positions: Upper left, Upper right, or Booklet. (Some models support multiple booklet positions.) 4 Note: You can increase the left or top margin to provide additional space for stapling by using the Gutter feature in the Layout tab. See Scaling And Gutters on page 4-7. 5 Select how many pages to staple together under Count: 5 Note: The maximum number of sheets that can be stapled varies, depending on the selected Page size or Media type. • All sheets (maximum of [--]) Staples all document sheets up to the displayed limit. If the document being printed has more than the maximum number of sheets, it the maximum number will be stapled, and the remainder will be stapled separately. For example, If the maximum is 50 and the document has 58 sheets, the first 50 sheets will be stapled together, and the last eight will be stapled together. • After every [--] sheets Select this option to divide the document into sets, with a specified number of sheets in each set, then staple each set separately. You can designate from 2 sheets up to the limit displayed under All sheets. If the final set has fewer sheets than the limit, it will be stapled. For example, if stapling has been specified after every 20 sheets for a document that has 58 sheets, the print job will be stapled in sets of 20, 20, and 18 sheets. 6 Click OK to return to the Print dialog box. 6 7 Click OK to start printing. 7 The final printed document will be stapled and delivered to the output tray. For further details about stapler specifications, refer to your finishing device's Operation Guide. The Punch feature is available on printing systems with an optional finishing device installed. This feature places hole punches along the edge of the printed pages, so that the pages can be bound together or placed in a binder. Punch cannot be used when Booklet is selected in the Layout tab. Note: Not all finishing devices support the punch feature. For further details, refer to Installing Optional Devices on page 2-1. 5-2
-
 1
1 -
2
-
3
-
4
-
5
-
6
-
7
-
8
-
9
-
10
-
11
-
12
-
13
-
14
-
15
-
16
-
17
-
18
-
19
-
20
-
21
-
22
-
23
-
24
-
25
-
26
-
27
-
28
-
29
-
30
-
31
-
32
-
33
-
34
-
35
-
36
-
37
-
38
-
39
-
40
-
41
-
42
-
43
-
44
-
45
-
46
-
47
-
 48
48 -
 49
49 -
 50
50 -
 51
51 -
 52
52 -
 53
53 -
 54
54 -
 55
55 -
 56
56 -
 57
57 -
 58
58 -
59
-
60
-
61
-
62
-
63
-
64
-
65
-
66
-
67
-
68
-
69
-
70
-
71
-
72
-
73
-
74
-
75
-
76
-
77
-
78
-
79
-
80
-
81
-
82
-
83
-
84
-
85
-
86
-
87
-
88
-
89
-
90
-
91
-
92
-
93
-
94
-
95
-
96
-
97
-
98
-
99
-
100
-
101
-
102
-
103
-
104
-
105
-
106
-
107
-
108
-
109
-
110
-
111
-
112
-
113
-
114
-
115
-
116
-
117
-
118
-
119
-
120
-
121
-
122
-
123
-
124
-
125
-
126
-
127
 |
 |