Kyocera KM-3035 Kyocera Extended Driver 4.0 User Guide Rev-2.1 - Page 98
Identification, Private Print, Deleting Quick Copy Jobs, ENTER
 |
View all Kyocera KM-3035 manuals
Add to My Manuals
Save this manual to your list of manuals |
Page 98 highlights
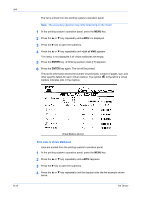
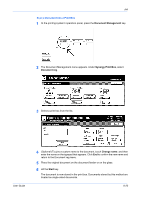
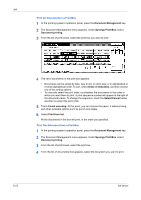
Job 5 Press the ENTER key, the user name displays with a blinking question mark [ ? ]. 5 6 If the user name is correct, press the ENTER key. Otherwise, press the S or T key until the correct name is displayed. 6 7 The job name is displayed with a blinking question mark [ ? ]. Press the ENTER key.7 8 The user name displayed is specified following the instructions in Identification on page 2-5. If this is the correct job for printing, press the ENTER key. 8 9 Otherwise, press the S or T key until the correct job name appears, then press the ENTER key. 9 10 Enter the four-digit access code created in Private Print on page 8-18. 10 11 Press the S or T key to increase or decrease the number. 11 12 Press the W or X key to move the cursor right and left. 12 13 Press the ENTER key. Use the S or T key to specify the number of copies for printing. 13 14 Press the ENTER key to start printing. 14 15 After printing, the job will be automatically deleted from the hard disk. To delete the job without printing it, follow the same procedure as in Deleting Quick Copy Jobs on page 8-17. 15 8-19 KX Driver
-
 1
1 -
2
-
3
-
4
-
5
-
6
-
7
-
8
-
9
-
10
-
11
-
12
-
13
-
14
-
15
-
16
-
17
-
18
-
19
-
20
-
21
-
22
-
23
-
24
-
25
-
26
-
27
-
28
-
29
-
30
-
31
-
32
-
33
-
34
-
35
-
36
-
37
-
38
-
39
-
40
-
41
-
42
-
43
-
44
-
45
-
46
-
47
-
48
-
49
-
50
-
51
-
52
-
53
-
54
-
55
-
56
-
57
-
58
-
59
-
60
-
61
-
62
-
63
-
64
-
65
-
66
-
67
-
68
-
69
-
70
-
71
-
72
-
73
-
74
-
75
-
76
-
77
-
78
-
79
-
80
-
81
-
82
-
83
-
84
-
85
-
86
-
87
-
88
-
89
-
90
-
91
-
92
-
 93
93 -
 94
94 -
 95
95 -
 96
96 -
 97
97 -
 98
98 -
 99
99 -
 100
100 -
 101
101 -
 102
102 -
 103
103 -
104
-
105
-
106
-
107
-
108
-
109
-
110
-
111
-
112
-
113
-
114
-
115
-
116
-
117
-
118
-
119
-
120
-
121
-
122
-
123
-
124
-
125
-
126
-
127
 |
 |