Samsung SM-G900AZ User Manual Crt S5 Sm-g900az Kit Kat English User Manual Ver - Page 188
General Email Settings, Gallery, Priority sender settings
 |
View all Samsung SM-G900AZ manuals
Add to My Manuals
Save this manual to your list of manuals |
Page 188 highlights
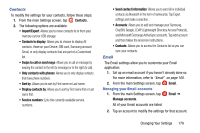
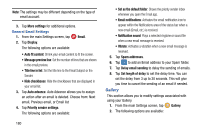
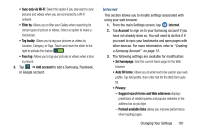
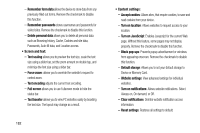
Note: The settings may be different depending on the type of email account. 3. Tap More settings for additional options. General Email Settings 1. From the main Settings screen, tap Email. 2. Tap Display. The following options are available: • Auto fit content: Shrink your email content to fit the screen. • Message preview line: Set the number of lines that are shown in the email preview. • Title line in list: Set the title line to the Email Subject or the Sender. • Hide checkboxes: Hide the checkboxes that are displayed in your email list. 3. Tap Auto advance. Auto Advance allows you to assign an action after an email is deleted. Choose from: Next email, Previous email, or Email list 4. Tap Priority sender settings. The following options are available: 180 • Set as the default folder: Shows the priority sender inbox whenever you open the Email app. • Email notifications: Activates the email notification icon to appear within the Notifications area of the status bar when a new email (Gmail, etc.) is received. • Notification sound: Plays a selected ringtone or sound file when a new email message is received. • Vibrate: Activates a vibration when a new email message is received. 5. Tap Spam addresses. 6. Tap to add an Email address to your Spam folder. 7. Tap Delay email sending to delay the sending of emails. 8. Tap Set length of delay to set the delay time. You can set the delay from 3 up to 30 seconds. This will give you time to cancel the sending of an email if needed. Gallery This section allows you to modify settings associated with using your Gallery. 1. From the main Settings screen, tap Gallery. 2. The following options are available:
-
 1
1 -
2
-
3
-
4
-
5
-
6
-
7
-
8
-
9
-
10
-
11
-
12
-
13
-
14
-
15
-
16
-
17
-
18
-
19
-
20
-
21
-
22
-
23
-
24
-
25
-
26
-
27
-
28
-
29
-
30
-
31
-
32
-
33
-
34
-
35
-
36
-
37
-
38
-
39
-
40
-
41
-
42
-
43
-
44
-
45
-
46
-
47
-
48
-
49
-
50
-
51
-
52
-
53
-
54
-
55
-
56
-
57
-
58
-
59
-
60
-
61
-
62
-
63
-
64
-
65
-
66
-
67
-
68
-
69
-
70
-
71
-
72
-
73
-
74
-
75
-
76
-
77
-
78
-
79
-
80
-
81
-
82
-
83
-
84
-
85
-
86
-
87
-
88
-
89
-
90
-
91
-
92
-
93
-
94
-
95
-
96
-
97
-
98
-
99
-
100
-
101
-
102
-
103
-
104
-
105
-
106
-
107
-
108
-
109
-
110
-
111
-
112
-
113
-
114
-
115
-
116
-
117
-
118
-
119
-
120
-
121
-
122
-
123
-
124
-
125
-
126
-
127
-
128
-
129
-
130
-
131
-
132
-
133
-
134
-
135
-
136
-
137
-
138
-
139
-
140
-
141
-
142
-
143
-
144
-
145
-
146
-
147
-
148
-
149
-
150
-
151
-
152
-
153
-
154
-
155
-
156
-
157
-
158
-
159
-
160
-
161
-
162
-
163
-
164
-
165
-
166
-
167
-
168
-
169
-
170
-
171
-
172
-
173
-
174
-
175
-
176
-
177
-
178
-
179
-
180
-
181
-
182
-
 183
183 -
 184
184 -
 185
185 -
 186
186 -
 187
187 -
 188
188 -
 189
189 -
 190
190 -
 191
191 -
 192
192 -
 193
193 -
194
-
195
-
196
-
197
-
198
-
199
-
200
 |
 |