Samsung SM-G900AZ User Manual Crt S5 Sm-g900az Kit Kat English User Manual Ver - Page 74
Removing a Contact From a Group, Creating a New Group, Contacts, Groups, Remove from group
 |
View all Samsung SM-G900AZ manuals
Add to My Manuals
Save this manual to your list of manuals |
Page 74 highlights
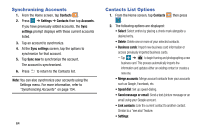
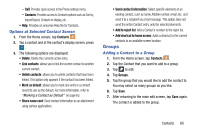
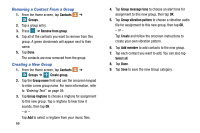
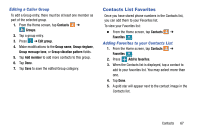
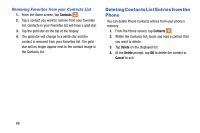
Removing a Contact From a Group 1. From the Home screen, tap Contacts ➔ Groups. 2. Tap a group entry. 3. Press ➔ Remove from group. 4. Tap all of the contacts you want to remove from this group. A green checkmark will appear next to their name. 5. Tap Done. The contacts are now removed from the group. Creating a New Group 1. From the Home screen, tap Contacts ➔ Groups ➔ Create group. 2. Tap the Group name field and use the onscreen keypad to enter a new group name. For more information, refer to "Entering Text" on page 39. 3. Tap Group ringtone to choose a ringtone for assignment to this new group. Tap a ringtone to hear how it sounds, then tap OK. - or - Tap Add to select a ringtone from your music files. 66 4. Tap Group message tone to choose an alert tone for assignment to this new group, then tap OK. 5. Tap Group vibration pattern to choose a vibration audio file for assignment to this new group, then tap OK. - or - Tap Create and follow the onscreen instructions to create your own vibration pattern. 6. Tap Add member to add contacts to the new group. 7. Tap each contact you want to add. You can also tap Select all. 8. Tap Done. 9. Tap Save to save the new Group category.
-
 1
1 -
2
-
3
-
4
-
5
-
6
-
7
-
8
-
9
-
10
-
11
-
12
-
13
-
14
-
15
-
16
-
17
-
18
-
19
-
20
-
21
-
22
-
23
-
24
-
25
-
26
-
27
-
28
-
29
-
30
-
31
-
32
-
33
-
34
-
35
-
36
-
37
-
38
-
39
-
40
-
41
-
42
-
43
-
44
-
45
-
46
-
47
-
48
-
49
-
50
-
51
-
52
-
53
-
54
-
55
-
56
-
57
-
58
-
59
-
60
-
61
-
62
-
63
-
64
-
65
-
66
-
67
-
68
-
 69
69 -
 70
70 -
 71
71 -
 72
72 -
 73
73 -
 74
74 -
 75
75 -
 76
76 -
 77
77 -
 78
78 -
 79
79 -
80
-
81
-
82
-
83
-
84
-
85
-
86
-
87
-
88
-
89
-
90
-
91
-
92
-
93
-
94
-
95
-
96
-
97
-
98
-
99
-
100
-
101
-
102
-
103
-
104
-
105
-
106
-
107
-
108
-
109
-
110
-
111
-
112
-
113
-
114
-
115
-
116
-
117
-
118
-
119
-
120
-
121
-
122
-
123
-
124
-
125
-
126
-
127
-
128
-
129
-
130
-
131
-
132
-
133
-
134
-
135
-
136
-
137
-
138
-
139
-
140
-
141
-
142
-
143
-
144
-
145
-
146
-
147
-
148
-
149
-
150
-
151
-
152
-
153
-
154
-
155
-
156
-
157
-
158
-
159
-
160
-
161
-
162
-
163
-
164
-
165
-
166
-
167
-
168
-
169
-
170
-
171
-
172
-
173
-
174
-
175
-
176
-
177
-
178
-
179
-
180
-
181
-
182
-
183
-
184
-
185
-
186
-
187
-
188
-
189
-
190
-
191
-
192
-
193
-
194
-
195
-
196
-
197
-
198
-
199
-
200
 |
 |