Samsung SPH-M800 User Manual (user Manual) (ver.f10) (English) - Page 170
B. Web and Data: Sprint Power Vision, Microsoft Exchange Server. This information can
 |
UPC - 635753475593
View all Samsung SPH-M800 manuals
Add to My Manuals
Save this manual to your list of manuals |
Page 170 highlights
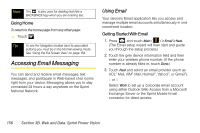
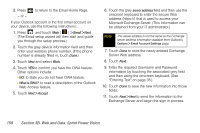
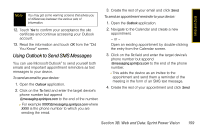
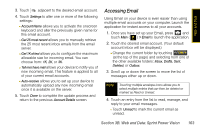
2. Press - or - to return to the Email Home Page. If your Outlook account is the first email account on your device, use the following instructions: 1. Press and touch Main ( ) > Email > Next. (The Email setup wizard will then start and guide you through the setup process.) 2. Touch the grey device information field and then enter your wireless phone number. (If the phone number is already filled in, touch Done.) 3. Touch Next and select Work. 4. Touch YES to confirm you have the OWA feature. Other options include: Ⅲ NO: to state you do not have OWA feature. Ⅲ What is OWA?: to read a description of the Outlook Web Access feature. 5. Touch Next > Accept. 6. Touch the grey server address field and then use the onscreen keyboard to enter the secure Web address (https://) that is used to access your Microsoft Exchange Server. (This information can be obtained from your IT administrator.) Note This server address is not the same as the Exchange server address information available from Outlook's Options > Email Account Settings page. 7. Touch Done to store the newly entered Exchange Server Web address. 8. Touch Next. 9. Enter the required Username and Password information by touching the associated grey field and then using the onscreen keyboard. (See "Entering Text" on page 35.) 10. Touch Done to save the new information into those fields. 11. Touch Next > Next to send the information to the Exchange Server and begin the sign in process. 158 Section 3B. Web and Data: Sprint Power Vision
-
 1
1 -
2
-
3
-
4
-
5
-
6
-
7
-
8
-
9
-
10
-
11
-
12
-
13
-
14
-
15
-
16
-
17
-
18
-
19
-
20
-
21
-
22
-
23
-
24
-
25
-
26
-
27
-
28
-
29
-
30
-
31
-
32
-
33
-
34
-
35
-
36
-
37
-
38
-
39
-
40
-
41
-
42
-
43
-
44
-
45
-
46
-
47
-
48
-
49
-
50
-
51
-
52
-
53
-
54
-
55
-
56
-
57
-
58
-
59
-
60
-
61
-
62
-
63
-
64
-
65
-
66
-
67
-
68
-
69
-
70
-
71
-
72
-
73
-
74
-
75
-
76
-
77
-
78
-
79
-
80
-
81
-
82
-
83
-
84
-
85
-
86
-
87
-
88
-
89
-
90
-
91
-
92
-
93
-
94
-
95
-
96
-
97
-
98
-
99
-
100
-
101
-
102
-
103
-
104
-
105
-
106
-
107
-
108
-
109
-
110
-
111
-
112
-
113
-
114
-
115
-
116
-
117
-
118
-
119
-
120
-
121
-
122
-
123
-
124
-
125
-
126
-
127
-
128
-
129
-
130
-
131
-
132
-
133
-
134
-
135
-
136
-
137
-
138
-
139
-
140
-
141
-
142
-
143
-
144
-
145
-
146
-
147
-
148
-
149
-
150
-
151
-
152
-
153
-
154
-
155
-
156
-
157
-
158
-
159
-
160
-
161
-
162
-
163
-
164
-
 165
165 -
 166
166 -
 167
167 -
 168
168 -
 169
169 -
 170
170 -
 171
171 -
 172
172 -
 173
173 -
 174
174 -
 175
175 -
176
-
177
-
178
-
179
-
180
-
181
-
182
-
183
-
184
-
185
-
186
-
187
-
188
-
189
-
190
-
191
-
192
-
193
-
194
-
195
-
196
-
197
-
198
-
199
-
200
-
201
-
202
-
203
-
204
-
205
-
206
-
207
-
208
-
209
-
210
-
211
-
212
-
213
-
214
-
215
-
216
-
217
-
218
-
219
-
220
-
221
-
222
-
223
-
224
-
225
-
226
-
227
-
228
-
229
-
230
-
231
-
232
-
233
-
234
-
235
-
236
-
237
-
238
-
239
-
240
-
241
-
242
 |
 |