Samsung SPH-M800 User Manual (user Manual) (ver.f10) (English) - Page 25
Key Functions, A. Device Basics - parts
 |
UPC - 635753475593
View all Samsung SPH-M800 manuals
Add to My Manuals
Save this manual to your list of manuals |
Page 25 highlights
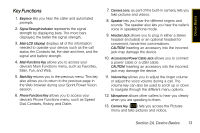
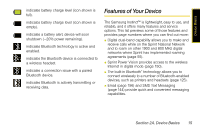
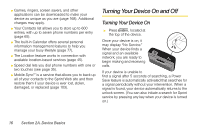
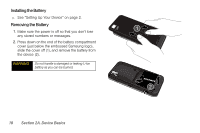
Device Basics Key Functions 1. Earpiece lets you hear the caller and automated prompts. 2. Signal Strength Indicator represents the signal strength by displaying bars. The more bars displayed, the better the signal strength. 3. Main LCD (display) displays all of the information needed to operate your device, such as the call status, the Contacts list, the date and time, and the signal and battery strength. 4. Main Functions Key allows you to access your device's Main Functions menu, such as Favorites, Main, Fun, and Web. 5. Back Key returns you to the previous menu. This key also allows you to return to the previous page in the Web browser during your Sprint Power Vision session. 6. Phone Functions Key allows you to access your device's Phone Functions menu, such as Speed Dial, Contacts, History, and Dialer. 7. Camera Lens, as part of the built-in camera, lets you take pictures and videos. 8. Speaker lets you hear the different ringers and sounds. The speaker also lets you hear the caller's voice in speakerphone mode. 9. Headset Jack allows you to plug in either a stereo headset (included) or an optional headset for convenient, hands-free conversations. CAUTION! Inserting an accessory into the incorrect jack may damage the device. 10. Accessories/Power Cable Jack allows you to connect a power cable or a USB cable. CAUTION! Inserting an accessory into the incorrect jack may damage the device. 11. Volume Key allows you to adjust the ringer volume or adjust the voice volume during a call. The volume key can also be used to scroll up or down to navigate through the different menu options. 12. Microphone allows other callers to hear you clearly when you are speaking to them. 13. Camera Key ( ) lets you access the Pictures menu and take pictures and videos. Section 2A. Device Basics 13
-
 1
1 -
2
-
3
-
4
-
5
-
6
-
7
-
8
-
9
-
10
-
11
-
12
-
13
-
14
-
15
-
16
-
17
-
18
-
19
-
 20
20 -
 21
21 -
 22
22 -
 23
23 -
 24
24 -
 25
25 -
 26
26 -
 27
27 -
 28
28 -
 29
29 -
 30
30 -
31
-
32
-
33
-
34
-
35
-
36
-
37
-
38
-
39
-
40
-
41
-
42
-
43
-
44
-
45
-
46
-
47
-
48
-
49
-
50
-
51
-
52
-
53
-
54
-
55
-
56
-
57
-
58
-
59
-
60
-
61
-
62
-
63
-
64
-
65
-
66
-
67
-
68
-
69
-
70
-
71
-
72
-
73
-
74
-
75
-
76
-
77
-
78
-
79
-
80
-
81
-
82
-
83
-
84
-
85
-
86
-
87
-
88
-
89
-
90
-
91
-
92
-
93
-
94
-
95
-
96
-
97
-
98
-
99
-
100
-
101
-
102
-
103
-
104
-
105
-
106
-
107
-
108
-
109
-
110
-
111
-
112
-
113
-
114
-
115
-
116
-
117
-
118
-
119
-
120
-
121
-
122
-
123
-
124
-
125
-
126
-
127
-
128
-
129
-
130
-
131
-
132
-
133
-
134
-
135
-
136
-
137
-
138
-
139
-
140
-
141
-
142
-
143
-
144
-
145
-
146
-
147
-
148
-
149
-
150
-
151
-
152
-
153
-
154
-
155
-
156
-
157
-
158
-
159
-
160
-
161
-
162
-
163
-
164
-
165
-
166
-
167
-
168
-
169
-
170
-
171
-
172
-
173
-
174
-
175
-
176
-
177
-
178
-
179
-
180
-
181
-
182
-
183
-
184
-
185
-
186
-
187
-
188
-
189
-
190
-
191
-
192
-
193
-
194
-
195
-
196
-
197
-
198
-
199
-
200
-
201
-
202
-
203
-
204
-
205
-
206
-
207
-
208
-
209
-
210
-
211
-
212
-
213
-
214
-
215
-
216
-
217
-
218
-
219
-
220
-
221
-
222
-
223
-
224
-
225
-
226
-
227
-
228
-
229
-
230
-
231
-
232
-
233
-
234
-
235
-
236
-
237
-
238
-
239
-
240
-
241
-
242
 |
 |