Samsung SPH-M800 User Manual (user Manual) (ver.f10) (English) - Page 176
Creating a New Email Message, Reply/Fwd, Reply, Reply All, Forward, Email, Recent, Contacts
 |
UPC - 635753475593
View all Samsung SPH-M800 manuals
Add to My Manuals
Save this manual to your list of manuals |
Page 176 highlights
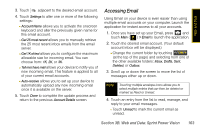
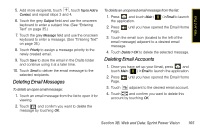
Ⅲ Touch Reply/Fwd to respond to the current sender's email by creating a new email message. Choose one of the following options: ● Reply to respond only to the originator. ● Reply All to respond to all recipients of the selected email. ● Forward to send the current email to another recipient. Creating a New Email Message 1. Once you have set up your Email, press and touch Main ( ) > Email to launch the application. (The most recently accessed account inbox will be displayed.) Tip To go to another configured email account, touch the envelope icon to the left of the current account name to display the Email Home Page, and then touch the account you wish to access. 2. Touch to begin creating a new email message. 3. Touch the To field and select the entry method you prefer by touching an associated option: Ⅲ Recent to select a recipient from a list of recent email contacts. Ⅲ Contacts to use the Power Search tab (shown here) to select a recipient from your Contacts (qualifying Contacts entries must contain either a wireless phone number or an email address). Power Search Tab Ⅲ Search to use a few characters to search through your email account's online Address Book for a matching Contact entry. Ⅲ Manual to manually enter an email address by using the onscreen keyboard to enter the recipient's email address. Touch Done to save the entry. 4. Touch Add to insert the new recipient. 164 Section 3B. Web and Data: Sprint Power Vision
-
 1
1 -
2
-
3
-
4
-
5
-
6
-
7
-
8
-
9
-
10
-
11
-
12
-
13
-
14
-
15
-
16
-
17
-
18
-
19
-
20
-
21
-
22
-
23
-
24
-
25
-
26
-
27
-
28
-
29
-
30
-
31
-
32
-
33
-
34
-
35
-
36
-
37
-
38
-
39
-
40
-
41
-
42
-
43
-
44
-
45
-
46
-
47
-
48
-
49
-
50
-
51
-
52
-
53
-
54
-
55
-
56
-
57
-
58
-
59
-
60
-
61
-
62
-
63
-
64
-
65
-
66
-
67
-
68
-
69
-
70
-
71
-
72
-
73
-
74
-
75
-
76
-
77
-
78
-
79
-
80
-
81
-
82
-
83
-
84
-
85
-
86
-
87
-
88
-
89
-
90
-
91
-
92
-
93
-
94
-
95
-
96
-
97
-
98
-
99
-
100
-
101
-
102
-
103
-
104
-
105
-
106
-
107
-
108
-
109
-
110
-
111
-
112
-
113
-
114
-
115
-
116
-
117
-
118
-
119
-
120
-
121
-
122
-
123
-
124
-
125
-
126
-
127
-
128
-
129
-
130
-
131
-
132
-
133
-
134
-
135
-
136
-
137
-
138
-
139
-
140
-
141
-
142
-
143
-
144
-
145
-
146
-
147
-
148
-
149
-
150
-
151
-
152
-
153
-
154
-
155
-
156
-
157
-
158
-
159
-
160
-
161
-
162
-
163
-
164
-
165
-
166
-
167
-
168
-
169
-
170
-
 171
171 -
 172
172 -
 173
173 -
 174
174 -
 175
175 -
 176
176 -
 177
177 -
 178
178 -
 179
179 -
 180
180 -
 181
181 -
182
-
183
-
184
-
185
-
186
-
187
-
188
-
189
-
190
-
191
-
192
-
193
-
194
-
195
-
196
-
197
-
198
-
199
-
200
-
201
-
202
-
203
-
204
-
205
-
206
-
207
-
208
-
209
-
210
-
211
-
212
-
213
-
214
-
215
-
216
-
217
-
218
-
219
-
220
-
221
-
222
-
223
-
224
-
225
-
226
-
227
-
228
-
229
-
230
-
231
-
232
-
233
-
234
-
235
-
236
-
237
-
238
-
239
-
240
-
241
-
242
 |
 |
