Canon MultiPASS C635 User Manual - Page 110
How ScanTastic Calculates Resolution, Setting Resolution Manually, Output Device, Image Type, Line Art
 |
View all Canon MultiPASS C635 manuals
Add to My Manuals
Save this manual to your list of manuals |
Page 110 highlights
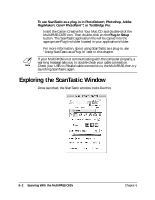
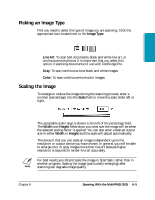
How ScanTastic Calculates Resolution ScanTastic will generate a different resolution based on your selection of Output Device and Image Type. When you choose Line Art, ScanTastic uses the number in the Res field. When you choose Color or Grayscale, ScanTastic uses a resolution most appropriate to the halftone capability of your Output Device. N Because halftone cells inherently limit the perceived resolution of a scanned image, there is no reason to scan an image at a higher than 1.5 times the line screen frequency of your final output. Keep in mind that the higher resolution scan you acquire, the more memory, disk space and processing time will be required to work with the scan. N The Monitor icon in the left most position of the panel behaves somewhat differently than the others in the group. This icon has no halftone calculation. This means it will always use the value supplied in the Res field for reference. Setting Resolution Manually To provide the most flexible scanning environment, you can override the device panel setting and choose your own resolution. 1. Click the check box next to the label Manual. 2. Slide the handle to the left to lower the resolution or to the right to increase the resolution. The number above the slider indicates the resolution you have set. You can also enter a number by typing directly into the field. The available resolution is tied to the value in the Scale field. Always scale the image, as described in the following section, before changing the resolution. 6-4 Scanning With the MultiPASS C635 Chapter 6
-
 1
1 -
2
-
3
-
4
-
5
-
6
-
7
-
8
-
9
-
10
-
11
-
12
-
13
-
14
-
15
-
16
-
17
-
18
-
19
-
20
-
21
-
22
-
23
-
24
-
25
-
26
-
27
-
28
-
29
-
30
-
31
-
32
-
33
-
34
-
35
-
36
-
37
-
38
-
39
-
40
-
41
-
42
-
43
-
44
-
45
-
46
-
47
-
48
-
49
-
50
-
51
-
52
-
53
-
54
-
55
-
56
-
57
-
58
-
59
-
60
-
61
-
62
-
63
-
64
-
65
-
66
-
67
-
68
-
69
-
70
-
71
-
72
-
73
-
74
-
75
-
76
-
77
-
78
-
79
-
80
-
81
-
82
-
83
-
84
-
85
-
86
-
87
-
88
-
89
-
90
-
91
-
92
-
93
-
94
-
95
-
96
-
97
-
98
-
99
-
100
-
101
-
102
-
103
-
104
-
 105
105 -
 106
106 -
 107
107 -
 108
108 -
 109
109 -
 110
110 -
 111
111 -
 112
112 -
 113
113 -
 114
114 -
 115
115 -
116
-
117
-
118
-
119
-
120
-
121
-
122
-
123
-
124
-
125
-
126
-
127
-
128
-
129
-
130
-
131
-
132
-
133
-
134
-
135
-
136
-
137
-
138
-
139
-
140
-
141
-
142
-
143
-
144
-
145
-
146
-
147
-
148
-
149
-
150
-
151
-
152
-
153
-
154
-
155
-
156
-
157
-
158
-
159
-
160
-
161
-
162
-
163
-
164
-
165
-
166
-
167
-
168
-
169
-
170
-
171
-
172
-
173
-
174
-
175
-
176
-
177
-
178
-
179
-
180
-
181
-
182
-
183
-
184
-
185
-
186
-
187
-
188
-
189
-
190
-
191
-
192
-
193
-
194
-
195
-
196
-
197
-
198
-
199
-
200
-
201
-
202
-
203
-
204
-
205
-
206
-
207
-
208
-
209
-
210
-
211
-
212
-
213
-
214
-
215
-
216
 |
 |
