Canon MultiPASS C635 User Manual - Page 123
Using Auto Balance, Resetting the Tone Curve, Adjusting the Tint
 |
View all Canon MultiPASS C635 manuals
Add to My Manuals
Save this manual to your list of manuals |
Page 123 highlights
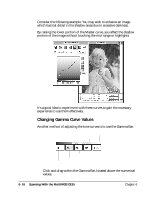
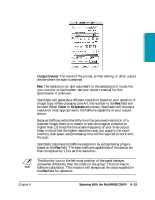
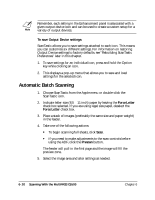
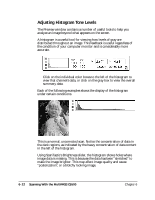
Scanning ❍ As you move right and left, the gamma increases or decreases in value. The tone curve is automatically modified as you adjust the gamma. ❍ As you drag, a gamma value will appear in the upper left corner of the tone curve. With each modification of the tone curve or gamma, the adjusted representation of your image will be updated to reflect the changes. Resetting the Tone Curve To reset a tone curve, select a curve and click the Reset button. Adjusting the Tint The Tint Adjustment tool allows you to adjust the color cast of your image in much the same way you would adjust the color on a television set. ❍ Drag the sliders to the left to decrease or the right to increase the Red, Green, or Blue tint of your image. The numeric values to the right reflect the position of the slider. Using Auto Balance The Auto Balance function alters the tonal balance of the image by stretching the contrast, or dynamic range, of each color channel between the whitest and blackest point of your image or selected area. Because all scanners compress image data, images have less dynamic range between light and dark (blacks are not as black as they should be and whites are not so white). The auto balance function attempts to adjust the contrast of the image to its best potential. The automatic functions are: ❍ The Entire Image button is designed to balance the image based on the entire visible preview. This is a very rapid method for image balance. ❍ The Current Selection button bases the balance factor for the entire image on the area you have selected with the Selection Rectangle. Chapter 6 Scanning With the MultiPASS C5500 6-17
-
 1
1 -
2
-
3
-
4
-
5
-
6
-
7
-
8
-
9
-
10
-
11
-
12
-
13
-
14
-
15
-
16
-
17
-
18
-
19
-
20
-
21
-
22
-
23
-
24
-
25
-
26
-
27
-
28
-
29
-
30
-
31
-
32
-
33
-
34
-
35
-
36
-
37
-
38
-
39
-
40
-
41
-
42
-
43
-
44
-
45
-
46
-
47
-
48
-
49
-
50
-
51
-
52
-
53
-
54
-
55
-
56
-
57
-
58
-
59
-
60
-
61
-
62
-
63
-
64
-
65
-
66
-
67
-
68
-
69
-
70
-
71
-
72
-
73
-
74
-
75
-
76
-
77
-
78
-
79
-
80
-
81
-
82
-
83
-
84
-
85
-
86
-
87
-
88
-
89
-
90
-
91
-
92
-
93
-
94
-
95
-
96
-
97
-
98
-
99
-
100
-
101
-
102
-
103
-
104
-
105
-
106
-
107
-
108
-
109
-
110
-
111
-
112
-
113
-
114
-
115
-
116
-
117
-
 118
118 -
 119
119 -
 120
120 -
 121
121 -
 122
122 -
 123
123 -
 124
124 -
 125
125 -
 126
126 -
 127
127 -
 128
128 -
129
-
130
-
131
-
132
-
133
-
134
-
135
-
136
-
137
-
138
-
139
-
140
-
141
-
142
-
143
-
144
-
145
-
146
-
147
-
148
-
149
-
150
-
151
-
152
-
153
-
154
-
155
-
156
-
157
-
158
-
159
-
160
-
161
-
162
-
163
-
164
-
165
-
166
-
167
-
168
-
169
-
170
-
171
-
172
-
173
-
174
-
175
-
176
-
177
-
178
-
179
-
180
-
181
-
182
-
183
-
184
-
185
-
186
-
187
-
188
-
189
-
190
-
191
-
192
-
193
-
194
-
195
-
196
-
197
-
198
-
199
-
200
-
201
-
202
-
203
-
204
-
205
-
206
-
207
-
208
-
209
-
210
-
211
-
212
-
213
-
214
-
215
-
216
 |
 |
