Canon MultiPASS C635 User Manual - Page 117
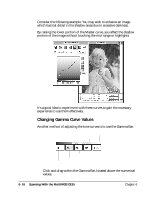
Hilite Eye Dropper, Shadow Eye Dropper, Reset, The standard Color Wheel appears.
 |
View all Canon MultiPASS C635 manuals
Add to My Manuals
Save this manual to your list of manuals |
Page 117 highlights
Scanning There may be times that you wish to "blow out" or "plug" a portion of the image for effect. An example of this would be a photograph of a piece of jewelry that contains bright reflections. These reflections are referred to as "spectral highlights" and are usually brighter than any other portion of the image. ❍ Click the Hilite Eye Dropper and then click on a part of the image that is supposed to be pure white to extend the contrast of the image to the desired level. ❍ Click the Shadow Eye Dropper to set the darkest point of the image in the same manner as above. ❍ Click the Mid-Tone Eye Dropper on an area of the image that is as close to neutral gray as possible. If you make a mistake with these tools, simply repeat the process until you are satisfied with the results. ❍ Click the Reset button to undo your changes. ❍ To manually set the balance points, click in the color boxes beneath the eye dropper. The standard Color Wheel appears. ❍ Click and drag around the wheel to set the desired hue and saturation and slide the scroll bar to set the appropriate brightness. Repeat the above procedure to manually set the mid-tone and black points. Chapter 6 Scanning With the MultiPASS C635 6-11
-
 1
1 -
2
-
3
-
4
-
5
-
6
-
7
-
8
-
9
-
10
-
11
-
12
-
13
-
14
-
15
-
16
-
17
-
18
-
19
-
20
-
21
-
22
-
23
-
24
-
25
-
26
-
27
-
28
-
29
-
30
-
31
-
32
-
33
-
34
-
35
-
36
-
37
-
38
-
39
-
40
-
41
-
42
-
43
-
44
-
45
-
46
-
47
-
48
-
49
-
50
-
51
-
52
-
53
-
54
-
55
-
56
-
57
-
58
-
59
-
60
-
61
-
62
-
63
-
64
-
65
-
66
-
67
-
68
-
69
-
70
-
71
-
72
-
73
-
74
-
75
-
76
-
77
-
78
-
79
-
80
-
81
-
82
-
83
-
84
-
85
-
86
-
87
-
88
-
89
-
90
-
91
-
92
-
93
-
94
-
95
-
96
-
97
-
98
-
99
-
100
-
101
-
102
-
103
-
104
-
105
-
106
-
107
-
108
-
109
-
110
-
111
-
 112
112 -
 113
113 -
 114
114 -
 115
115 -
 116
116 -
 117
117 -
 118
118 -
 119
119 -
 120
120 -
 121
121 -
 122
122 -
123
-
124
-
125
-
126
-
127
-
128
-
129
-
130
-
131
-
132
-
133
-
134
-
135
-
136
-
137
-
138
-
139
-
140
-
141
-
142
-
143
-
144
-
145
-
146
-
147
-
148
-
149
-
150
-
151
-
152
-
153
-
154
-
155
-
156
-
157
-
158
-
159
-
160
-
161
-
162
-
163
-
164
-
165
-
166
-
167
-
168
-
169
-
170
-
171
-
172
-
173
-
174
-
175
-
176
-
177
-
178
-
179
-
180
-
181
-
182
-
183
-
184
-
185
-
186
-
187
-
188
-
189
-
190
-
191
-
192
-
193
-
194
-
195
-
196
-
197
-
198
-
199
-
200
-
201
-
202
-
203
-
204
-
205
-
206
-
207
-
208
-
209
-
210
-
211
-
212
-
213
-
214
-
215
-
216
 |
 |
