Canon MultiPASS C635 User Manual - Page 169
Problem, Cause, Solution, call the Customer Care Center
 |
View all Canon MultiPASS C635 manuals
Add to My Manuals
Save this manual to your list of manuals |
Page 169 highlights
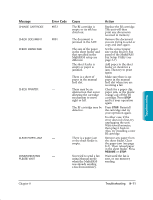
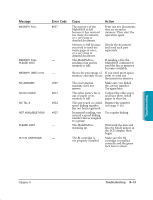
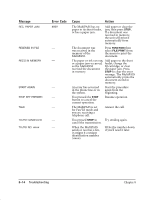
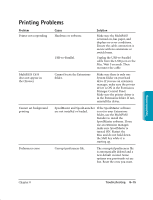
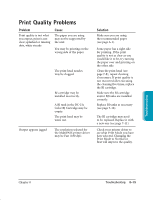
Problem The ALARM light comes on and the MultiPASS beeps while printing Data from computer is not printed Cause The MultiPASS may have a paper jam. Solution Clear any paper jams (see page 8-3). If the MultiPASS has no paper jam, unplug it, wait 5 seconds, then plug it in again. If the problem is fixed, the ALARM light will be off, the BJ cartridge will move to its home position, and the LCD display will show the date and Receive Mode (Standby Mode). If the ALARM light stays on, call the Customer Care Center (see page 1-4). The power cord may not be plugged in securely. Check that the power cord is plugged securely into the unit and into the wall outlet. If the MultiPASS is plugged into a power strip, make sure the power strip is plugged in and turned on. The MultiPASS may have been Unplug the MultiPASS and plugged in or the computer may turn off the computer. Plug have been turned on when you the unit back in and turn connected the interface cable. the computer back on again. The orange tape may not be removed from the BJ cartridge. The BJ cartridge may not have been installed properly. Be sure to remove the tape from the BJ cartridge when you install it (see page 7-14). Make sure the BJ cartridge is installed correctly (see page 7-11). The print head unit may need Clean the print head (see cleaning. page 7-8). The BJ cartridge may need to be Replace the BJ cartridge (see replaced. (It may be out of ink.) page 7-11). 8-16 Troubleshooting Chapter 8
-
 1
1 -
2
-
3
-
4
-
5
-
6
-
7
-
8
-
9
-
10
-
11
-
12
-
13
-
14
-
15
-
16
-
17
-
18
-
19
-
20
-
21
-
22
-
23
-
24
-
25
-
26
-
27
-
28
-
29
-
30
-
31
-
32
-
33
-
34
-
35
-
36
-
37
-
38
-
39
-
40
-
41
-
42
-
43
-
44
-
45
-
46
-
47
-
48
-
49
-
50
-
51
-
52
-
53
-
54
-
55
-
56
-
57
-
58
-
59
-
60
-
61
-
62
-
63
-
64
-
65
-
66
-
67
-
68
-
69
-
70
-
71
-
72
-
73
-
74
-
75
-
76
-
77
-
78
-
79
-
80
-
81
-
82
-
83
-
84
-
85
-
86
-
87
-
88
-
89
-
90
-
91
-
92
-
93
-
94
-
95
-
96
-
97
-
98
-
99
-
100
-
101
-
102
-
103
-
104
-
105
-
106
-
107
-
108
-
109
-
110
-
111
-
112
-
113
-
114
-
115
-
116
-
117
-
118
-
119
-
120
-
121
-
122
-
123
-
124
-
125
-
126
-
127
-
128
-
129
-
130
-
131
-
132
-
133
-
134
-
135
-
136
-
137
-
138
-
139
-
140
-
141
-
142
-
143
-
144
-
145
-
146
-
147
-
148
-
149
-
150
-
151
-
152
-
153
-
154
-
155
-
156
-
157
-
158
-
159
-
160
-
161
-
162
-
163
-
 164
164 -
 165
165 -
 166
166 -
 167
167 -
 168
168 -
 169
169 -
 170
170 -
 171
171 -
 172
172 -
 173
173 -
 174
174 -
175
-
176
-
177
-
178
-
179
-
180
-
181
-
182
-
183
-
184
-
185
-
186
-
187
-
188
-
189
-
190
-
191
-
192
-
193
-
194
-
195
-
196
-
197
-
198
-
199
-
200
-
201
-
202
-
203
-
204
-
205
-
206
-
207
-
208
-
209
-
210
-
211
-
212
-
213
-
214
-
215
-
216
 |
 |
