Canon MultiPASS C635 User Manual - Page 131
Troubleshooting, Poor Image Quality On the Screen, Poor Image Quality When Printing
 |
View all Canon MultiPASS C635 manuals
Add to My Manuals
Save this manual to your list of manuals |
Page 131 highlights
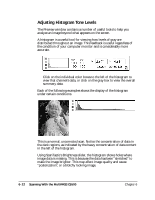
Troubleshooting Poor Image Quality On the Screen Scanning There are two main causes of poor image quality while viewing images on the screen. The first place to check for image quality is your Monitors setting. Locate the Monitors control panel from the Control Panels command in the Apple menu. For accurate screen representation of color images on the screen, your setting should read at least Thousands. Millions is preferable for the best view while editing images. Grayscale images should be viewed at 256 Grays, Thousands or Millions. Viewing Line Art on the Screen Unlike Color or Gray images, line art images do not look very good on the screen, particularly in preview ratios. The reason for this is that line art images do not benefit from the perception of smoothing when continuous tones are viewed. Normally, line art scans are performed at very high resolutions (in excess of 300 dpi). Since a computer monitor is 72 dpi, it is not capable of reducing the view effectively. Poor Image Quality When Printing Make sure you are scanning in the right mode and resolution. This is particularly important when working with line art. For example, if you try to scan line art when the color mode is selected, the resulting images can have blurred or jagged edges. See your documentation for the other programs you are using in the production of your art. Each program deals with output in a slightly different way and there are some subtle issues that can make a major difference in output quality. Ask yourself if you are familiar with the following concepts in the software you are using: ❍ Did you set a halftone or line screen frequency in the program from which you are printing? ❍ Is there a PostScript® problem with your software? Finally, be sure you read the section "How ScanTastic Calculates Resolution" earlier in this chapter. Chapter 6 Scanning With the MultiPASS C5500 6-25
-
 1
1 -
2
-
3
-
4
-
5
-
6
-
7
-
8
-
9
-
10
-
11
-
12
-
13
-
14
-
15
-
16
-
17
-
18
-
19
-
20
-
21
-
22
-
23
-
24
-
25
-
26
-
27
-
28
-
29
-
30
-
31
-
32
-
33
-
34
-
35
-
36
-
37
-
38
-
39
-
40
-
41
-
42
-
43
-
44
-
45
-
46
-
47
-
48
-
49
-
50
-
51
-
52
-
53
-
54
-
55
-
56
-
57
-
58
-
59
-
60
-
61
-
62
-
63
-
64
-
65
-
66
-
67
-
68
-
69
-
70
-
71
-
72
-
73
-
74
-
75
-
76
-
77
-
78
-
79
-
80
-
81
-
82
-
83
-
84
-
85
-
86
-
87
-
88
-
89
-
90
-
91
-
92
-
93
-
94
-
95
-
96
-
97
-
98
-
99
-
100
-
101
-
102
-
103
-
104
-
105
-
106
-
107
-
108
-
109
-
110
-
111
-
112
-
113
-
114
-
115
-
116
-
117
-
118
-
119
-
120
-
121
-
122
-
123
-
124
-
125
-
 126
126 -
 127
127 -
 128
128 -
 129
129 -
 130
130 -
 131
131 -
 132
132 -
 133
133 -
 134
134 -
 135
135 -
 136
136 -
137
-
138
-
139
-
140
-
141
-
142
-
143
-
144
-
145
-
146
-
147
-
148
-
149
-
150
-
151
-
152
-
153
-
154
-
155
-
156
-
157
-
158
-
159
-
160
-
161
-
162
-
163
-
164
-
165
-
166
-
167
-
168
-
169
-
170
-
171
-
172
-
173
-
174
-
175
-
176
-
177
-
178
-
179
-
180
-
181
-
182
-
183
-
184
-
185
-
186
-
187
-
188
-
189
-
190
-
191
-
192
-
193
-
194
-
195
-
196
-
197
-
198
-
199
-
200
-
201
-
202
-
203
-
204
-
205
-
206
-
207
-
208
-
209
-
210
-
211
-
212
-
213
-
214
-
215
-
216
 |
 |
