Canon XF705 Instruction Manual - Page 159
Searching for Access Points, t of available option
 |
View all Canon XF705 manuals
Add to My Manuals
Save this manual to your list of manuals |
Page 159 highlights
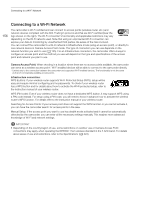
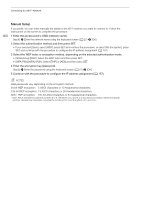
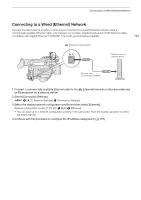
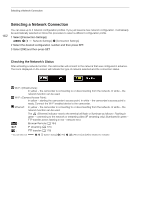
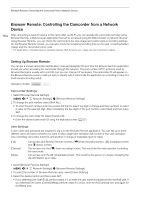
Connecting to a Wi-Fi Network WPS using a PIN code 1 After you select [WPS: PIN Code], the camcorder will generate and display an 8-digit PIN code on the screen. 2 Enter the PIN code into the wireless router's WPS (PIN code) setup screen. • For most wireless routers, you must use a Web browser to access the setup screen. • For details about how to access your wireless router's settings and activate the Wi-Fi Protected Setup (WPS) using a PIN code, refer to the instruction manual of your wireless router. 3 Within 2 minutes, press SET. • While [Connecting] appears on the screen, you can press SET to cancel the operation. 4 Continue with the procedure to configure the IP address assignment (A 157). 159 Searching for Access Points The camcorder will automatically detect access points in the vicinity. After you select the desired access point, you only need to enter the selected network's password to connect the camcorder. For details about the access point's network name (SSID) and password refer to the wireless router's instruction manual or consult the network administrator in charge of the access point. Current access point/Total number of active access points detected Network name (SSID, only ASCII characters) Encrypted access point 1 After you select [Search for Access Points], the camcorder will search for active access points in the vicinity and display a list of available options on the screen. 2 Push the joystick up/down to select the desired access point and then press SET. • Only ASCII characters in the network name (SSID) are displayed. If the access point's SSID contains special characters or characters in other languages, they will appear as blank spaces. • If the access point is not encrypted, skip to step 5. 3 If necessary, select the WEP index key. • This step is only necessary if the Wi-Fi network's authentication method is set to [Shared Key] or if the encryption method is set to [WEP]. 4 Enter the encryption key (password). [Input] > Enter the password using the keyboard screen (A 27) > [OK] 5 Continue with the procedure to configure the IP address assignment (A 157).
-
 1
1 -
2
-
3
-
4
-
5
-
6
-
7
-
8
-
9
-
10
-
11
-
12
-
13
-
14
-
15
-
16
-
17
-
18
-
19
-
20
-
21
-
22
-
23
-
24
-
25
-
26
-
27
-
28
-
29
-
30
-
31
-
32
-
33
-
34
-
35
-
36
-
37
-
38
-
39
-
40
-
41
-
42
-
43
-
44
-
45
-
46
-
47
-
48
-
49
-
50
-
51
-
52
-
53
-
54
-
55
-
56
-
57
-
58
-
59
-
60
-
61
-
62
-
63
-
64
-
65
-
66
-
67
-
68
-
69
-
70
-
71
-
72
-
73
-
74
-
75
-
76
-
77
-
78
-
79
-
80
-
81
-
82
-
83
-
84
-
85
-
86
-
87
-
88
-
89
-
90
-
91
-
92
-
93
-
94
-
95
-
96
-
97
-
98
-
99
-
100
-
101
-
102
-
103
-
104
-
105
-
106
-
107
-
108
-
109
-
110
-
111
-
112
-
113
-
114
-
115
-
116
-
117
-
118
-
119
-
120
-
121
-
122
-
123
-
124
-
125
-
126
-
127
-
128
-
129
-
130
-
131
-
132
-
133
-
134
-
135
-
136
-
137
-
138
-
139
-
140
-
141
-
142
-
143
-
144
-
145
-
146
-
147
-
148
-
149
-
150
-
151
-
152
-
153
-
 154
154 -
 155
155 -
 156
156 -
 157
157 -
 158
158 -
 159
159 -
 160
160 -
 161
161 -
 162
162 -
 163
163 -
 164
164 -
165
-
166
-
167
-
168
-
169
-
170
-
171
-
172
-
173
-
174
-
175
-
176
-
177
-
178
-
179
-
180
-
181
-
182
-
183
-
184
-
185
-
186
-
187
-
188
-
189
-
190
-
191
-
192
-
193
-
194
-
195
-
196
-
197
-
198
-
199
-
200
-
201
-
202
-
203
-
204
-
205
-
206
-
207
-
208
-
209
-
210
-
211
-
212
-
213
-
214
-
215
-
216
-
217
-
218
-
219
-
220
-
221
-
222
-
223
-
224
-
225
-
226
-
227
-
228
-
229
-
230
-
231
-
232
-
233
-
234
 |
 |
