Canon XF705 Instruction Manual - Page 93
Setting the User Bit, Setting an Hexadecimal Code, Using the Date or Time
 |
View all Canon XF705 manuals
Add to My Manuals
Save this manual to your list of manuals |
Page 93 highlights
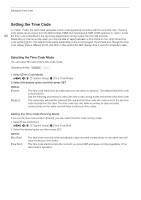
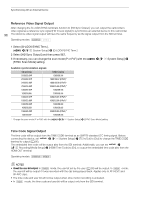
Setting the User Bit Setting the User Bit The user bit display can be selected from the date or the time of recording, or an identification code consisting of 8 characters in the hexadecimal system. There are sixteen possible characters: the numbers 0 to 9 and the letters A to F. 93 The user bit is recorded with clips* and can be output from the TIME CODE terminal, SDI terminal or HDMI OUT terminal. It can be used freely to categorize and manage recordings or to keep additional information about them. * XF-HEVC and XF-AVC clips only. Operating modes: Setting an Hexadecimal Code 1 Open the user bit setting screen. > [B # System Setup] > [User Bit Type] > [Setting] > [Change] • The user bit setting screen appears with an orange selection frame on the leftmost character. • To reset the user bit to [00 00 00 00], select [Reset] instead. 2 Push the joystick up/down to select the first character and press SET to move to the next. • Change the rest of the characters in the same way. • Press the CANCEL button to return to the previous screen without setting the user bit. 3 Select [Set] and press SET. Using the Date or Time 1 Select [User Bit Type]. > [B # System Setup] > [User Bit Type] 2 Select [Date] or [Time] and then press SET.
-
 1
1 -
2
-
3
-
4
-
5
-
6
-
7
-
8
-
9
-
10
-
11
-
12
-
13
-
14
-
15
-
16
-
17
-
18
-
19
-
20
-
21
-
22
-
23
-
24
-
25
-
26
-
27
-
28
-
29
-
30
-
31
-
32
-
33
-
34
-
35
-
36
-
37
-
38
-
39
-
40
-
41
-
42
-
43
-
44
-
45
-
46
-
47
-
48
-
49
-
50
-
51
-
52
-
53
-
54
-
55
-
56
-
57
-
58
-
59
-
60
-
61
-
62
-
63
-
64
-
65
-
66
-
67
-
68
-
69
-
70
-
71
-
72
-
73
-
74
-
75
-
76
-
77
-
78
-
79
-
80
-
81
-
82
-
83
-
84
-
85
-
86
-
87
-
 88
88 -
 89
89 -
 90
90 -
 91
91 -
 92
92 -
 93
93 -
 94
94 -
 95
95 -
 96
96 -
 97
97 -
 98
98 -
99
-
100
-
101
-
102
-
103
-
104
-
105
-
106
-
107
-
108
-
109
-
110
-
111
-
112
-
113
-
114
-
115
-
116
-
117
-
118
-
119
-
120
-
121
-
122
-
123
-
124
-
125
-
126
-
127
-
128
-
129
-
130
-
131
-
132
-
133
-
134
-
135
-
136
-
137
-
138
-
139
-
140
-
141
-
142
-
143
-
144
-
145
-
146
-
147
-
148
-
149
-
150
-
151
-
152
-
153
-
154
-
155
-
156
-
157
-
158
-
159
-
160
-
161
-
162
-
163
-
164
-
165
-
166
-
167
-
168
-
169
-
170
-
171
-
172
-
173
-
174
-
175
-
176
-
177
-
178
-
179
-
180
-
181
-
182
-
183
-
184
-
185
-
186
-
187
-
188
-
189
-
190
-
191
-
192
-
193
-
194
-
195
-
196
-
197
-
198
-
199
-
200
-
201
-
202
-
203
-
204
-
205
-
206
-
207
-
208
-
209
-
210
-
211
-
212
-
213
-
214
-
215
-
216
-
217
-
218
-
219
-
220
-
221
-
222
-
223
-
224
-
225
-
226
-
227
-
228
-
229
-
230
-
231
-
232
-
233
-
234
 |
 |
