Canon XF705 Instruction Manual - Page 63
Iris Limit, Exposure Compensation - AE Shift, Camera Setup]
 |
View all Canon XF705 manuals
Add to My Manuals
Save this manual to your list of manuals |
Page 63 highlights
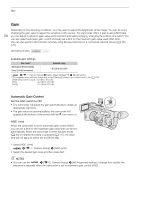
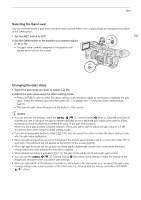
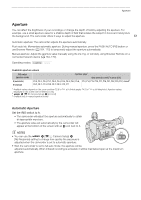
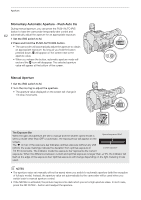
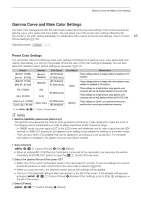
Aperture • You can use the > [v ! Camera Setup] > [Iris Ring Direction] setting to change the direction of the adjustment when you turn the iris ring. • You can operate the iris ring even the camcorder's controls are locked (A 43). • When an optional RC-V100 Remote Controller is connected to the camcorder, you can adjust the aperture with the remote controller's IRIS dial. At default settings, turn the dial right to open up the aperture and left to 63 close the aperture. You can also switch between automatic and manual aperture with the remote controller's AUTO IRIS button. Iris Limit By default, the iris limit is set to prevent the aperture from closing below the diffraction limit of the lens (F11). 1 Select [Iris Limit]. > [v ! Camera Setup] > [Iris Limit] 2 Select the desired option and then press SET. Options [On]: [Off]: The maximum aperture value is [F11], the diffraction limit of the lens. You can fully close the aperture ([closed]). Aperture values that exceed the diffraction limit will appear in gray. NOTES • Using aperture values that exceed the lens's diffraction limit may affect the recorded image (for example, causing diffraction blur). Using aperture values within the lens's diffraction limit (iris limit) is recommended. Exposure Compensation - AE Shift Use AE shift to darken or lighten the image when you want to compensate the exposure that was set automatically (shutter, gain or aperture set to automatic mode or after using push auto iris to automatically set the aperture). AE shift is not available when the camcorder is set to full auto mode (A 43) or you activate infrared recording (A 117). You can also perform this function remotely using Browser Remote on a connected network device (A 164, 170). 1 Select [AE Shift]. > [v ! Camera Setup] > [AE Shift] 2 Select an AE shift level and then press SET. • You can select one of 17 AE shift levels from -2.0 to +2.0. NOTES • If you set an assignable button to [AE Shift +] or [AE Shift -] (A 119), you can press the button to adjust the AE shift level.
-
 1
1 -
2
-
3
-
4
-
5
-
6
-
7
-
8
-
9
-
10
-
11
-
12
-
13
-
14
-
15
-
16
-
17
-
18
-
19
-
20
-
21
-
22
-
23
-
24
-
25
-
26
-
27
-
28
-
29
-
30
-
31
-
32
-
33
-
34
-
35
-
36
-
37
-
38
-
39
-
40
-
41
-
42
-
43
-
44
-
45
-
46
-
47
-
48
-
49
-
50
-
51
-
52
-
53
-
54
-
55
-
56
-
57
-
 58
58 -
 59
59 -
 60
60 -
 61
61 -
 62
62 -
 63
63 -
 64
64 -
 65
65 -
 66
66 -
 67
67 -
 68
68 -
69
-
70
-
71
-
72
-
73
-
74
-
75
-
76
-
77
-
78
-
79
-
80
-
81
-
82
-
83
-
84
-
85
-
86
-
87
-
88
-
89
-
90
-
91
-
92
-
93
-
94
-
95
-
96
-
97
-
98
-
99
-
100
-
101
-
102
-
103
-
104
-
105
-
106
-
107
-
108
-
109
-
110
-
111
-
112
-
113
-
114
-
115
-
116
-
117
-
118
-
119
-
120
-
121
-
122
-
123
-
124
-
125
-
126
-
127
-
128
-
129
-
130
-
131
-
132
-
133
-
134
-
135
-
136
-
137
-
138
-
139
-
140
-
141
-
142
-
143
-
144
-
145
-
146
-
147
-
148
-
149
-
150
-
151
-
152
-
153
-
154
-
155
-
156
-
157
-
158
-
159
-
160
-
161
-
162
-
163
-
164
-
165
-
166
-
167
-
168
-
169
-
170
-
171
-
172
-
173
-
174
-
175
-
176
-
177
-
178
-
179
-
180
-
181
-
182
-
183
-
184
-
185
-
186
-
187
-
188
-
189
-
190
-
191
-
192
-
193
-
194
-
195
-
196
-
197
-
198
-
199
-
200
-
201
-
202
-
203
-
204
-
205
-
206
-
207
-
208
-
209
-
210
-
211
-
212
-
213
-
214
-
215
-
216
-
217
-
218
-
219
-
220
-
221
-
222
-
223
-
224
-
225
-
226
-
227
-
228
-
229
-
230
-
231
-
232
-
233
-
234
 |
 |
