Canon XF705 Instruction Manual - Page 208
Picture and, peed and
 |
View all Canon XF705 manuals
Add to My Manuals
Save this manual to your list of manuals |
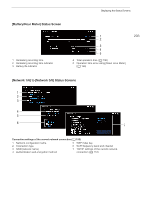
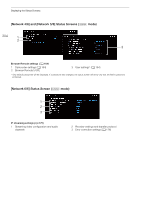
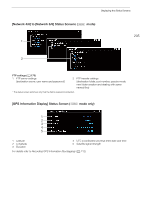
Page 208 highlights
Troubleshooting ` appears in red on the screen. - The fan may not be working properly. The camcorder will automatically turn off in approximately 10 minutes. Consult a Canon Service Center. 208 Picture and Sound The peaking/magnification/zebra pattern/waveform monitor/B&W image does not appear on the screen. - Check the corresponding output settings to make sure the display of the desired assistance function is enabled for the desired screen/video output. Screen displays turn on and off repeatedly. - The battery pack is exhausted. Replace or charge the battery pack. - Remove the battery pack and reattach it correctly. Abnormal characters appear on the screen and the camcorder does not operate properly. - Disconnect the power source and reconnect it after a short time. If the problem still persists, use the > [! System Setup] > [Reset] > [All Settings] function. This resets all the camcorder's settings to default values, except for the hour meter. Video noise appears on screen. - Keep a distance between the camcorder and devices that emit strong electromagnetic fields such as near powerful magnets and motors, MRI machines or high-voltage power lines. Horizontal bands appear on the screen. - This is a phenomenon typical of CMOS image sensors when recording under some types of fluorescent, mercury or sodium lamps. This is not a malfunction. You may be able to reduce the symptoms by setting the shutter speed mode to Speed and the shutter speed to a value matching the frequency of the local electrical system: 1/50* or 1/100 for 50 Hz systems, 1/60 or 1/120 for 60 Hz systems. * May not be available depending on the frame rate. Audio cannot be recorded. - The INPUT switch (audio input selection) is set to AES/EBU but an analog audio source is connected, or it is set to ANALOG and a digital audio source is connected. Set the audio related switches correctly according to the audio source you wish to use (A 100). - When using the INPUT 1/INPUT 2 terminals, make sure you are using an XLR connector. When using the MIC terminal, make sure you are using a condenser microphone with its own power supply and a ∅ 3.5 mm stereo mini plug. - The external microphone connected to the INPUT 1/INPUT 2 terminal requires phantom power. Set the corresponding ANALOG switch to MIC+48V (A 100). Audio is recorded at an extremely low level. - When using the INPUT 1/INPUT 2 terminals or MIC terminal: The - (audio level) switch for CH1 or CH2 is set to M, and the recording level is set too low. Check the audio level meter on the screen and adjust the audio level correctly (A 101). - The microphone attenuator is on. Turn off the microphone attenuator (A 104, 104). Sound is distorted or is recorded at lower levels. - When recording near loud sounds (such as fireworks, shows or concerts), sound may become distorted or it may not be recorded at the actual levels. Activate the microphone attenuator (A 104, 104), or adjust the audio recording level manually. The picture is displayed correctly but there is no sound from the built-in speaker. - Speaker volume is turned off. Adjust the volume (A 138). - Disconnect any cables/external devices connected to the × (headphone) terminal.
-
 1
1 -
2
-
3
-
4
-
5
-
6
-
7
-
8
-
9
-
10
-
11
-
12
-
13
-
14
-
15
-
16
-
17
-
18
-
19
-
20
-
21
-
22
-
23
-
24
-
25
-
26
-
27
-
28
-
29
-
30
-
31
-
32
-
33
-
34
-
35
-
36
-
37
-
38
-
39
-
40
-
41
-
42
-
43
-
44
-
45
-
46
-
47
-
48
-
49
-
50
-
51
-
52
-
53
-
54
-
55
-
56
-
57
-
58
-
59
-
60
-
61
-
62
-
63
-
64
-
65
-
66
-
67
-
68
-
69
-
70
-
71
-
72
-
73
-
74
-
75
-
76
-
77
-
78
-
79
-
80
-
81
-
82
-
83
-
84
-
85
-
86
-
87
-
88
-
89
-
90
-
91
-
92
-
93
-
94
-
95
-
96
-
97
-
98
-
99
-
100
-
101
-
102
-
103
-
104
-
105
-
106
-
107
-
108
-
109
-
110
-
111
-
112
-
113
-
114
-
115
-
116
-
117
-
118
-
119
-
120
-
121
-
122
-
123
-
124
-
125
-
126
-
127
-
128
-
129
-
130
-
131
-
132
-
133
-
134
-
135
-
136
-
137
-
138
-
139
-
140
-
141
-
142
-
143
-
144
-
145
-
146
-
147
-
148
-
149
-
150
-
151
-
152
-
153
-
154
-
155
-
156
-
157
-
158
-
159
-
160
-
161
-
162
-
163
-
164
-
165
-
166
-
167
-
168
-
169
-
170
-
171
-
172
-
173
-
174
-
175
-
176
-
177
-
178
-
179
-
180
-
181
-
182
-
183
-
184
-
185
-
186
-
187
-
188
-
189
-
190
-
191
-
192
-
193
-
194
-
195
-
196
-
197
-
198
-
199
-
200
-
201
-
202
-
 203
203 -
 204
204 -
 205
205 -
 206
206 -
 207
207 -
 208
208 -
 209
209 -
 210
210 -
 211
211 -
 212
212 -
 213
213 -
214
-
215
-
216
-
217
-
218
-
219
-
220
-
221
-
222
-
223
-
224
-
225
-
226
-
227
-
228
-
229
-
230
-
231
-
232
-
233
-
234
 |
 |
