Canon XF705 Instruction Manual - Page 27
Rearranging Menu Settings, Resetting the My Menu Submenu, Renaming the Selected My Menu Set, e the joy
 |
View all Canon XF705 manuals
Add to My Manuals
Save this manual to your list of manuals |
Page 27 highlights
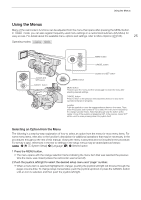
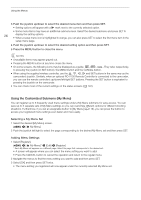
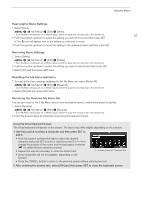
Using the Menus Rearranging Menu Settings 1 Select [Move]. > [¥ My Menu]* > [Edit] > [Move] * Each My Menu set appears on a different page. Select the page that corresponds to the desired set. 27 2 Push the joystick up/down to select the setting you want to move and then press SET. • The ] icon will appear next to the setting you selected to move. 3 Push the joystick up/down to move the setting to the desired position and then press SET. Removing Menu Settings 1 Select [Delete]. > [¥ My Menu]* > [Edit] > [Delete] * Each My Menu set appears on a different page. Select the page that corresponds to the desired set. 2 Push the joystick up/down to select the setting you want to remove and then press SET. 3 Select [OK] and then press SET twice. Resetting the My Menu Submenu 1 To reset all the menu settings registered to the My Menu set, select [Reset All]. > [¥ My Menu]* > [Edit] > [Reset All] * Each My Menu set appears on a different page. Select the page that corresponds to the desired set. 2 Select [OK] and then press SET twice. Renaming the Selected My Menu Set You can give each of the 5 My Menu sets a more descriptive name to make them easier to identify. 1 Select [Rename]. > [¥ My Menu]* > [Edit] > [Rename] * Each My Menu set appears on a different page. Select the page that corresponds to the desired set. 2 Enter the desired name (8 characters long) using the keyboard screen. Using the Virtual Keyboard Screen The virtual keyboard will appear on the screen. The layout may differ slightly depending on the function. 1 Use the joystick to select a character and then press SET to add it. • Push the joystick up/down/left/right to select the desired character and press SET to enter it. Use the arrows ( / / / ) to change the position of the cursor and the backspace character ( ) to delete the last character entered. • Repeat this step as necessary to enter the desired text. Current character / Character limit • Some characters will not be available, depending on the function. • Press the CANCEL button to return to the previous screen without entering any text. 2 After entering the desired text, select [OK] and then press SET to close the keyboard screen.
-
 1
1 -
2
-
3
-
4
-
5
-
6
-
7
-
8
-
9
-
10
-
11
-
12
-
13
-
14
-
15
-
16
-
17
-
18
-
19
-
20
-
21
-
 22
22 -
 23
23 -
 24
24 -
 25
25 -
 26
26 -
 27
27 -
 28
28 -
 29
29 -
 30
30 -
 31
31 -
 32
32 -
33
-
34
-
35
-
36
-
37
-
38
-
39
-
40
-
41
-
42
-
43
-
44
-
45
-
46
-
47
-
48
-
49
-
50
-
51
-
52
-
53
-
54
-
55
-
56
-
57
-
58
-
59
-
60
-
61
-
62
-
63
-
64
-
65
-
66
-
67
-
68
-
69
-
70
-
71
-
72
-
73
-
74
-
75
-
76
-
77
-
78
-
79
-
80
-
81
-
82
-
83
-
84
-
85
-
86
-
87
-
88
-
89
-
90
-
91
-
92
-
93
-
94
-
95
-
96
-
97
-
98
-
99
-
100
-
101
-
102
-
103
-
104
-
105
-
106
-
107
-
108
-
109
-
110
-
111
-
112
-
113
-
114
-
115
-
116
-
117
-
118
-
119
-
120
-
121
-
122
-
123
-
124
-
125
-
126
-
127
-
128
-
129
-
130
-
131
-
132
-
133
-
134
-
135
-
136
-
137
-
138
-
139
-
140
-
141
-
142
-
143
-
144
-
145
-
146
-
147
-
148
-
149
-
150
-
151
-
152
-
153
-
154
-
155
-
156
-
157
-
158
-
159
-
160
-
161
-
162
-
163
-
164
-
165
-
166
-
167
-
168
-
169
-
170
-
171
-
172
-
173
-
174
-
175
-
176
-
177
-
178
-
179
-
180
-
181
-
182
-
183
-
184
-
185
-
186
-
187
-
188
-
189
-
190
-
191
-
192
-
193
-
194
-
195
-
196
-
197
-
198
-
199
-
200
-
201
-
202
-
203
-
204
-
205
-
206
-
207
-
208
-
209
-
210
-
211
-
212
-
213
-
214
-
215
-
216
-
217
-
218
-
219
-
220
-
221
-
222
-
223
-
224
-
225
-
226
-
227
-
228
-
229
-
230
-
231
-
232
-
233
-
234
 |
 |
