Canon XF705 Instruction Manual - Page 57
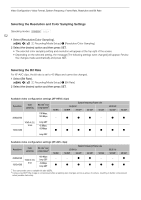
Changing the Shutter Speed Value, Flicker Reduction, can frequency u
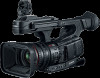 |
View all Canon XF705 manuals
Add to My Manuals
Save this manual to your list of manuals |
Page 57 highlights
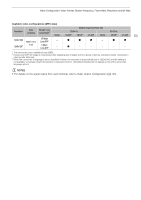
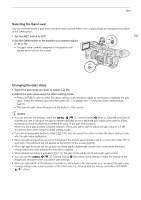
Shutter Speed Changing the Shutter Speed Value When the shutter speed mode is set to a mode other than OFF or automatic, you can set the shutter speed manually as a speed value, angle or clear scan frequency. You can also perform this function remotely using Browser Remote on a connected network device (A 164, 170). 57 1 To change the shutter speed increment for Speed mode, select [Shutter Increment]. > [v ! Camera Setup] > [Shutter Increment] 2 Select [Normal] or [Fine] and then press SET. • If you select [Fine], you can adjust the shutter speed in increments of 1/256 stop. 3 After closing the menu, select a shutter speed mode other than OFF or Automatic (A 55). • The camera will enter direct setting mode with the shutter speed value highlighted in orange. • Alternatively, you can press the FUNC button repeatedly to highlight the current shutter speed value without changing the current shutter speed mode. 4 Adjust the shutter speed, angle value or clear scan frequency using the direct setting mode. • For details refer to Using the Direct Setting Mode (A 54). • The selected shutter speed will appear at the bottom of the screen. NOTES • Closing down the aperture when recording under bright conditions may cause the picture to appear soft or out of focus. To avoid the loss of sharpness due to diffraction, use a denser ND filter (A 60), a faster shutter speed, or open up the aperture (A 61). • When the gain and aperture are set to manual and the shutter speed mode is set to a mode other than OFF or automatic, the exposure bar will appear at the bottom of the screen (A 62). • When the camcorder is set to full auto mode (A 43) or you activate infrared recording (A 117), the shutter speed mode will be set to automatic. If you activate both slow motion recording and infrared recording at the same time, the shutter speed will be set to 1/120 (59.94 Hz recordings) or automatically within the range 1/120 - 1/100 (50.00 Hz recordings). • When an optional RC-V100 Remote Controller is connected to the camcorder, you can change the shutter speed mode with the remote controller's SHUTTER SELECT button and the shutter speed value with the remote controller's SHUTTER Í/Î buttons, regardless of the position of the camcorder's SHUTTER switch. • If you set an assignable button to [Shutter] (A 119), you can press the button to enter the direct setting mode with the shutter speed highlighted. Flicker Reduction You can perform the following procedure to have the camcorder automatically detect and reduce flicker. 1 Select [Flicker Reduction]. > [v ' Camera Setup] > [Flicker Reduction] 2 Select [Automatic] and then press SET. NOTES • When recording under artificial light sources such as fluorescent, mercury or halogen lamps, the screen may flicker depending on the shutter speed. You may be able to avoid flicker by setting the shutter speed mode to Speed and the shutter speed to a value matching the frequency of the local electrical system: 1/50* or 1/100 for 50 Hz systems, 1/60 or 1/120 for 60 Hz systems. * May not be available depending on the frame rate.
-
 1
1 -
2
-
3
-
4
-
5
-
6
-
7
-
8
-
9
-
10
-
11
-
12
-
13
-
14
-
15
-
16
-
17
-
18
-
19
-
20
-
21
-
22
-
23
-
24
-
25
-
26
-
27
-
28
-
29
-
30
-
31
-
32
-
33
-
34
-
35
-
36
-
37
-
38
-
39
-
40
-
41
-
42
-
43
-
44
-
45
-
46
-
47
-
48
-
49
-
50
-
51
-
 52
52 -
 53
53 -
 54
54 -
 55
55 -
 56
56 -
 57
57 -
 58
58 -
 59
59 -
 60
60 -
 61
61 -
 62
62 -
63
-
64
-
65
-
66
-
67
-
68
-
69
-
70
-
71
-
72
-
73
-
74
-
75
-
76
-
77
-
78
-
79
-
80
-
81
-
82
-
83
-
84
-
85
-
86
-
87
-
88
-
89
-
90
-
91
-
92
-
93
-
94
-
95
-
96
-
97
-
98
-
99
-
100
-
101
-
102
-
103
-
104
-
105
-
106
-
107
-
108
-
109
-
110
-
111
-
112
-
113
-
114
-
115
-
116
-
117
-
118
-
119
-
120
-
121
-
122
-
123
-
124
-
125
-
126
-
127
-
128
-
129
-
130
-
131
-
132
-
133
-
134
-
135
-
136
-
137
-
138
-
139
-
140
-
141
-
142
-
143
-
144
-
145
-
146
-
147
-
148
-
149
-
150
-
151
-
152
-
153
-
154
-
155
-
156
-
157
-
158
-
159
-
160
-
161
-
162
-
163
-
164
-
165
-
166
-
167
-
168
-
169
-
170
-
171
-
172
-
173
-
174
-
175
-
176
-
177
-
178
-
179
-
180
-
181
-
182
-
183
-
184
-
185
-
186
-
187
-
188
-
189
-
190
-
191
-
192
-
193
-
194
-
195
-
196
-
197
-
198
-
199
-
200
-
201
-
202
-
203
-
204
-
205
-
206
-
207
-
208
-
209
-
210
-
211
-
212
-
213
-
214
-
215
-
216
-
217
-
218
-
219
-
220
-
221
-
222
-
223
-
224
-
225
-
226
-
227
-
228
-
229
-
230
-
231
-
232
-
233
-
234
 |
 |
