Canon XF705 Instruction Manual - Page 60
ND Filter, About the ND warning
 |
View all Canon XF705 manuals
Add to My Manuals
Save this manual to your list of manuals |
Page 60 highlights
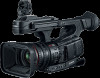
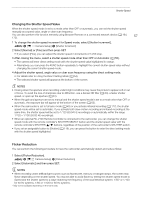
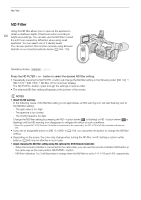
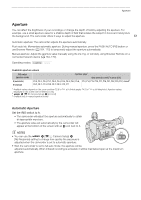
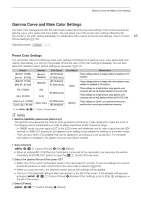
ND Filter ND Filter Using the ND filter allows you to open up the aperture to 60 obtain a shallower depth of field even when recording in bright surroundings. You can also use the ND filter to avoid the soft focus caused by diffraction when using small apertures. You can select one of 3 density levels. You can also perform this function remotely using Browser Remote on a connected network device (A 164, 170). Operating modes: Press the ND FILTER + or - button to select the desired ND filter setting. • Repeatedly pressing the ND FILTER + button will change the ND filter setting in the following order: [ND 1/4] [ND 1/16] [ND 1/64] ND filter off (no onscreen display). The ND FILTER - button cycles through the settings in reverse order. • The selected ND filter setting will appear at the bottom of the screen. NOTES • About the ND warning: In the following cases, if the ND filter setting is not appropriate, an ND warning icon will start flashing next to the ND filter setting*. - The gain value is too high - The aperture is too closed - The shutter speed is too fast Change the ND filter setting by pressing the ND + button (when is flashing) or ND - button (when is flashing) until the ND warning icon disappears to mitigate the effect of such conditions. * When the optional RC-V100 Remote Controller is connected to the camcorder, the RC-V100's ND filter indicator will flash as well. • If you set an assignable button to [ND +] or [ND -] (A 119), you can press the button to change the ND filter setting. • Depending on the scene, the color may change when turning the ND filter on/off. Setting a custom white balance (A 69) may be effective in such case. • About changing the ND filter setting using the optional RC-V100 Remote Controller: - When the remote controller is connected to the camcorder, you can use the remote controller's ND button in the same way as the camcorder's ND FILTER + button. - ND filter indicators 1 to 3 will illuminate in orange when the ND filter is set to 1/4, 1/16 and 1/64, respectively.
-
 1
1 -
2
-
3
-
4
-
5
-
6
-
7
-
8
-
9
-
10
-
11
-
12
-
13
-
14
-
15
-
16
-
17
-
18
-
19
-
20
-
21
-
22
-
23
-
24
-
25
-
26
-
27
-
28
-
29
-
30
-
31
-
32
-
33
-
34
-
35
-
36
-
37
-
38
-
39
-
40
-
41
-
42
-
43
-
44
-
45
-
46
-
47
-
48
-
49
-
50
-
51
-
52
-
53
-
54
-
 55
55 -
 56
56 -
 57
57 -
 58
58 -
 59
59 -
 60
60 -
 61
61 -
 62
62 -
 63
63 -
 64
64 -
 65
65 -
66
-
67
-
68
-
69
-
70
-
71
-
72
-
73
-
74
-
75
-
76
-
77
-
78
-
79
-
80
-
81
-
82
-
83
-
84
-
85
-
86
-
87
-
88
-
89
-
90
-
91
-
92
-
93
-
94
-
95
-
96
-
97
-
98
-
99
-
100
-
101
-
102
-
103
-
104
-
105
-
106
-
107
-
108
-
109
-
110
-
111
-
112
-
113
-
114
-
115
-
116
-
117
-
118
-
119
-
120
-
121
-
122
-
123
-
124
-
125
-
126
-
127
-
128
-
129
-
130
-
131
-
132
-
133
-
134
-
135
-
136
-
137
-
138
-
139
-
140
-
141
-
142
-
143
-
144
-
145
-
146
-
147
-
148
-
149
-
150
-
151
-
152
-
153
-
154
-
155
-
156
-
157
-
158
-
159
-
160
-
161
-
162
-
163
-
164
-
165
-
166
-
167
-
168
-
169
-
170
-
171
-
172
-
173
-
174
-
175
-
176
-
177
-
178
-
179
-
180
-
181
-
182
-
183
-
184
-
185
-
186
-
187
-
188
-
189
-
190
-
191
-
192
-
193
-
194
-
195
-
196
-
197
-
198
-
199
-
200
-
201
-
202
-
203
-
204
-
205
-
206
-
207
-
208
-
209
-
210
-
211
-
212
-
213
-
214
-
215
-
216
-
217
-
218
-
219
-
220
-
221
-
222
-
223
-
224
-
225
-
226
-
227
-
228
-
229
-
230
-
231
-
232
-
233
-
234
 |
 |