Canon XF705 Instruction Manual - Page 62
Momentary Automatic Aperture - Push Auto Iris, Manual Aperture, et the IRI, witch to M.
 |
View all Canon XF705 manuals
Add to My Manuals
Save this manual to your list of manuals |
Page 62 highlights
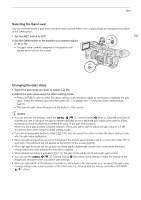
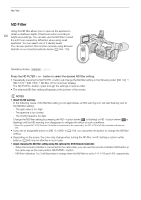
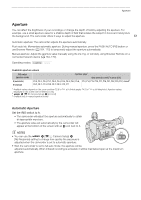
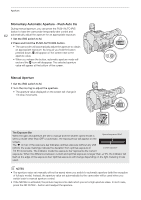
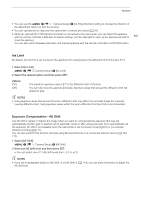
Aperture Momentary Automatic Aperture - Push Auto Iris During manual aperture, you can press the PUSH AUTO IRIS button to have the camcorder temporarily take control and 62 automatically adjust the aperture for an appropriate exposure. 1 Set the IRIS switch to M. 2 Press and hold the PUSH AUTO IRIS button. • The camcorder will automatically adjust the aperture to obtain an appropriate exposure. As long as you hold the button pressed down, E will appear on the screen next to the aperture value. • When you release the button, automatic aperture mode will end and the E icon will disappear. The selected aperture value will appear at the bottom of the screen. Manual Aperture 1 Set the IRIS switch to M. 2 Turn the iris ring to adjust the aperture. • The aperture value displayed on the screen will change in 1/4-stop increments. The Exposure Bar When the gain and aperture are set to manual and the shutter speed mode is Optimal exposure AE±0 set to a mode other than OFF or automatic, the exposure bar will appear on the screen. The Î on top of the exposure bar indicates optimal exposure without any shift (AE±0); the scale markings indicate the deviation from optimal exposure in Current exposure 1/2 EV increments. The indicator inside the exposure bar represents the current exposure. When the difference between current and optimal exposure is larger than ±2 EV, the indicator will flash at the edge of the exposure bar. Optimal exposure will change depending on the light metering mode used. NOTES • The aperture value set manually will not be saved when you switch to automatic aperture (with the exception of full auto mode). Instead, the aperture value set automatically by the camcorder will be used when you switch back to manual aperture control. • If the ND filter is activated, the picture may become dark when you set a high aperture value. In such case, press the ND FILTER - button and readjust the aperture.
-
 1
1 -
2
-
3
-
4
-
5
-
6
-
7
-
8
-
9
-
10
-
11
-
12
-
13
-
14
-
15
-
16
-
17
-
18
-
19
-
20
-
21
-
22
-
23
-
24
-
25
-
26
-
27
-
28
-
29
-
30
-
31
-
32
-
33
-
34
-
35
-
36
-
37
-
38
-
39
-
40
-
41
-
42
-
43
-
44
-
45
-
46
-
47
-
48
-
49
-
50
-
51
-
52
-
53
-
54
-
55
-
56
-
 57
57 -
 58
58 -
 59
59 -
 60
60 -
 61
61 -
 62
62 -
 63
63 -
 64
64 -
 65
65 -
 66
66 -
 67
67 -
68
-
69
-
70
-
71
-
72
-
73
-
74
-
75
-
76
-
77
-
78
-
79
-
80
-
81
-
82
-
83
-
84
-
85
-
86
-
87
-
88
-
89
-
90
-
91
-
92
-
93
-
94
-
95
-
96
-
97
-
98
-
99
-
100
-
101
-
102
-
103
-
104
-
105
-
106
-
107
-
108
-
109
-
110
-
111
-
112
-
113
-
114
-
115
-
116
-
117
-
118
-
119
-
120
-
121
-
122
-
123
-
124
-
125
-
126
-
127
-
128
-
129
-
130
-
131
-
132
-
133
-
134
-
135
-
136
-
137
-
138
-
139
-
140
-
141
-
142
-
143
-
144
-
145
-
146
-
147
-
148
-
149
-
150
-
151
-
152
-
153
-
154
-
155
-
156
-
157
-
158
-
159
-
160
-
161
-
162
-
163
-
164
-
165
-
166
-
167
-
168
-
169
-
170
-
171
-
172
-
173
-
174
-
175
-
176
-
177
-
178
-
179
-
180
-
181
-
182
-
183
-
184
-
185
-
186
-
187
-
188
-
189
-
190
-
191
-
192
-
193
-
194
-
195
-
196
-
197
-
198
-
199
-
200
-
201
-
202
-
203
-
204
-
205
-
206
-
207
-
208
-
209
-
210
-
211
-
212
-
213
-
214
-
215
-
216
-
217
-
218
-
219
-
220
-
221
-
222
-
223
-
224
-
225
-
226
-
227
-
228
-
229
-
230
-
231
-
232
-
233
-
234
 |
 |
